In this tutorial I will be going over the necessary SNMP configuration for both APIC and fabric switches. This tutorial will only cover the necessary configuration for pulling (snmpget, snmpwalk) SNMP information and will not cover configuration of setting up SNMP traps in ACI. However, most of the configuration in this tutorial is necessary for configuring SNMP traps.
Prerequisites:
* Fabric discovery completed
* In-Band/Out-of-Band connectivity to your APIC(s) and fabric switches
* In-Band/Out-of-Band contracts configured to allow SNMP traffic (UDP ports 161 and 162)
* Static node management addresses configured for your APICs and fabric switches under the default mgmt tenant (without this, pulling SNMP info from an APIC will fail)
My other tutorial Configuring Out-of-Band Management Connectivity in ACI will assist with configuring the necessary Out-of-Band Management prerequisites (contracts and static node management addresses).
My Setup:
* Running ACI version 3.2(4d)
* Using MacOS built in snmpwalk and snmpget commands
Topics:
* Understanding SNMP Scopes
* Configuring SNMP Fabric Policies
* Configuring SNMP VRF Context Scopes
* Pulling SNMP Data From a Fabric Switch
Understanding SNMP Scopes:
One quick fundamental concept of SNMP in ACI is that there are two scopes SNMP information can be pulled from:
1. Global
2. VRF Context
The Global scope will pull chassis MIBs such as number of interfaces, interface indexes, interface names, interface status, etc of a leaf/spine node. VRF Context scope specific MIBs will pull VRF specific information such as IP addresses and routing protocol information.
Below is a full list of supported APIC and fabric switch Global and VRF Context MIBs:
https://www.cisco.com/c/en/us/td/docs/switches/datacenter/aci/apic/sw/1-x/mib/list/mib-support.html
Configuring SNMP Fabric Policies:
The first step in configuring SNMP is to create the necessary SNMP Fabric Policies. To create the SNMP Fabric Policies navigate to the following APIC web GUI path:
Fabric -> Fabric Policies -> Policies -> Pod -> SNMP

Right click SNMP and select Create SNMP Policy
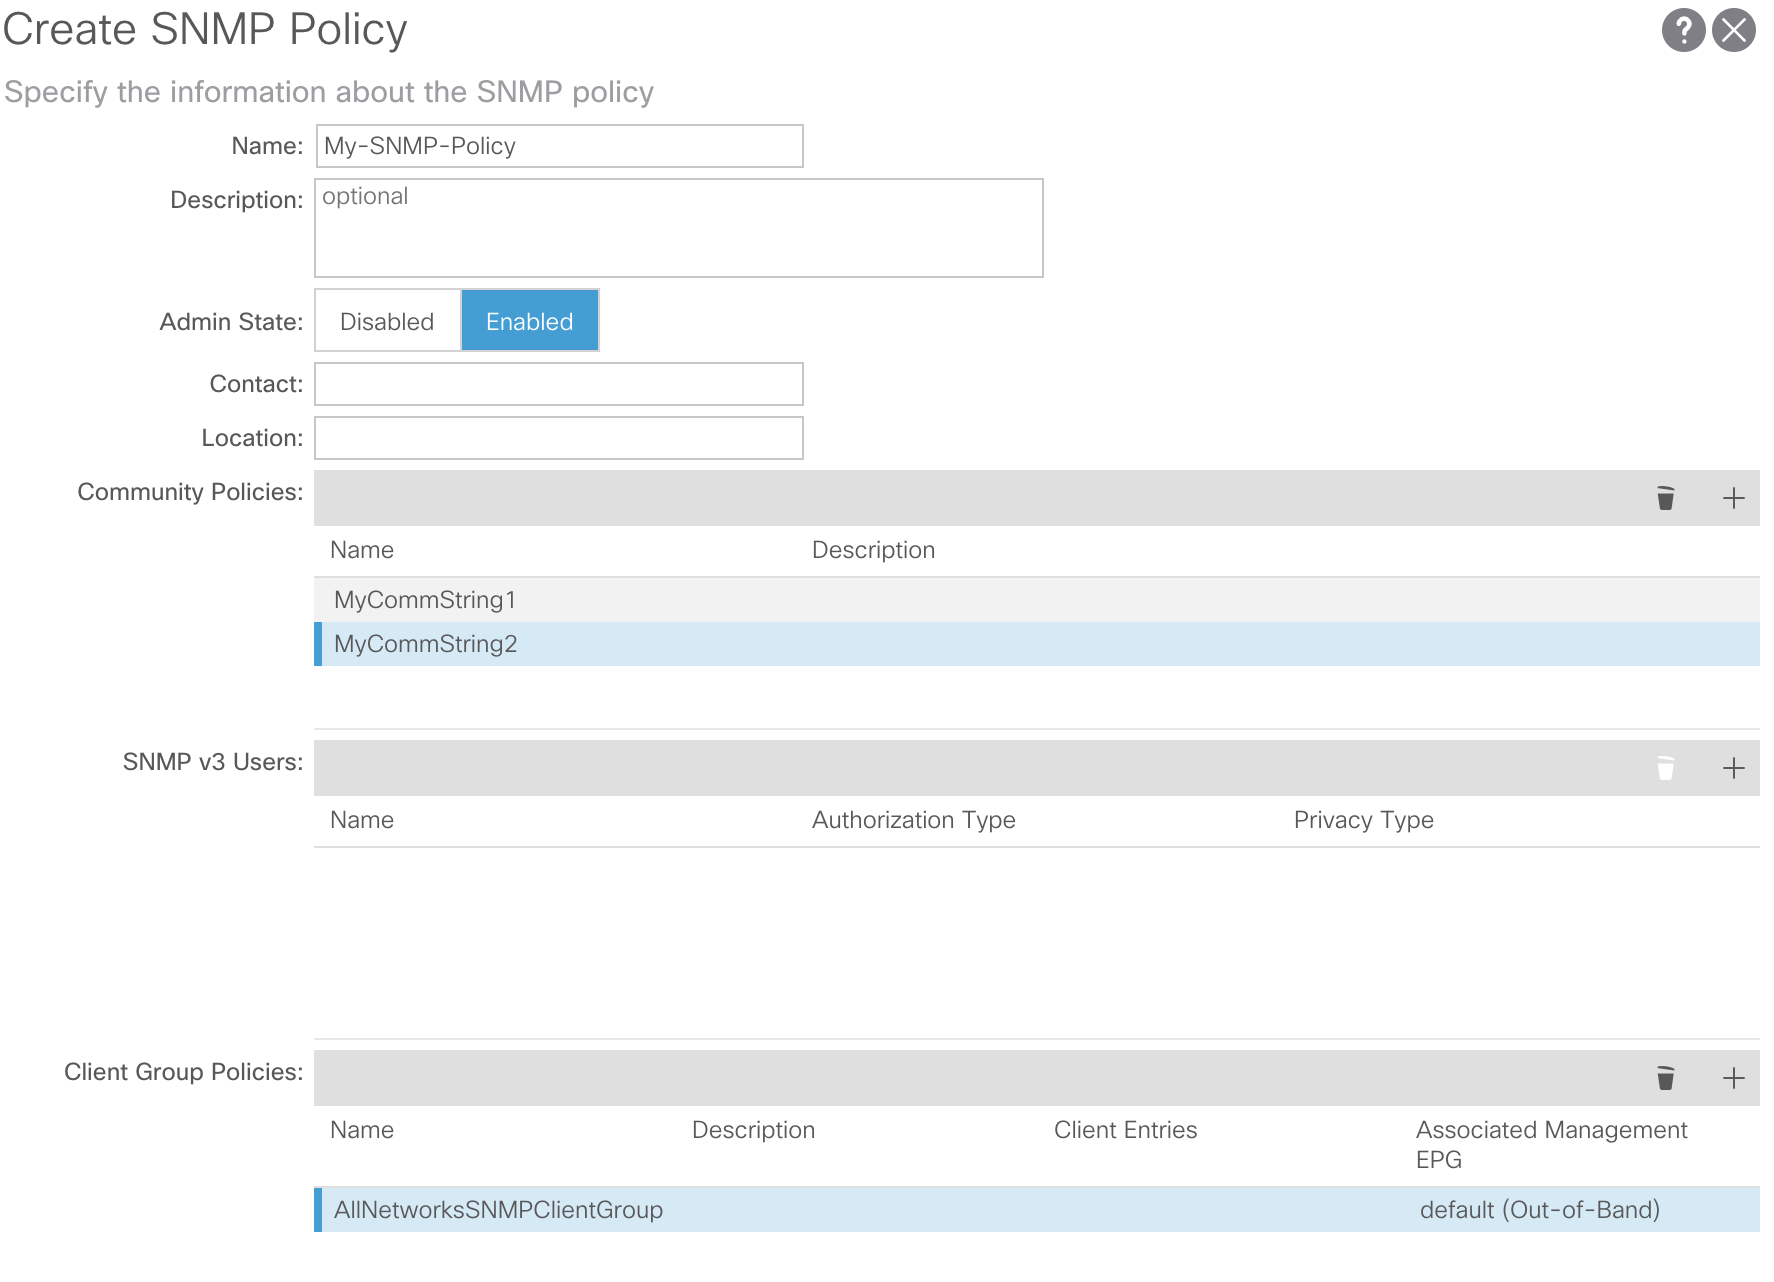
Let’s call our SNMP Policy My-SNMP-Policy. For our purposes we are going to use SNMP version 2c so the only fields we are going to focus on are Community Policies and Client Group Policies.
The Community Policy Name field defines the SNMP community string to be used. For our purposes let’s use two community strings, MyCommString1 and MyCommString2. You’ll see where these two community strings come in later. The next step is to add the Client Group Policy/Profile.
The purpose of the Client Group Policy/Profile is to define what IPs/subnets are able to pull SNMP data from APICs and fabric switches:

For our purposes we are going to call our Client Group Policy/Profile AllNetworksSNMPClientGroup. In the Client Group Policy/Profile we need to associate our preferred Management EPG. You will need to make sure the Management EPG you choose has the necessary contracts to allow SNMP traffic (UDP ports 161 and 162). For our purposes we are going to use the default Out-of-Band Management EPG. The last step in the Client Group Policy/Profile configuration is to define your Client Entries to allow specific IPs or entire subnets access to pull ACI SNMP data. Below is the syntax for defining a specific IP or an entire subnet:
Specific IP: 192.168.1.5
Entire Subnet: 192.168.1.0/24
For our purposes we are going to allow all subnets to access SNMP data, so we will leave the Client Entry list empty.
Note: You may think that adding a 0.0.0.0 Client Entry will allow all subnets, however that is not correct. If you enter 0.0.0.0 as a Client Entry you may hit the following software bug:
https://bst.cloudapps.cisco.com/bugsearch/bug/CSCvj12673
Set the Admin State to Enabled on the SNMP Policy and submit your changes.
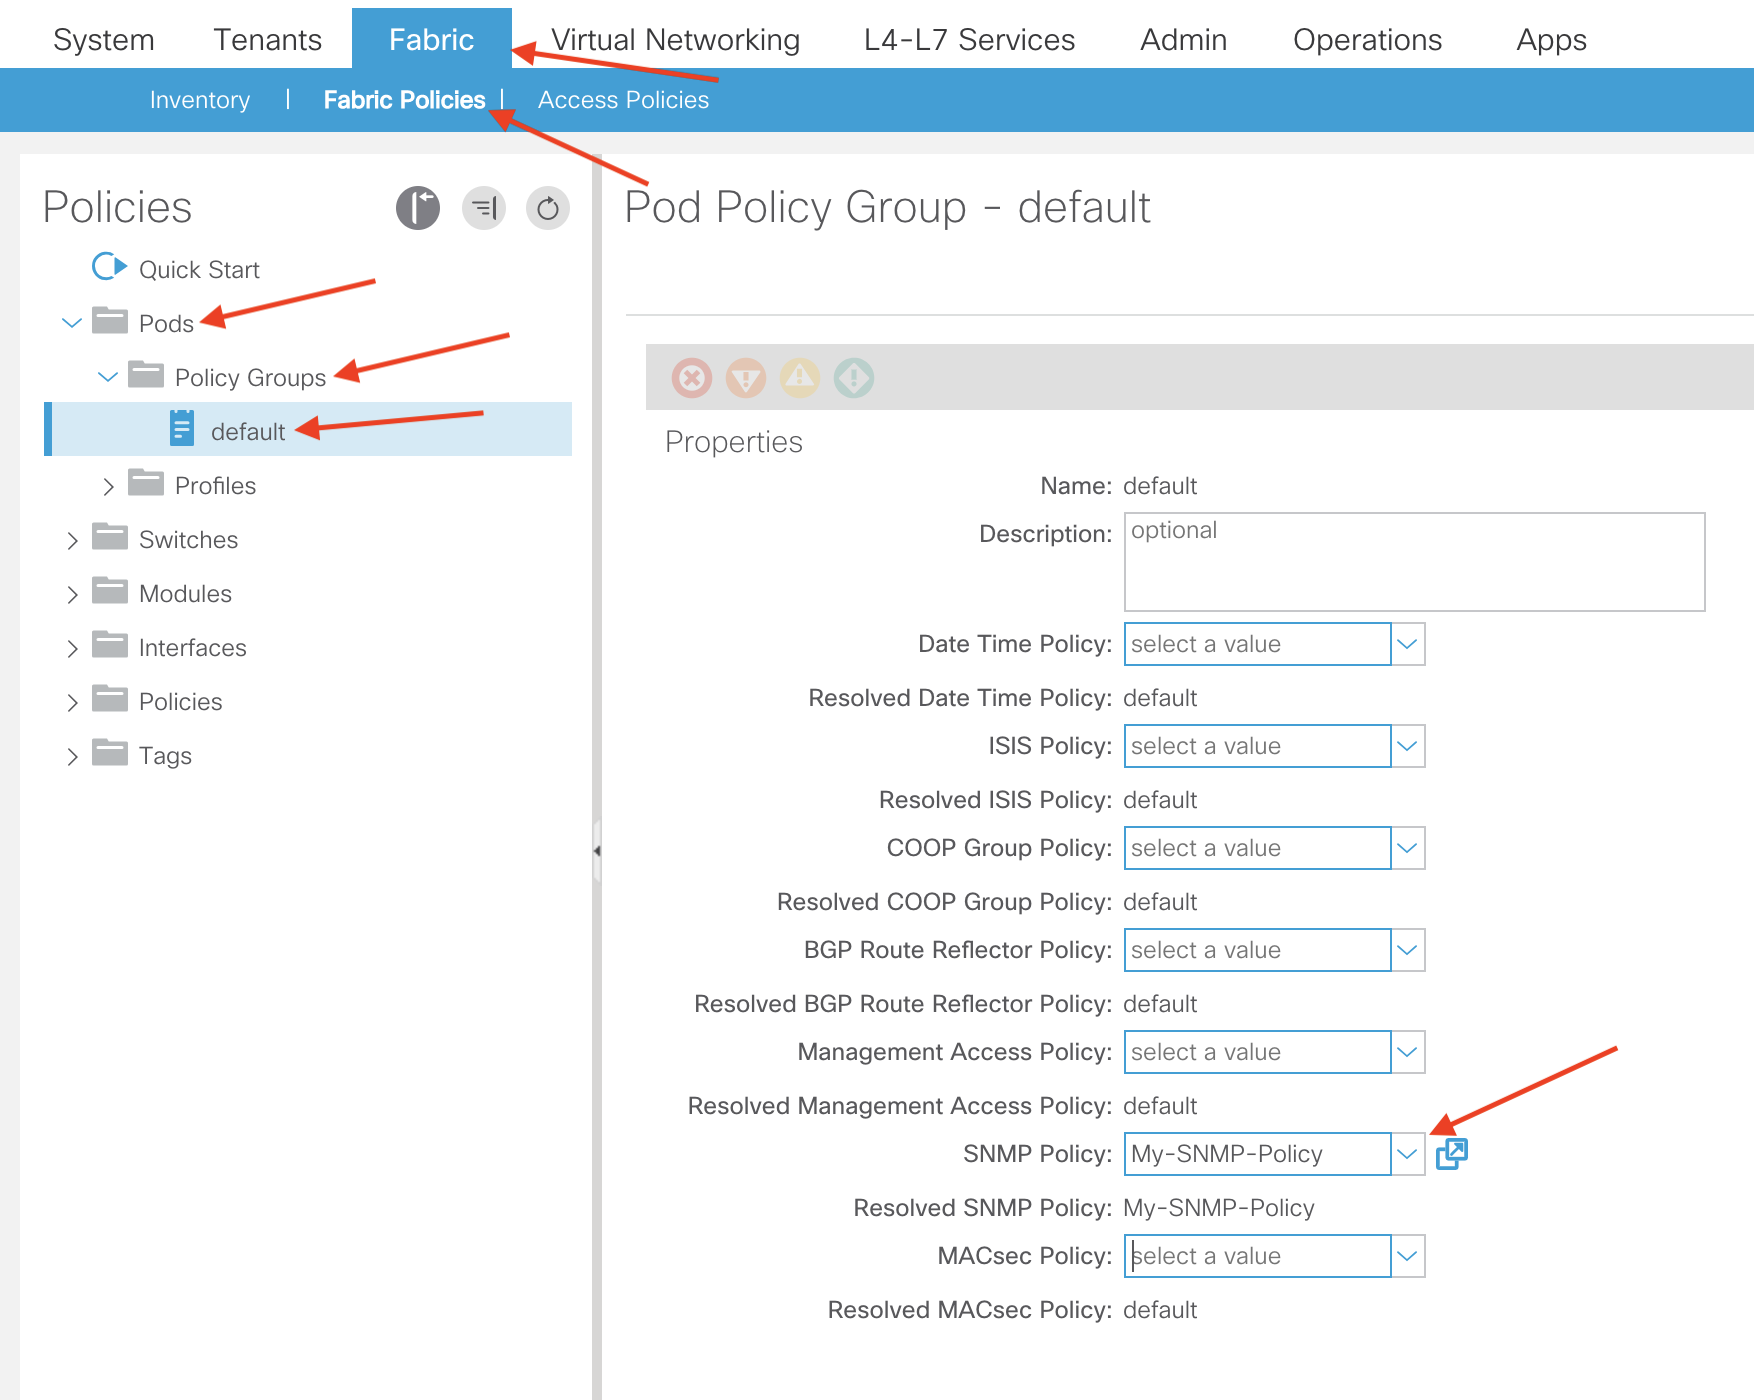
Next we need to tie the newly created SNMP Policy, My-SNMP-Policy, to the Pod Policy Group. For our purposes we are going to use the default Pod Policy Group that comes out of the box with ACI.
To apply this configuration navigate to the following APIC web GUI path:
Fabric -> Fabric Policies -> Pods -> Policy Groups -> YOUR_POD_POLICY_GROUP_HERE
Note: If you do not have a default Pod Policy Group you can create a new one by right clicking Policy Groups and selecting Create Pod Policy Group
On the right hand pane you will see a field for SNMP Policy. From the drop down, select your newly created SNMP Policy and submit your changes.
Next, make sure to associate your Pod Policy Group to your Pod Profile. For our purposes we are going to use the default Pod Profile that comes out of the box with ACI to associate the default Pod Policy Group.
To do so, navigate to the following APIC web GUI path:
Fabric -> Fabric Policies -> Pods -> Profiles -> YOUR_POD_PROFILE_HERE

Note: If you do not have a default Pod Profile you can create a new one by right clicking Profiles and selecting Create Pod Profile
After submitting your configuration you have completed all the necessary steps in the Fabric Policies section for SNMP configuration.
Configuring SNMP VRF Context Scopes:
As mentioned in the Understanding SNMP Scopes section of this tutorial we have a Global scope and VRF Context scope, each consisting of different SNMP data.
If you remember earlier in the tutorial we created two community strings, MyCommString1 and MyCommString2. We will use MyCommString1 for pulling Global scope SNMP data and use MyCommString2 for pulling VRF Context SNMP data. Once we associate a community string to a VRF Context, that specific community string cannot be used to pull Global scope SNMP data, so it is required to create two SNMP community strings if you are looking to pull both Global scope and VRF Context SNMP data.
In our setup let’s configure an SNMP VRF Context on two VRFs, the default oob VRF in the default mgmt tenant and a custom VRF located in one of my custom tenants. To configure an SMMP context on a particular VRF, right click the VRF and select Create SNMP Context:

After selecting this you will be prompted to name the SNMP Context for your VRF. You can only create one SNMP Context per VRF and you will want to give meaning to your SNMP Context Name, you will see why shortly. For our purposes we will name our SNMP Context for our oob VRF oob-Mgmt-SNMP-Context and add a Community Profile. The Community Profile is simply one of the community strings we created previously during the Fabric Policy SNMP configuration. For our SNMP VRF context we will use the previously created MyCommString2 community string. Our configuration will look like such:

After submitting the configuration, you can verify the SNMP Context configuration you applied by left clicking your VRF, going to the Policy tab on the VRF, and scrolling down towards the bottom of the pane:

To disable an SNMP Context on a VRF you can de-select the Create SNMP Context checkbox (seen in the above screenshot), or right click the VRF and select Delete SNMP Context.
Now that we’ve applied an SNMP Context to my oob VRF, let’s apply one to my custom VRF in my custom tenant:

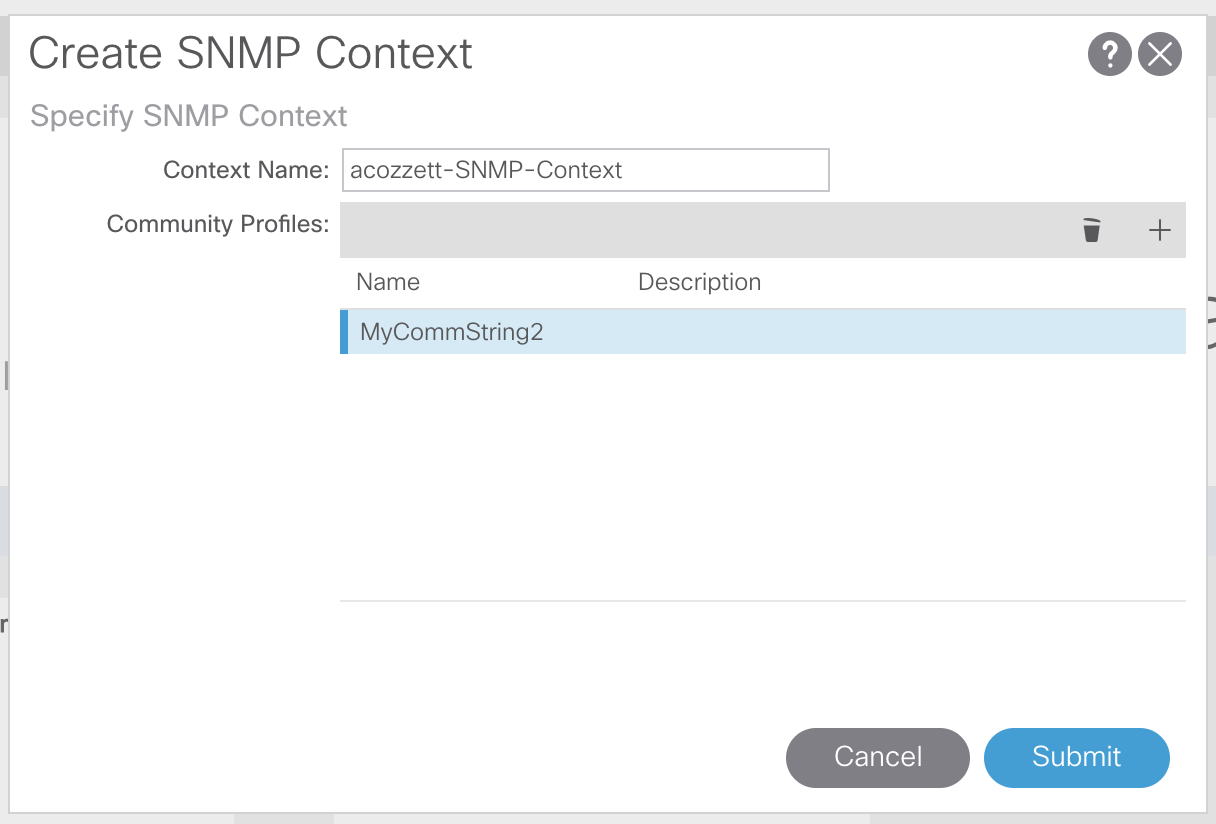
In the above screenshots you can see that I am applying an SNMP Context to my acozzett VRF, using a Context Name of acozzett-SNMP-Context and re-using the MyCommString2 community string.
This concludes the necessary configuration for pulling SNMP Context specific data.
Pulling SNMP Data From a Fabric Switch:
At this point in the tutorial we’ve completed all the necessary configuration to pull SNMP data from Global scope and VRF Context scopes, so let’s see it in action.
As mentioned previously we are using MyCommString1 to pull Global SNMP data and MyCommString2 to pull VRF Context SNMP data. Using the built in MacOS snmpwalk command we can simply pull data from our leaf switch. First let’s look at pulling SNMP data from the Global scope of a leaf switch. Using the below command we can do just that:
snmpwalk -v 2c -c MyCommString1 10.122.143.33
Let’s break down the above command:
snmpwalk = The snmpwalk executable installed on MacOS
-v = Specifies the version of SNMP we want to use
2c = Specifies that we are using SNMP version 2c
-c = Specifies that a particular community string will follow
MyCommString1 = The community string we are using for pulling Global scope SNMP data
10.122.143.33 = The out-of-band management IP address of my leaf switch
Command Result:
ACOZZETT-M-C6SZ:~ acozzett$ snmpwalk -v 2c -c MyCommString1 10.122.143.33
SNMPv2-MIB::sysDescr.0 = STRING: Cisco NX-OS(tm) aci, Software (aci-n9000-system), Version 13.2(2o), RELEASE SOFTWARE Copyright (c) 2002-2015 by Cisco Systems, Inc. Compiled 2018/07/26 09:34:42
SNMPv2-MIB::sysObjectID.0 = OID: SNMPv2-SMI::enterprises.9.12.3.1.3.1626
DISMAN-EVENT-MIB::sysUpTimeInstance = Timeticks: (45013216) 5 days, 5:02:12.16
SNMPv2-MIB::sysContact.0 = STRING:
SNMPv2-MIB::sysName.0 = STRING: leaf1
SNMPv2-MIB::sysLocation.0 = STRING:
SNMPv2-MIB::sysServices.0 = INTEGER: 70
SNMPv2-MIB::sysORLastChange.0 = Timeticks: (3) 0:00:00.03
SNMPv2-MIB::sysORID.1 = OID: SNMPv2-MIB::snmpMIB
SNMPv2-MIB::sysORID.2 = OID: SNMP-VIEW-BASED-ACM-MIB::vacmBasicGroup
SNMPv2-MIB::sysORID.3 = OID: SNMP-FRAMEWORK-MIB::snmpFrameworkMIBCompliance
SNMPv2-MIB::sysORID.4 = OID: SNMP-MPD-MIB::snmpMPDCompliance
SNMPv2-MIB::sysORID.5 = OID: SNMP-USER-BASED-SM-MIB::usmMIBCompliance
SNMPv2-MIB::sysORDescr.1 = STRING: The MIB module for SNMPv2 entities
SNMPv2-MIB::sysORDescr.2 = STRING: View-based Access Control Model for SNMP.
SNMPv2-MIB::sysORDescr.3 = STRING: The SNMP Management Architecture MIB.
SNMPv2-MIB::sysORDescr.4 = STRING: The MIB for Message Processing and Dispatching.
SNMPv2-MIB::sysORDescr.5 = STRING: The management information definitions for the SNMP User-based Security Model.
SNMPv2-MIB::sysORUpTime.1 = Timeticks: (3) 0:00:00.03
In the above snipped command output we can see that the snmpwalk was successful and hardware specific information was pulled. If we had let the snmpwalk keep going we would see hardware interface names, descriptions, etc.
Now let’s go ahead and pull VRF Context SNMP data. If you remember earlier we created two SNMP contexts, oob-Mgmt-SNMP-Context and acozzett-SNMP-Context for two different VRFs using the same SNMP community string, MyCommString2.
Since we used the same community string, MyCommString2, across two different SNMP Contexts we will need to specify which SNMP Context we want the SNMP data pulled from. Below is the snmpwalk syntax we need to use to specify a particular SNMP Context:
snmpwalk -v 2c -c MyCommString2@oob-Mgmt-SNMP-Context 10.122.143.33
snmpwalk -v 2c -c MyCommString2@acozzett-SNMP-Context 10.122.143.33
You can see that to pull from a specific SNMP Context it follows the format of:
COMMUNITY_NAME_HERE@SNMP_CONTEXT_NAME_HERE
This concludes all the necessary configuration for pulling SNMP data from APICs and fabric switches.
