In this tutorial we will be going over the process for generating and installing custom SSL certificates for use in your ACI fabric.
Prerequisites:
* Fabric discovery completed
* Have all Certificate Authority servers configured for certificate generation
* Verify that the time on your APICs is current and correct. If the time of your APICs falls outside the validity period of your custom SSL certificate, certificate installation will fail
My other tutorial NTP Configuration in ACI will assist you with the necessary ACI NTP configuration to make sure that your APICs and fabric switch clocks are synced correctly
My Setup:
* ACI fabric running 3.1(2m)
* 3 CAs (1 root and 2 subordinate) running Windows Server 2008 R2
Topics:
* Creating the ACI Certificate Authority
* Creating the ACI Key Ring
* Creating the ACI Certificate Request
* Applying the Certificate Across the Fabric
Creating the ACI Certificate Authority:
The first step in configuring a custom SSL certificate is to create a certificate authority in ACI. To create the ACI CA navigate to the following APIC web GUI path:
Admin -> AAA -> Public Key Management -> Certificate Authorities

Right click Certificate Authorities and select Create Certificate Authority

This is where we define the entire certificate chain. The certificate chain consists of all the certificates in the path all the way from the subordinate CA to the root CA. My certificate chain is as follows:
-ROOT-CA
—-INTER-CA-1
——–INTER-CA-2
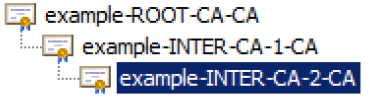
You can see above that I have a single root CA and multiple subordinate CAs. The top of our certificate chain will be ROOT-CA followed by INTER-CA-1, and then finally INTER-CA-2
If you are running a Windows Server you can obtain the entire certificate chain by going to the following URL in a web browser on the CA which is at the bottom of the certificate chain (in our case INTER-CA-2).
http://localhost/certsrv/certcarc.asp
If navigating to the above URL on the CA server does not work, make sure you have the Certification Authority Web Enrollment role installed:
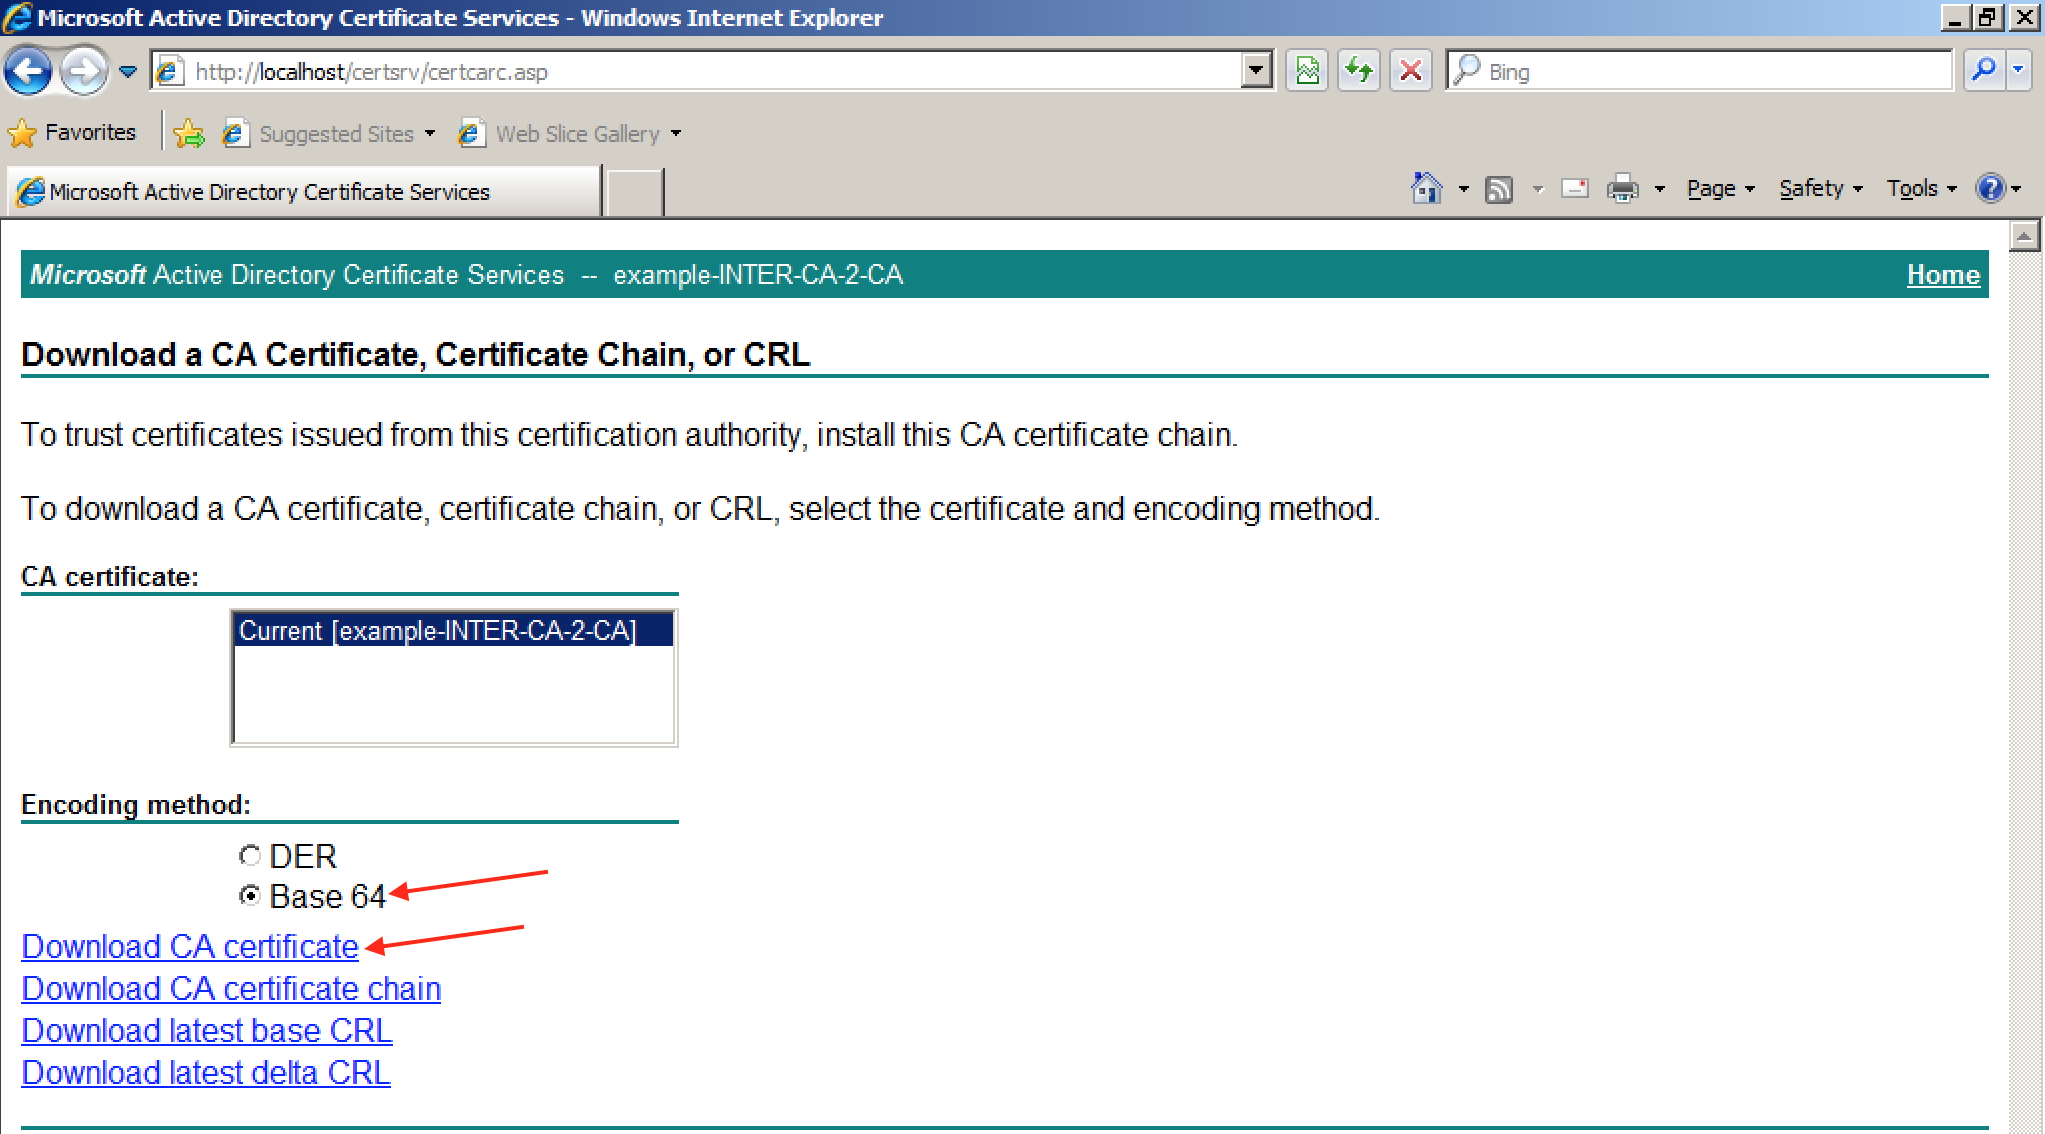
Select Base 64 as the Encoding method. And select Download CA certificate. You DO NOT want to select Download CA certificate chain. Doing so will compress all CA certificates into a single chain, which ACI will not accept.
You can extract the Base 64 certificate from the file you just saved just by opening the file in Notepad or another text editor. This certificate body will only be for the CA we downloaded the certificate from (in our case INTER-CA-2).
In order to extract the certificates from the other subordinate and root CA we need to double click the just saved certificate file and click on the Certification Path tab:

From here we can see the entire tree of CAs. To extract the certificate of another CA, select it from the Certification Path list, and select View Certificate.

After selecting View Certificate, a new window will open for that certificate. Select the Details tab, and select Copy to File:

You will go through a Certificate Export Wizard. Make sure to select Base-64 encoding:

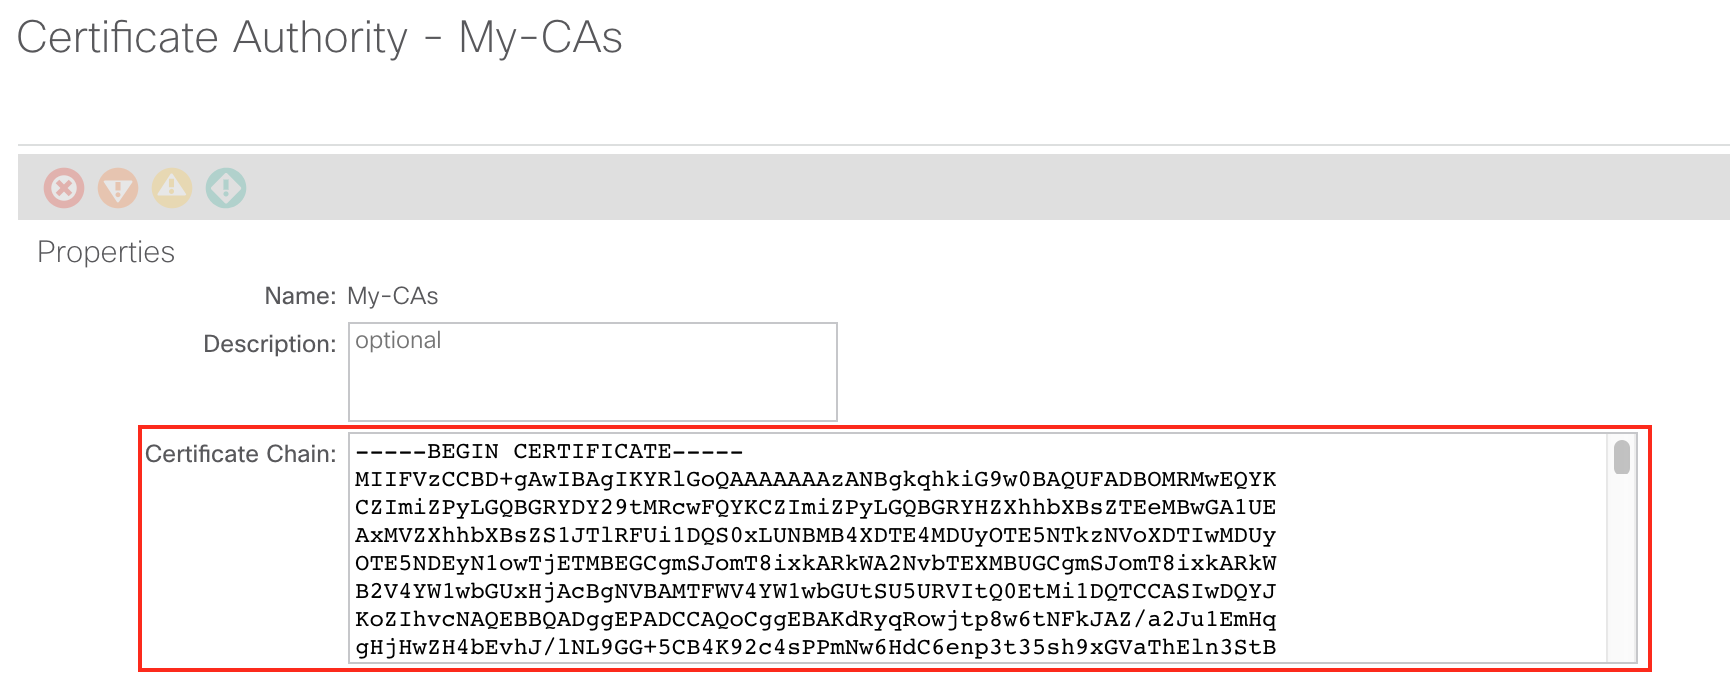
Save the file, and continue exporting the remaining CAs. After all the CA certificates have been exported, open them each with Notepad or another text editor and copy each of the file contents to a single text file. Use the certificate chain format below:
—–BEGIN CERTIFICATE—–
INTER-CA-2 CERTIFICATE CONTENT HERE
—–END CERTIFICATE—–
—–BEGIN CERTIFICATE—–
INTER-CA-1 CERTIFICATE CONTENT HERE
—–END CERTIFICATE—–
—–BEGIN CERTIFICATE—–
ROOT-CA CERTIFICATE CONTENT HERE
—–END CERTIFICATE—–
After submitting the ACI CA certificate chain configuration, the next step is to create an ACI Key Ring.
Creating the ACI Key Ring:
To create the ACI Key Ring navigate to the following APIC web GUI path:
Admin -> AAA -> Public Key Management -> Key Rings

Right click Key Rings and select Create Key Ring:
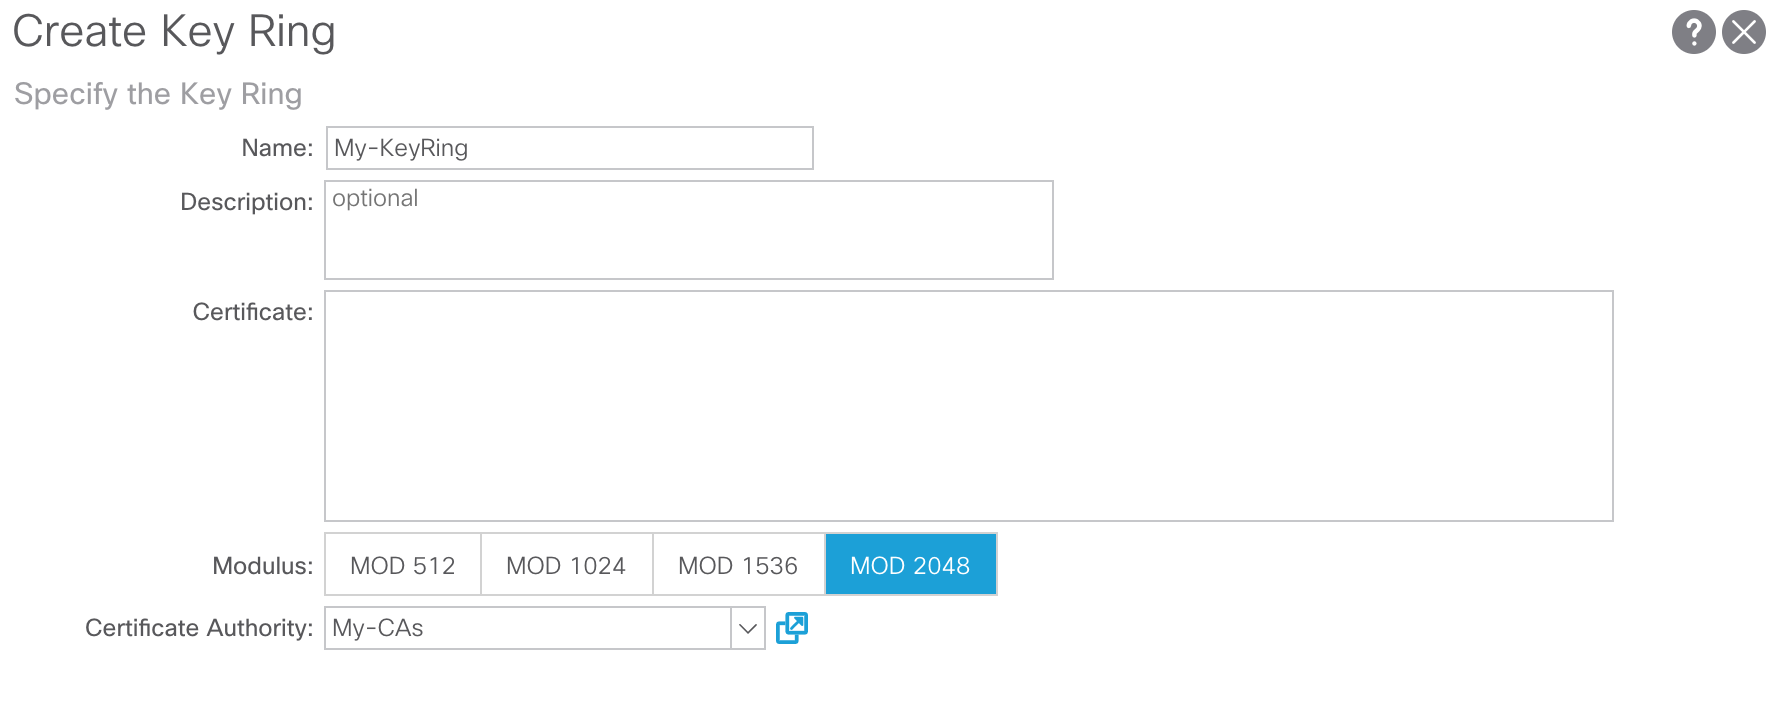
Assign a Name, select a Modulus, and select the CA we just created from the drop down list. Leave the Certificate field empty, we will come back to this later. After submitting the Key Ring configuration, the next step is to create the ACI Certificate Request.
Creating the ACI Certificate Request:
To create the ACI Certificate Request navigate to the following APIC web GUI path:
Admin -> AAA -> Public Key Management -> Key Rings -> YOUR_KEY_RING_HERE
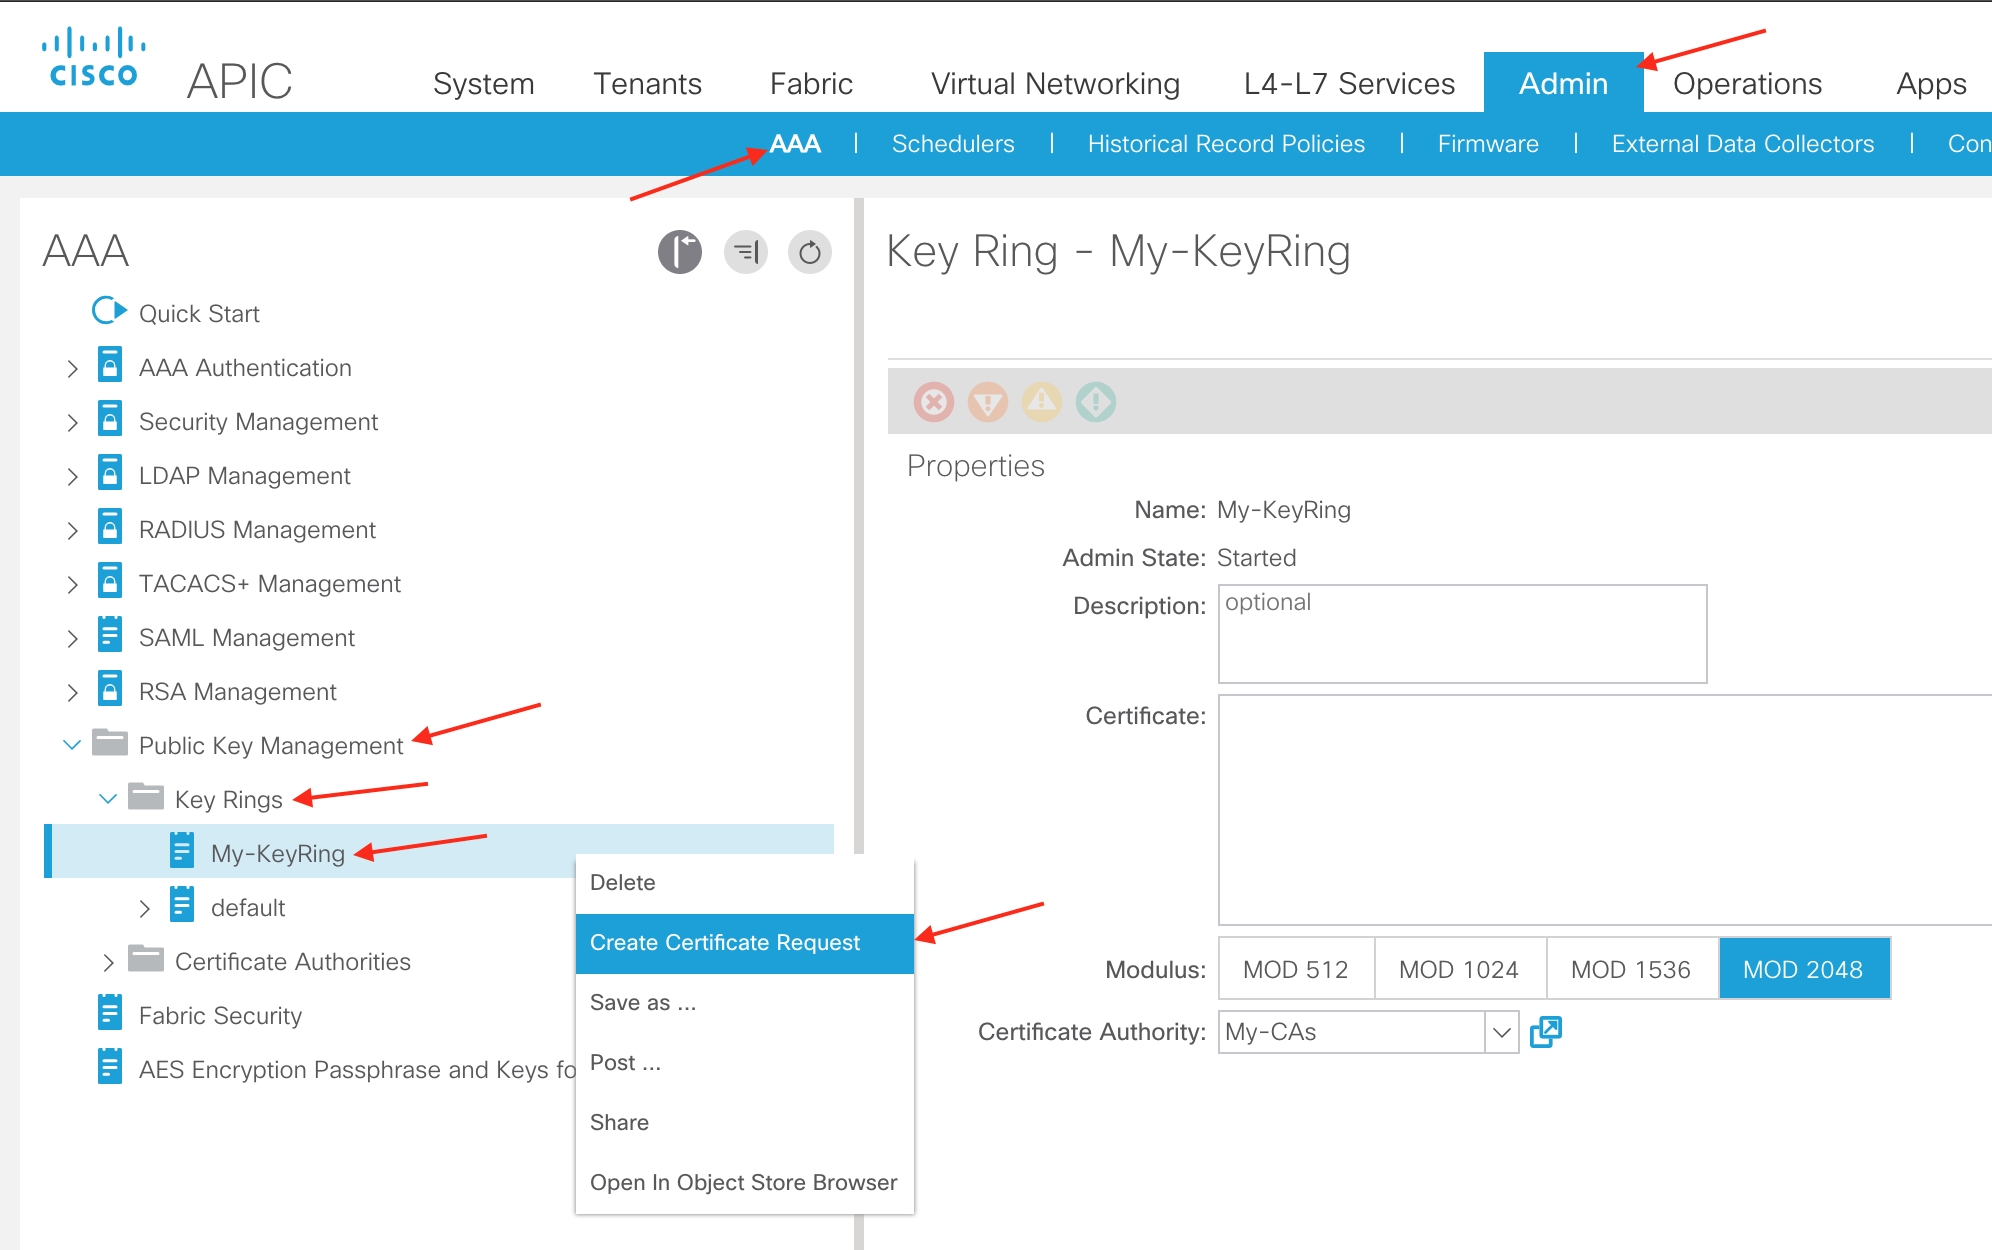
Right click your newly created key ring and select Create Certificate Request:

The Subject field requires the Fully Qualified Domain Name or Distinguished Name of one of the APICs. The Alternate Subject Name field will be used for the other APICs. Inserting Alternate Subject Names from the APIC GUI was not introduced until ACI 3.0.x code. Additionally, currently the Alternate Subject Name field only supports up to 64 characters. The following enhancement has been filed to support up to 1024 characters:
https://bst.cloudapps.cisco.com/bugsearch/bug/CSCvf83309/?reffering_site=dumpcr
If you are not running a code version which allows greater than 64 characters for the Alternate Subject Name, then please contact Cisco TAC. Cisco TAC has a method of generating the Certificate Request from the APIC CLI.
After submitting the Certificate Request in the APIC GUI, the entire Certificate Request body can be found in the following APIC web GUI path:
Admin -> AAA -> Public Key Management -> Key Rings -> YOUR_KEY_RING_HERE -> Certificate Request

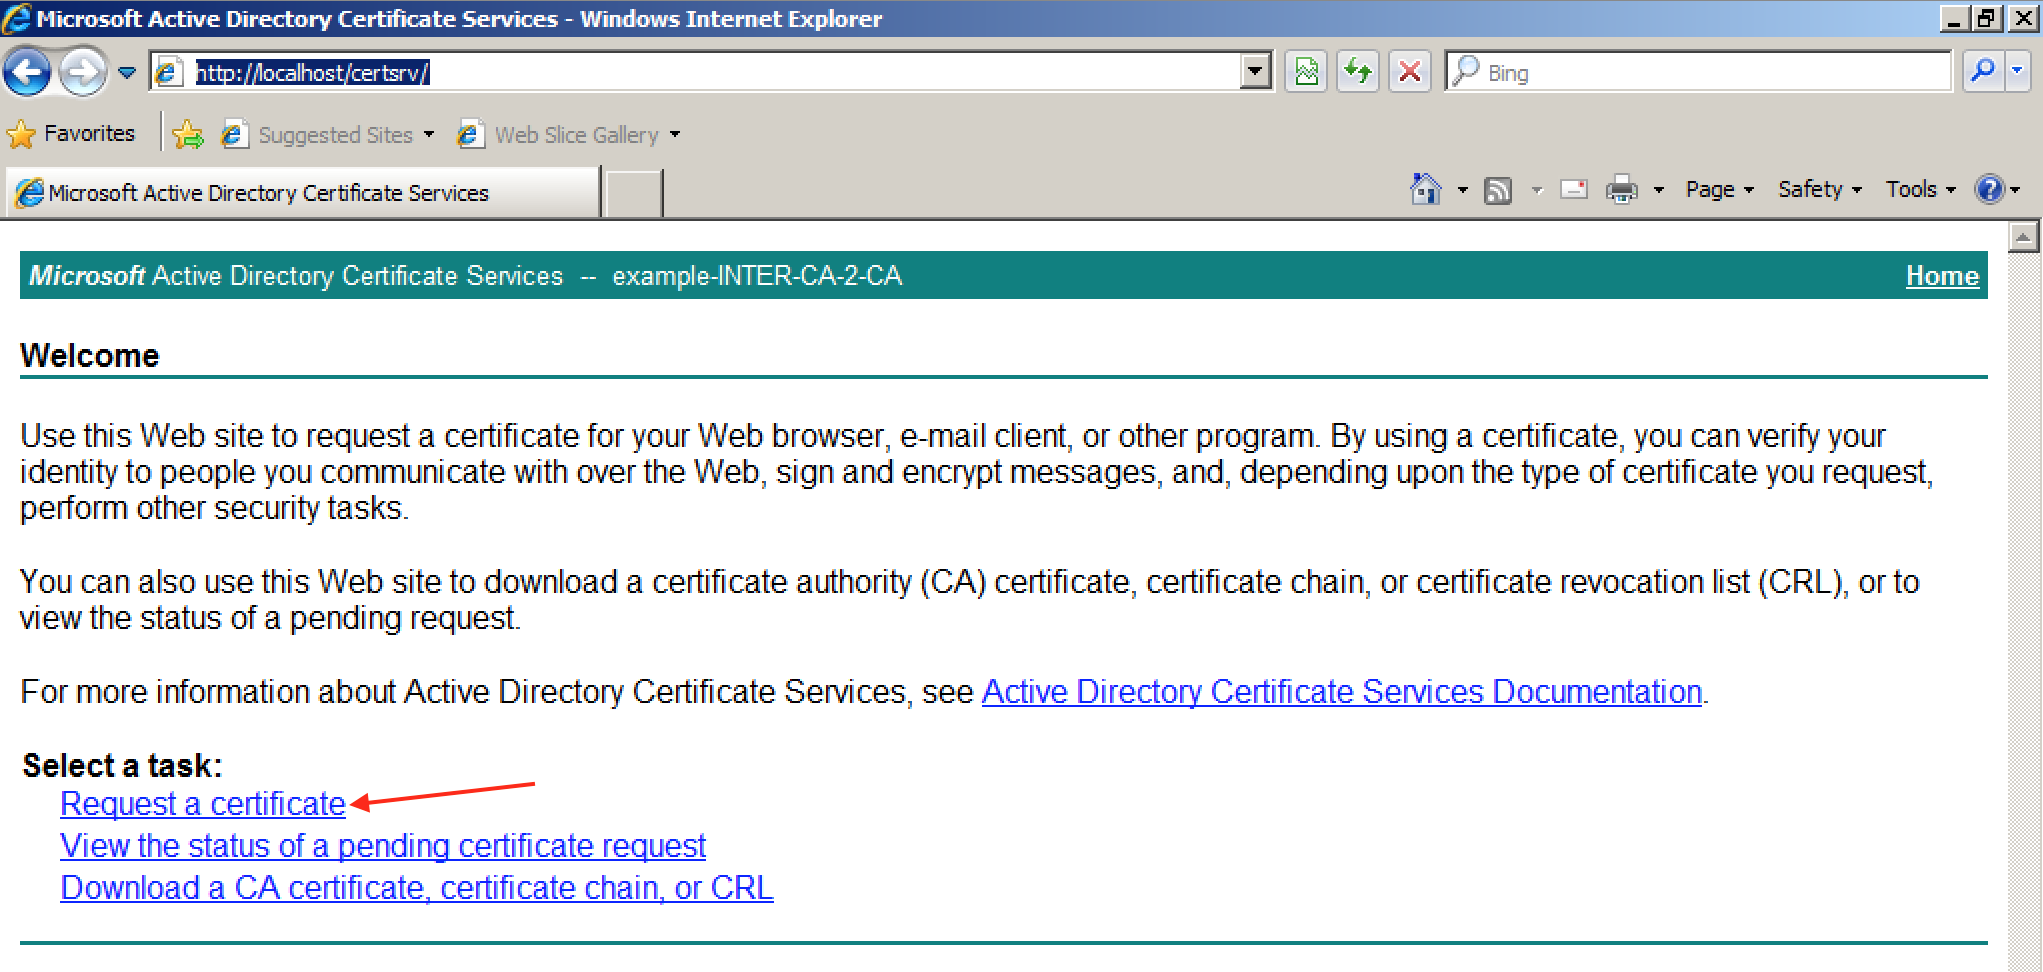
The next step is to submit this Certificate Request to your bottom level CA, in our case INTER-CA-2. Navigate to the following URL on your CA you will submit the request to:
http://localhost/certsrv/
From there select Request a certificate:
Then select advanced certificate request:

Then select Submit a certificate request by using base-64….
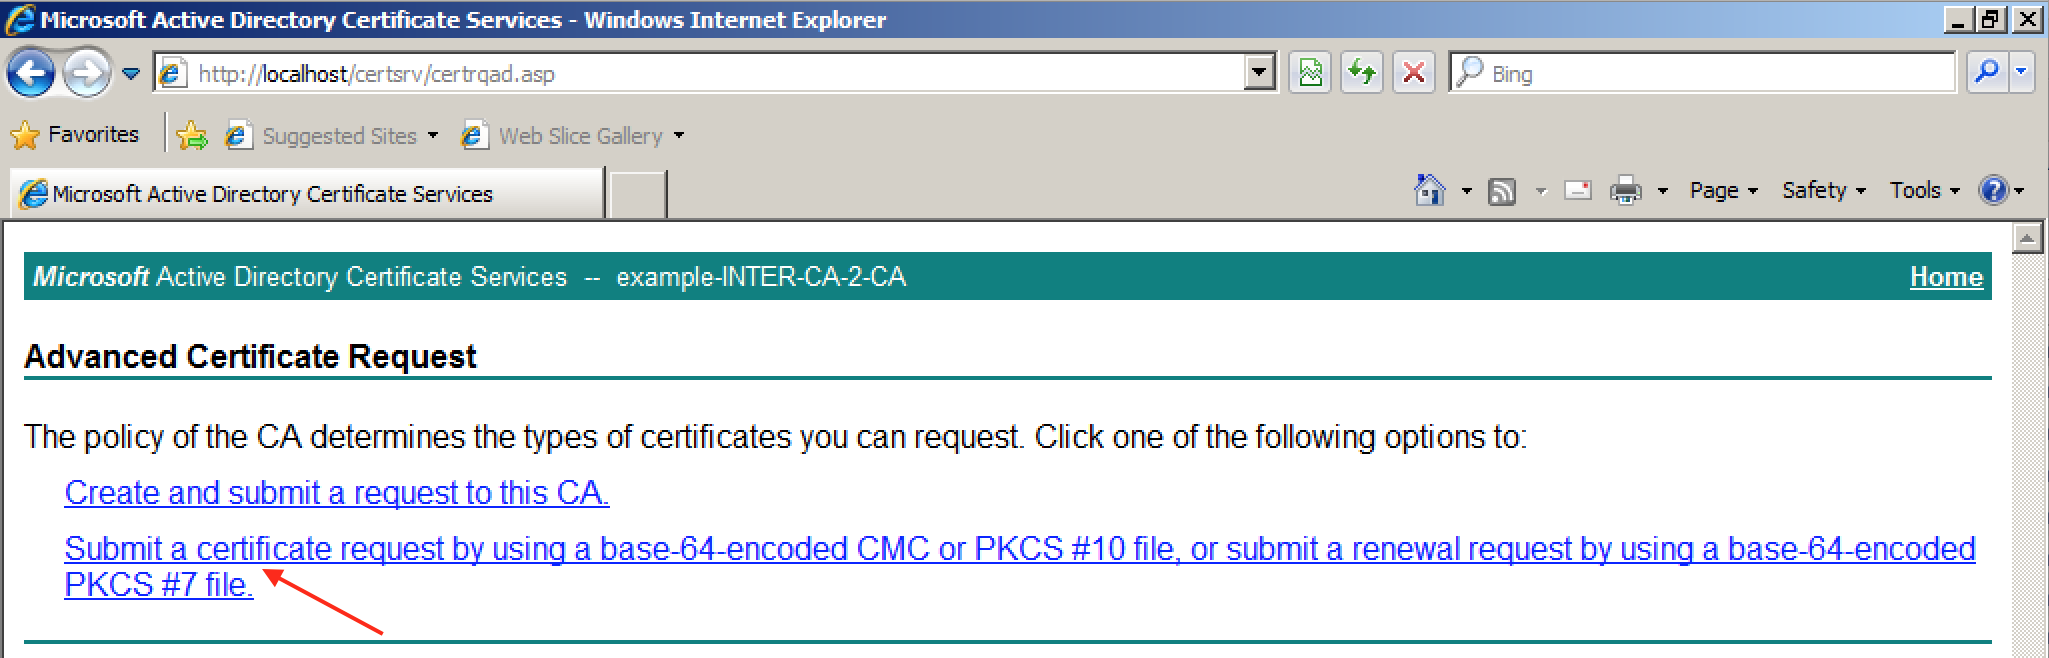
Paste in your Certificate Request generated by ACI, select Web Server as the Certificate Template, and click Submit.
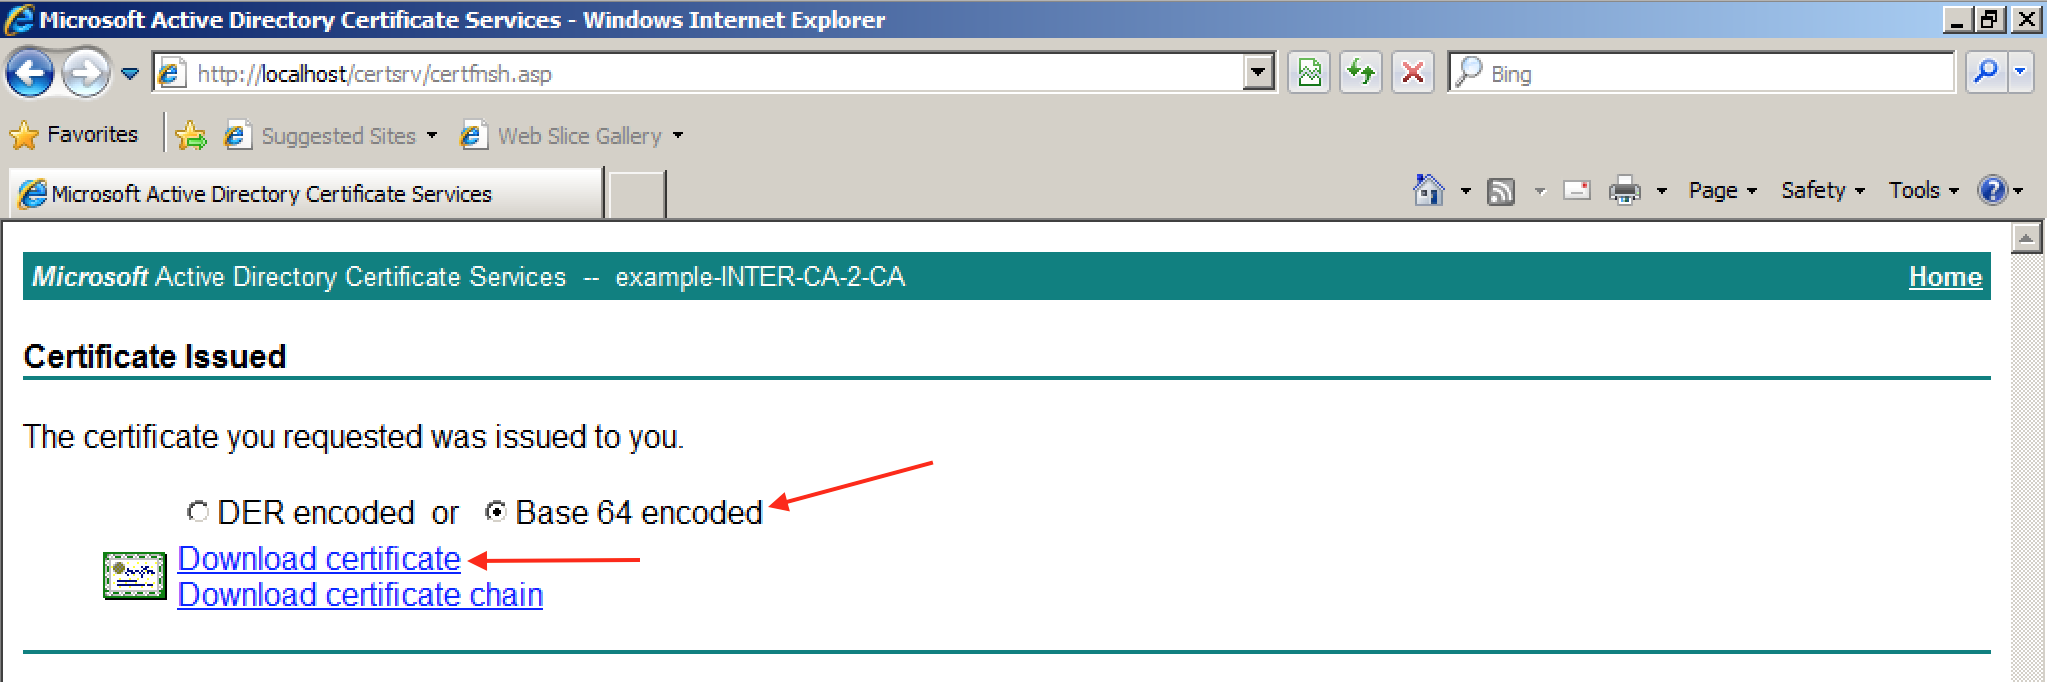
When prompted, select Base 64 encoded and Download certificate:
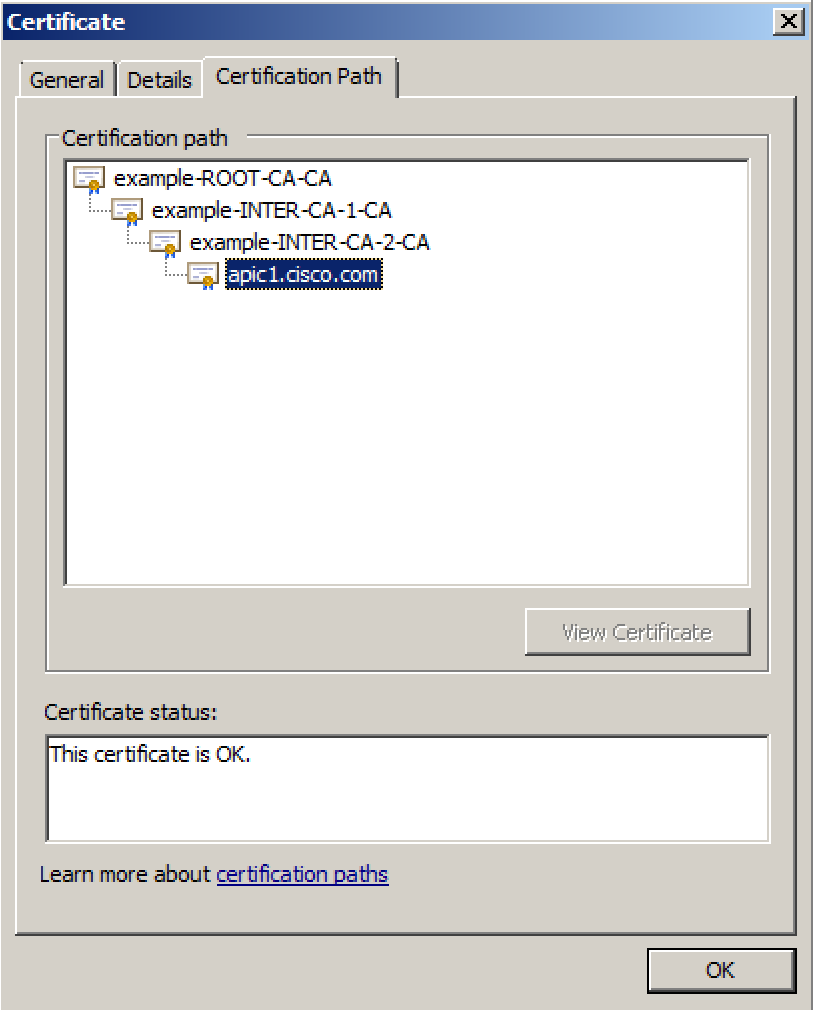
After saving the certificate you can double click it to verify the entire Certification Path:
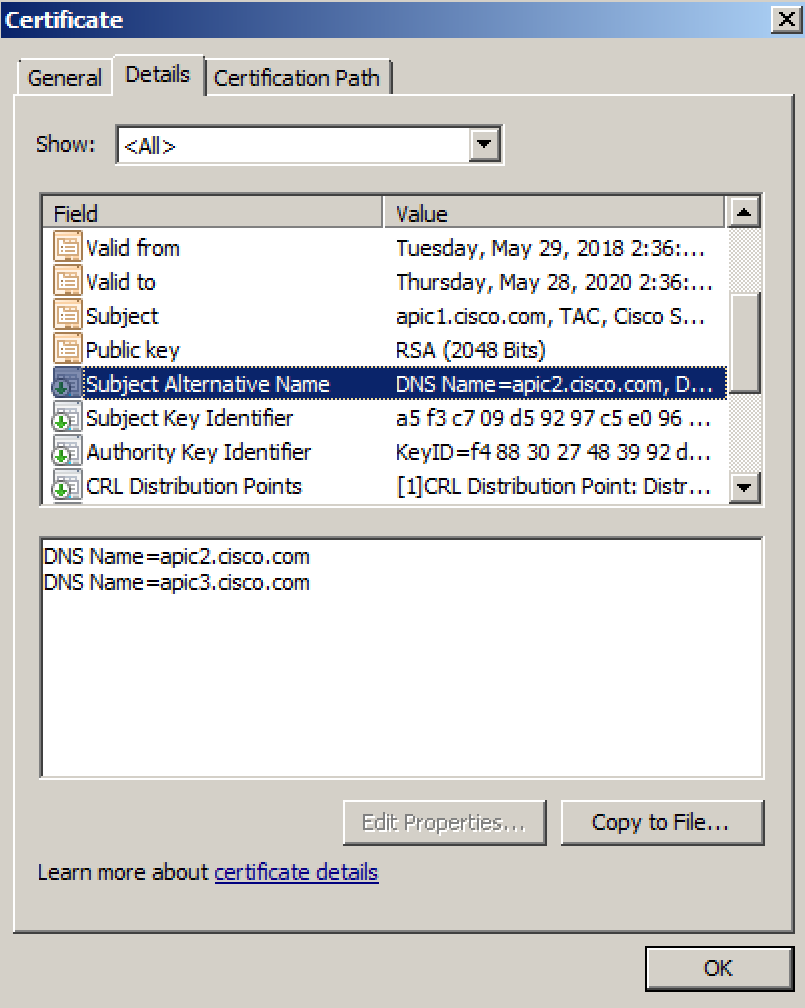
You can also see the Alternate Subject Names we configured from ACI:
The next step is to open the final certificate we just generated in a text editor and copy the entire contents to the ACI Key Ring configuration. Navigate to the following APIC web GUI path to insert the final generated certificate:
Admin -> AAA -> Public Key Management -> Key Rings -> YOUR_KEY_RING_HERE

After pasting and submitting the certificate, the Admin State should go from Started to Completed. The final step in the process is to apply the newly created certificate so that it can be used.
Applying the Certificate Across the Fabric:
To apply the certificate navigate to the following APIC web GUI path:
Fabric -> Fabric Policies -> Pod Policies -> Policies -> Management Access -> YOUR_MANAGEMENT_ACCESS_POLICY_HERE
Under the HTTPS section you will select your Key Ring created earlier:

Click Submit
This completes the necessary configuration for creating and installing a custom SSL certificate in ACI.
