In this tutorial we will be going over TACACS configuration so that users can login to APICs and fabric switches with TACACS credentials. For this tutorial I will be using ACS 5.8 and ISE 2.0 as the TACACS server to authenticate against.
Note: All ACS and ISE configuration in this tutorial is built from the ground up. If you have existing ACS or ISE configuration in place already that you would like to reuse please feel free to do so.
Prerequisites:
* Fabric discovery completed
* In-Band/Out-of-Band connectivity to your APIC(s) and fabric switches
* In-Band/Out-of-Band contracts configured (need to allow ICMP protocol and default TACACS ports UDP 49 and TCP 49)
* Make sure you can ping your TACACS server from the APICs and fabric switches you are trying to authenticate from
My Setup:
* ACI fabric running 3.1(2m)
* ACS version 5.8.1.4
* ISE version 2.0
Topics:
* Configuring TACACS Policies in ACI
* Configuring TACACS Policies in ACS 5.8
* Configuring TACACS Policies in ISE 2.0
Configuring TACACS Policies in ACI:
Configuration Overview:
* Create TACACS Provider
* Create TACACS Provider Group
* Create Login Domain
The first step in the ACI TACACS configuration is to create a TACACS Provider. To create the TACACS Provider navigate to the following APIC web GUI path:
Admin -> AAA -> TACACS+ Management -> TACACS+ Providers
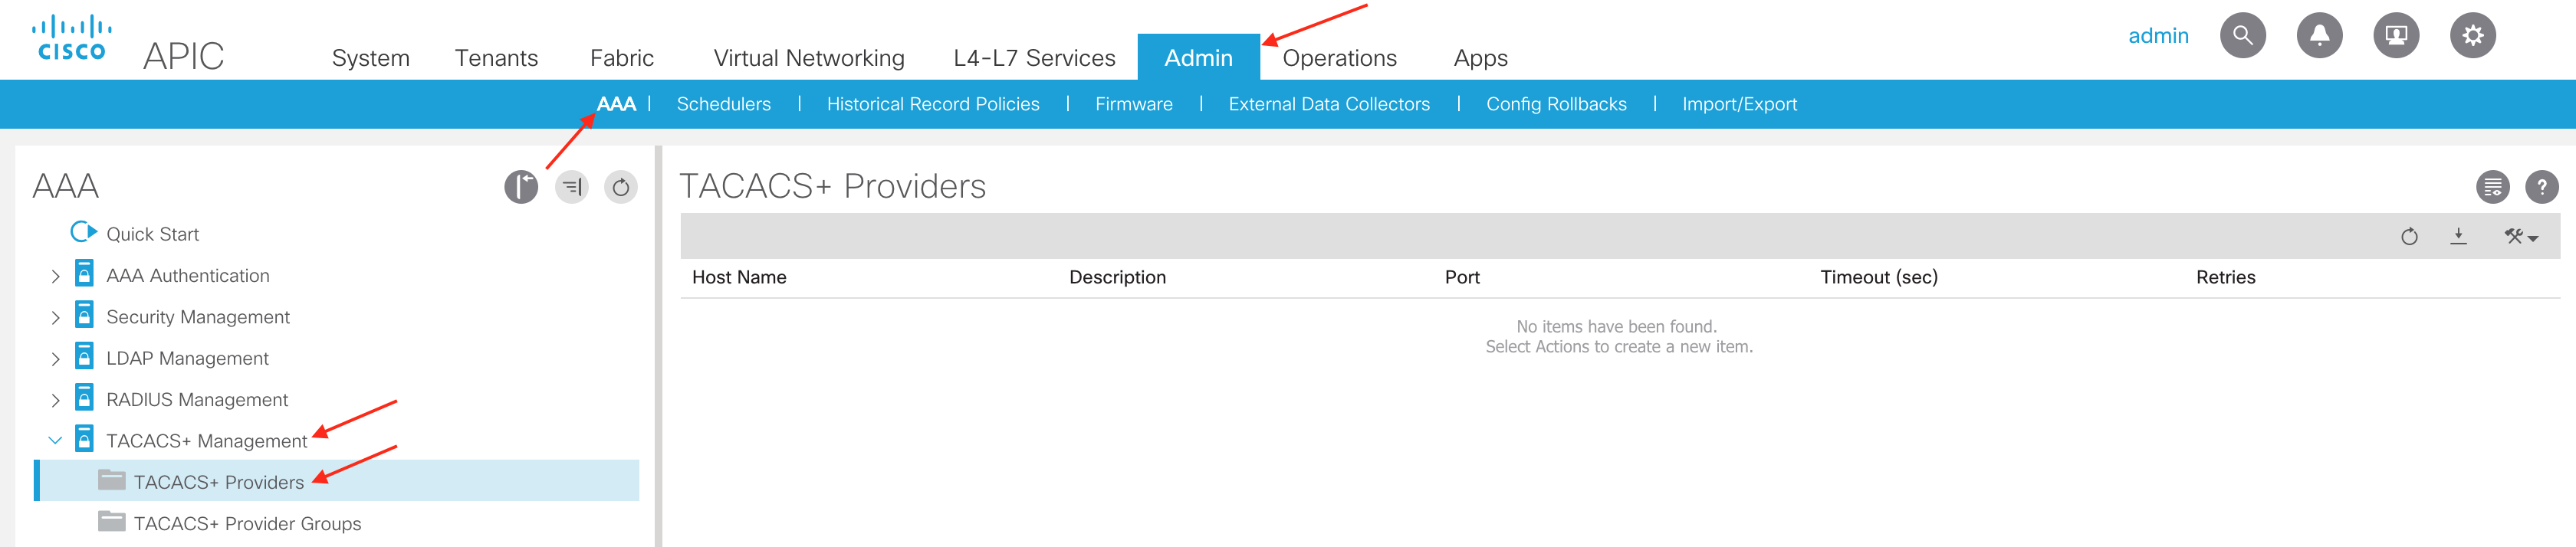
Right click TACACS+ Providers and select Create TACACS+ Provider

This is where we define all of the TACACS attributes used to connect to the TACACS server:
IP Address: This is the IP address of the TACACS server
Port: This is the port used to connect to the TACACS server. TACACS default is port 49
Authorization Protocol: This needs to match the configuration on the TACACS server which we will go over later in the ACS and ISE configuration
Key: This needs to match the configuration on the TACACS server which we will go over later in the ACS and ISE configuration
Timeout: The amount of time allowed for a login attempt to occur before giving up (measured in seconds)
Retries: The number of automatic re-try login attempts allowed for a single authentication submission
Management EPG: The management EPG used to connect to the TACACS server. You will want to use the Management EPG which has all the necessary contracts in place
Server Monitoring: Used to determine if the TACACS server is alive. This option uses the TACACS protocol login to check if the TACACS server is alive
The next step is to create the TACACS Provider Group and associate our newly created TACACS Provider. To create the TACACS Provider Group navigate to the following APIC web GUI path:
Admin -> AAA -> TACACS+ Management -> TACACS+ Provider Groups
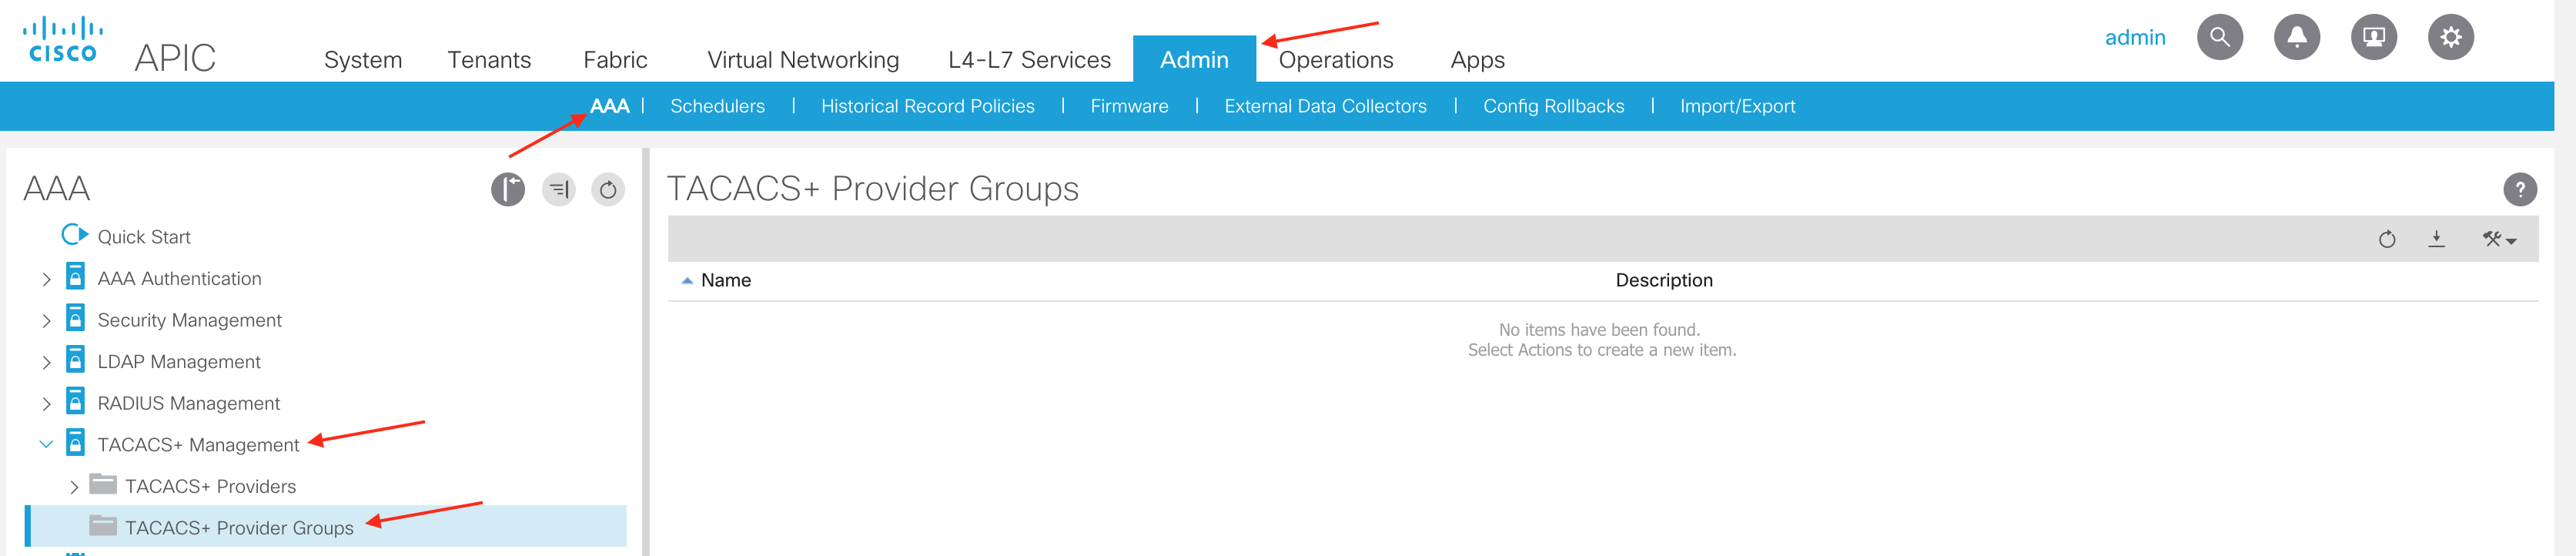
Right click TACACS+ Provider Groups and select Create TACACS+ Provider Group
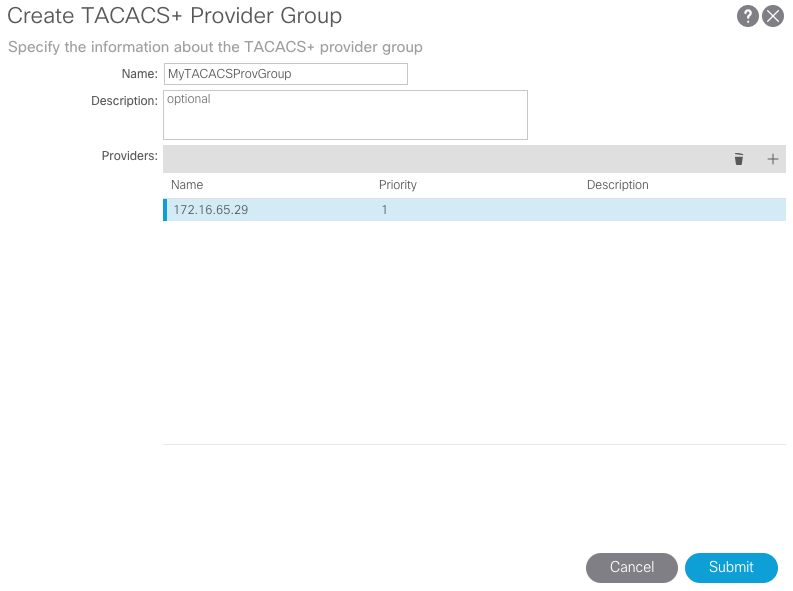
This is where we add the TACACS Provider we previously created. Since we only have one TACACS provider we can set the priority to 1.
The final ACI configuration step is to create the Login Domain and associate our newly created TACACS Provider Group. To create a Login Domain navigate to the following APIC web GUI path:
Admin -> AAA -> AAA Authentication -> Login Domains

Right click Login Domains and select Create Login Domain
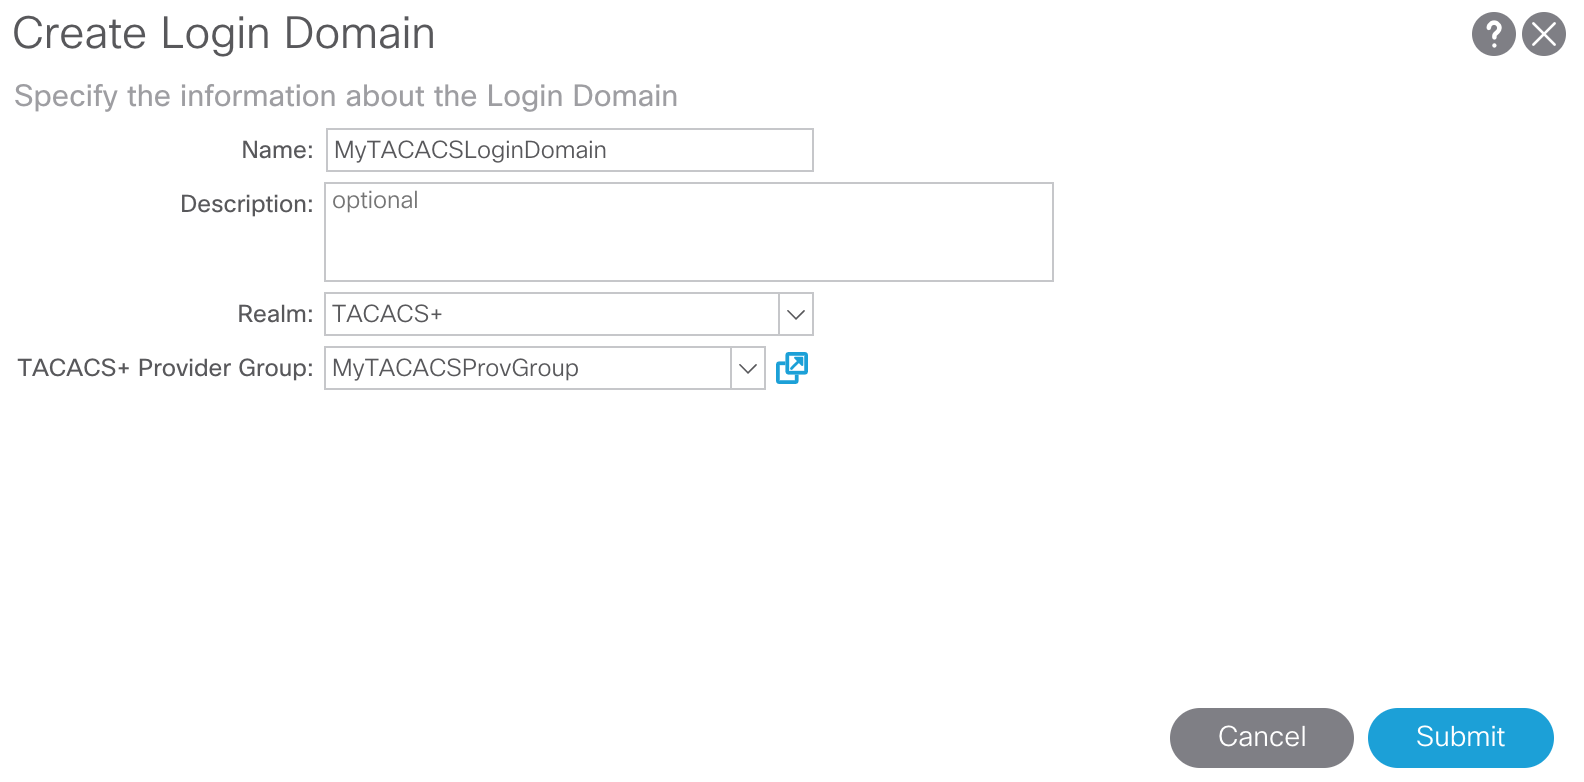
Provide a name, realm, and select the newly created TACACS Provider Group.
It is recommended to create an additional Login Domain which has a Realm of Local. This local Login Domain will allow users to use local APIC credentials and will appear in the Domain drop down list in the APIC GUI login screen.
Let’s go ahead and take a look at our APIC login screen to see the reflected changes:
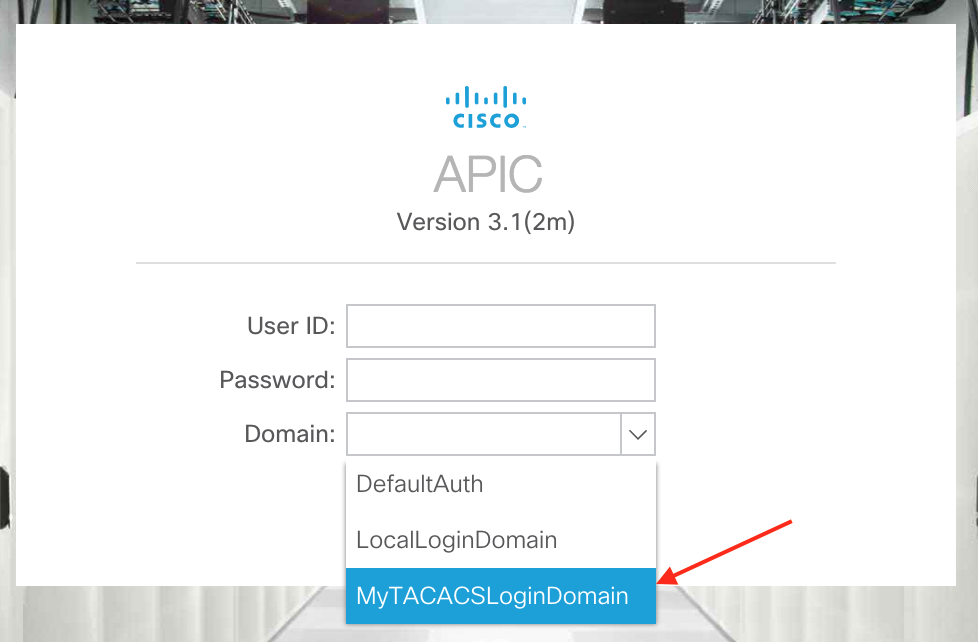
From here we can see our newly created TACACS Login Domain, MyTACACSLoginDomain, as well as the Login Domain, LocalLoginDomain, which we created for local authentication. If a Login Domain is not selected, the built in DefaultAuth login domain will be used. The DefaultAuth login domain piggybacks off of the Default Authentication configuration see in the below AAA Authentication screenshot below. So what if we don’t always want to select our TACACS login domain every time we want to login with a TACACS user? We can change the default Login Domain behavior by navigating to the following APIC web GUI path:
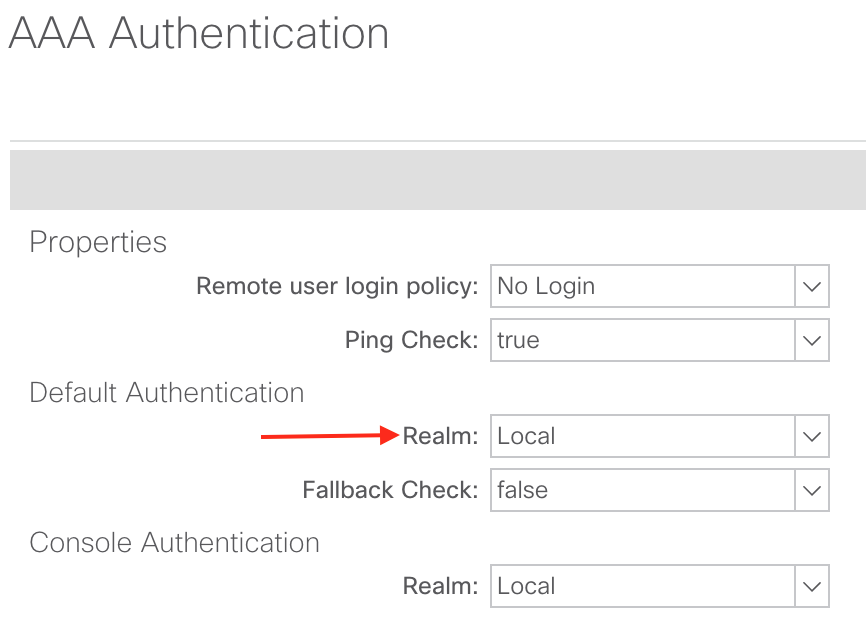
Admin -> AAA -> AAA Authentication
From here we can see that the Default Authentication Realm is set to local.
So let’s change that to TACACS and select our newly created TACACS Provider Group:
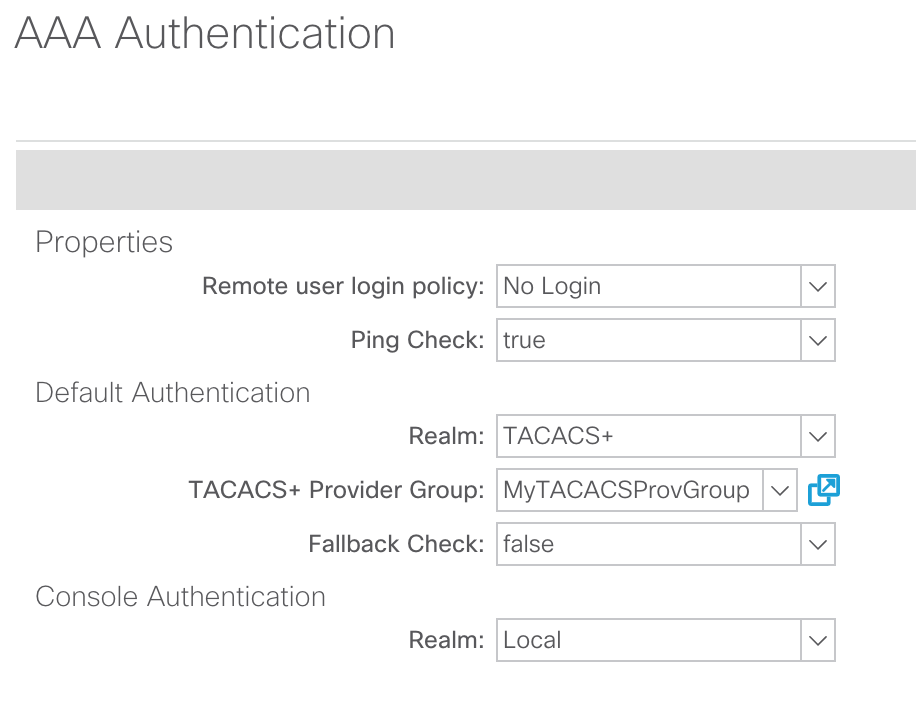
This will enable default TACACS authentication for the APIC GUI and SSH sessions to APICs and fabric switches. However, in order to enable TACACS authentication for console sessions to fabric switches you will also need to enable the TACACS+ Realm for Console Authentication.
Note: Make sure to leave/set the Fallback Check property to false. Setting the Fallback Check property to true may cause local logins to fail.
So what happens if you set your default Login Domain to TACACS, you did not create an additional Login Domain for local authentication, and you forgot your TACACS credentials? In ACI there is a Login Domain which is known as fallback. The fallback Login Domain cannot be deleted and is set to use local authentication by default (though this can be changed for some reason). In order to login to the fallback Login Domain you must use a specific syntax:
APIC GUI: apic:LOGIN_DOMAIN_HERE\\LOCAL_USERNAME_HERE
APIC CLI: apic#LOGIN_DOMAIN_HERE\\LOCAL_USERNAME_HERE
To login to the local admin account you would use the following APIC GUI and CLI syntax’s:
APIC GUI: apic:fallback\\admin
APIC CLI: apic#fallback\\admin
This concludes all the necessary ACI configuration for TACACS. Now let’s move onto the ACS 5.8 TACACS configuration.
Configuring TACACS Policies in ACS 5.8:
Configuration Overview:
* Create Network Device Location
* Create Network Device Type
* Create Network Devices and AAA Clients
* Create Identity Group
* Create local user on the ACS server
* Create Shell Profile with AVPair
* Create Device Administration Authorization Policy
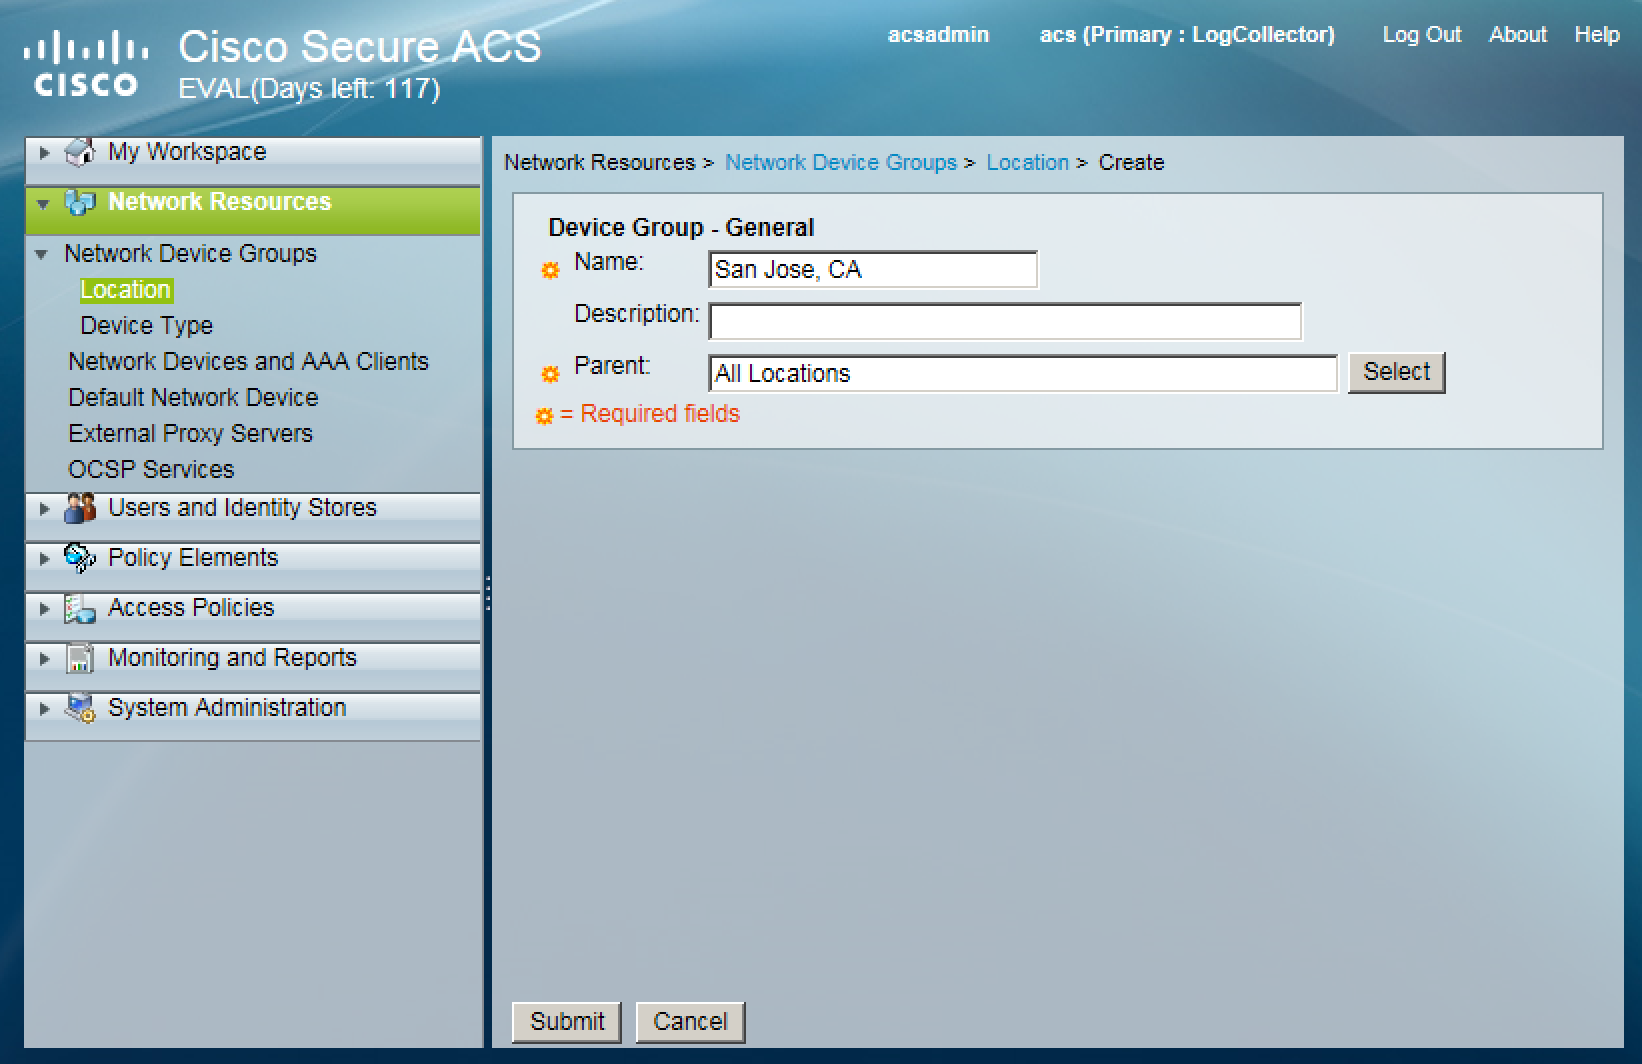
The first step in the ACS TACACS configuration process is to create the Network Device Location and Device Types to group all of our ACI APICs and fabric switches which will be acting as TACACS clients. To do this navigate to the following ACS web GUI path:
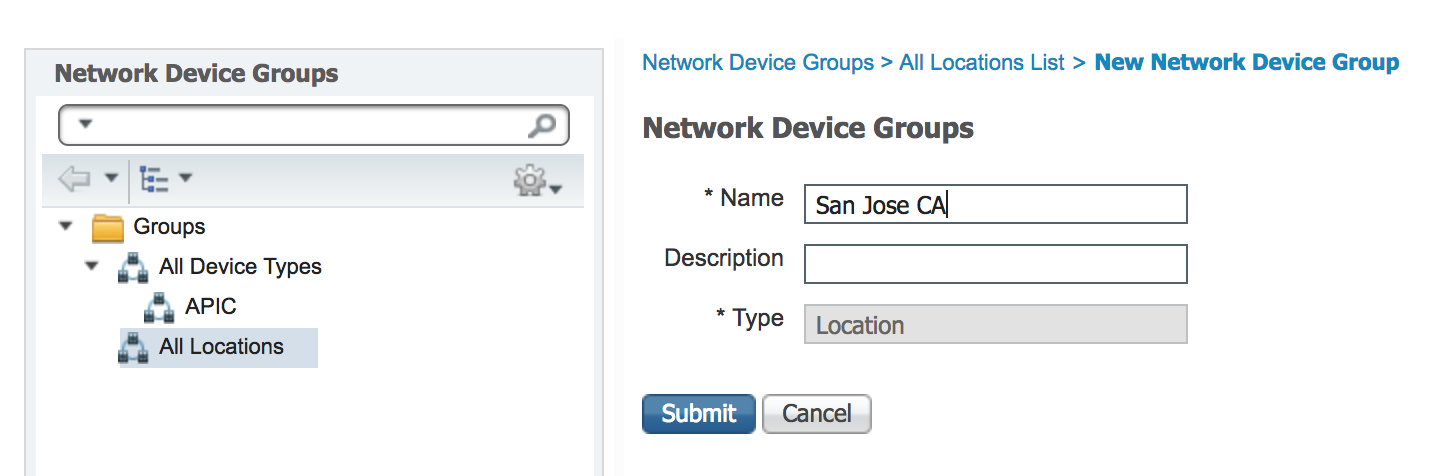
Network Resources -> Network Device Groups -> Location -> Create

From here we can go ahead and assign a name to our Device Location and leave the Parent set to All Locations. For our purposes we will use the following configuration:
After submitting our changes the next step is to create the Device Type. To do this navigate to the following ACS web GUI path:
Network Resources -> Network Device Groups -> Device Type -> Create

From here we can go ahead and assign a name to our Device Type and leave the Parent set to All Device Types. For our purposes we will use the following configuration:

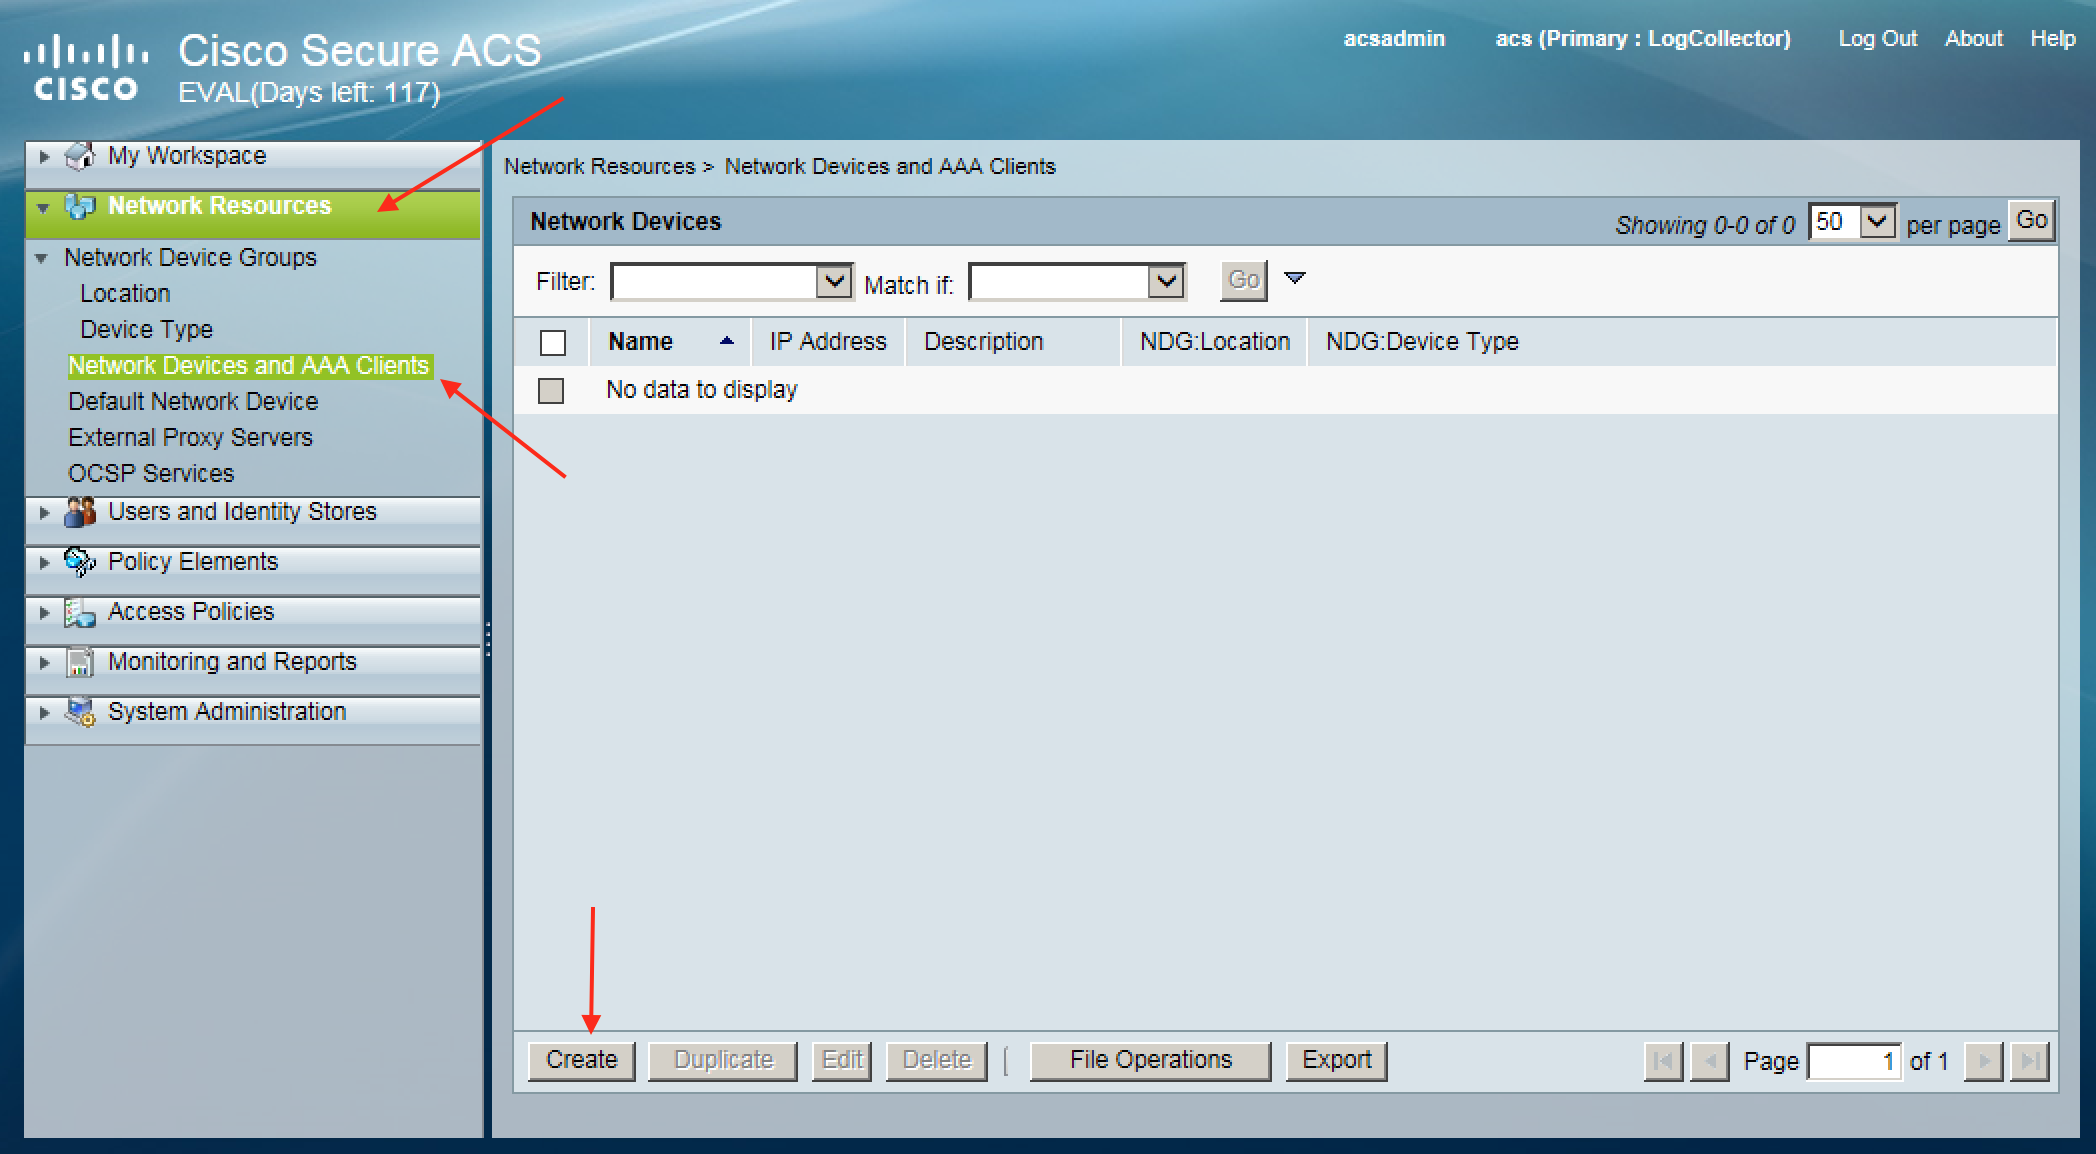
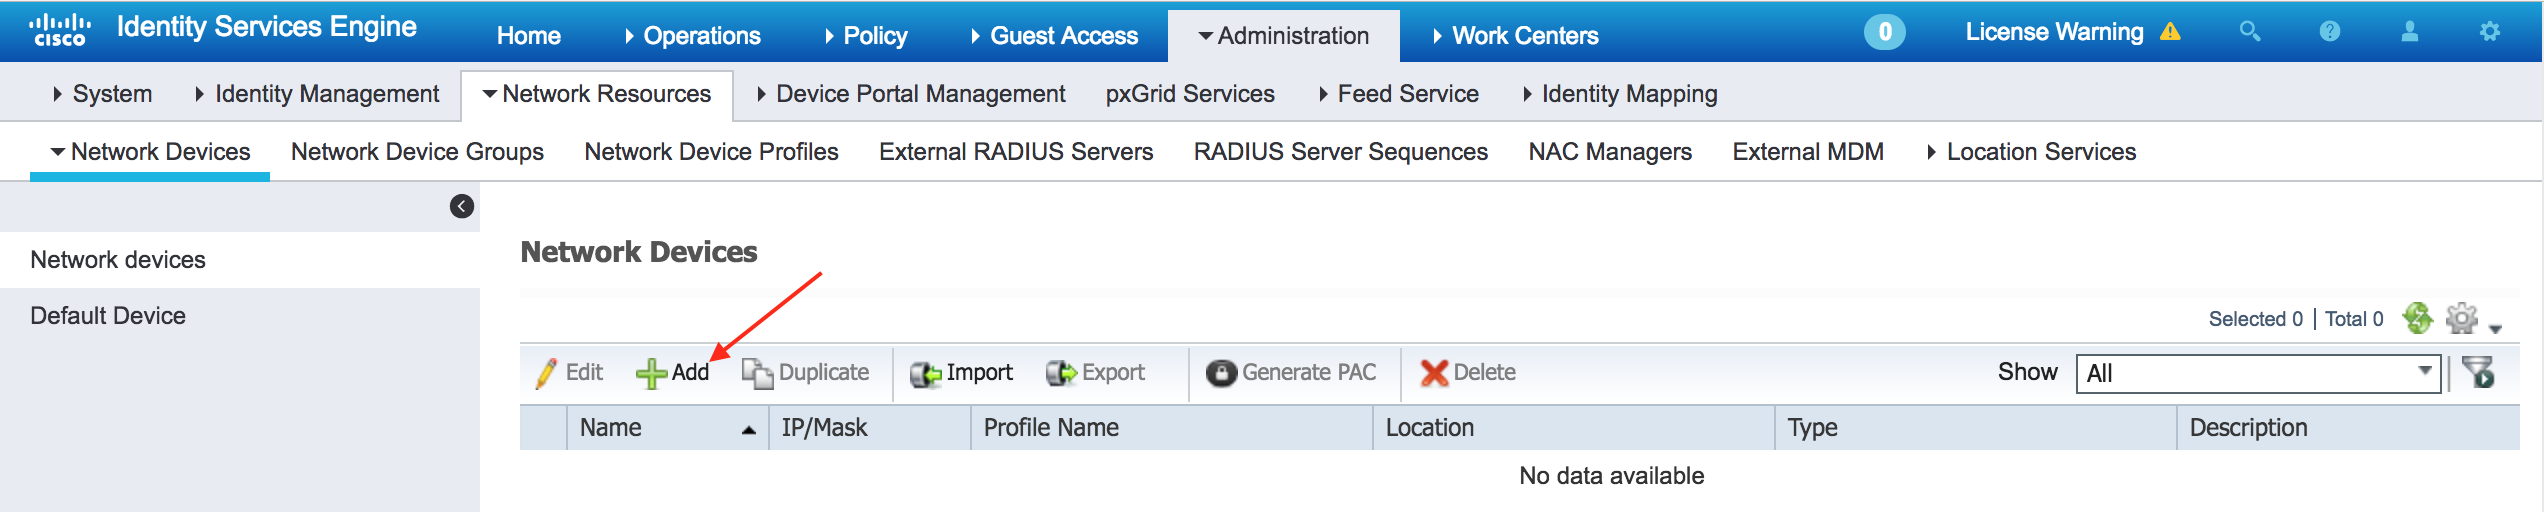
After submitting our changes the next step is to create our Network Devices and AAA Clients and assign the IP addresses of all the APICs and fabric switches we want to use TACACS with. To do this navigate to the following ACS web GUI path:
Network Resources -> Network Devices and AAA Clients -> Create
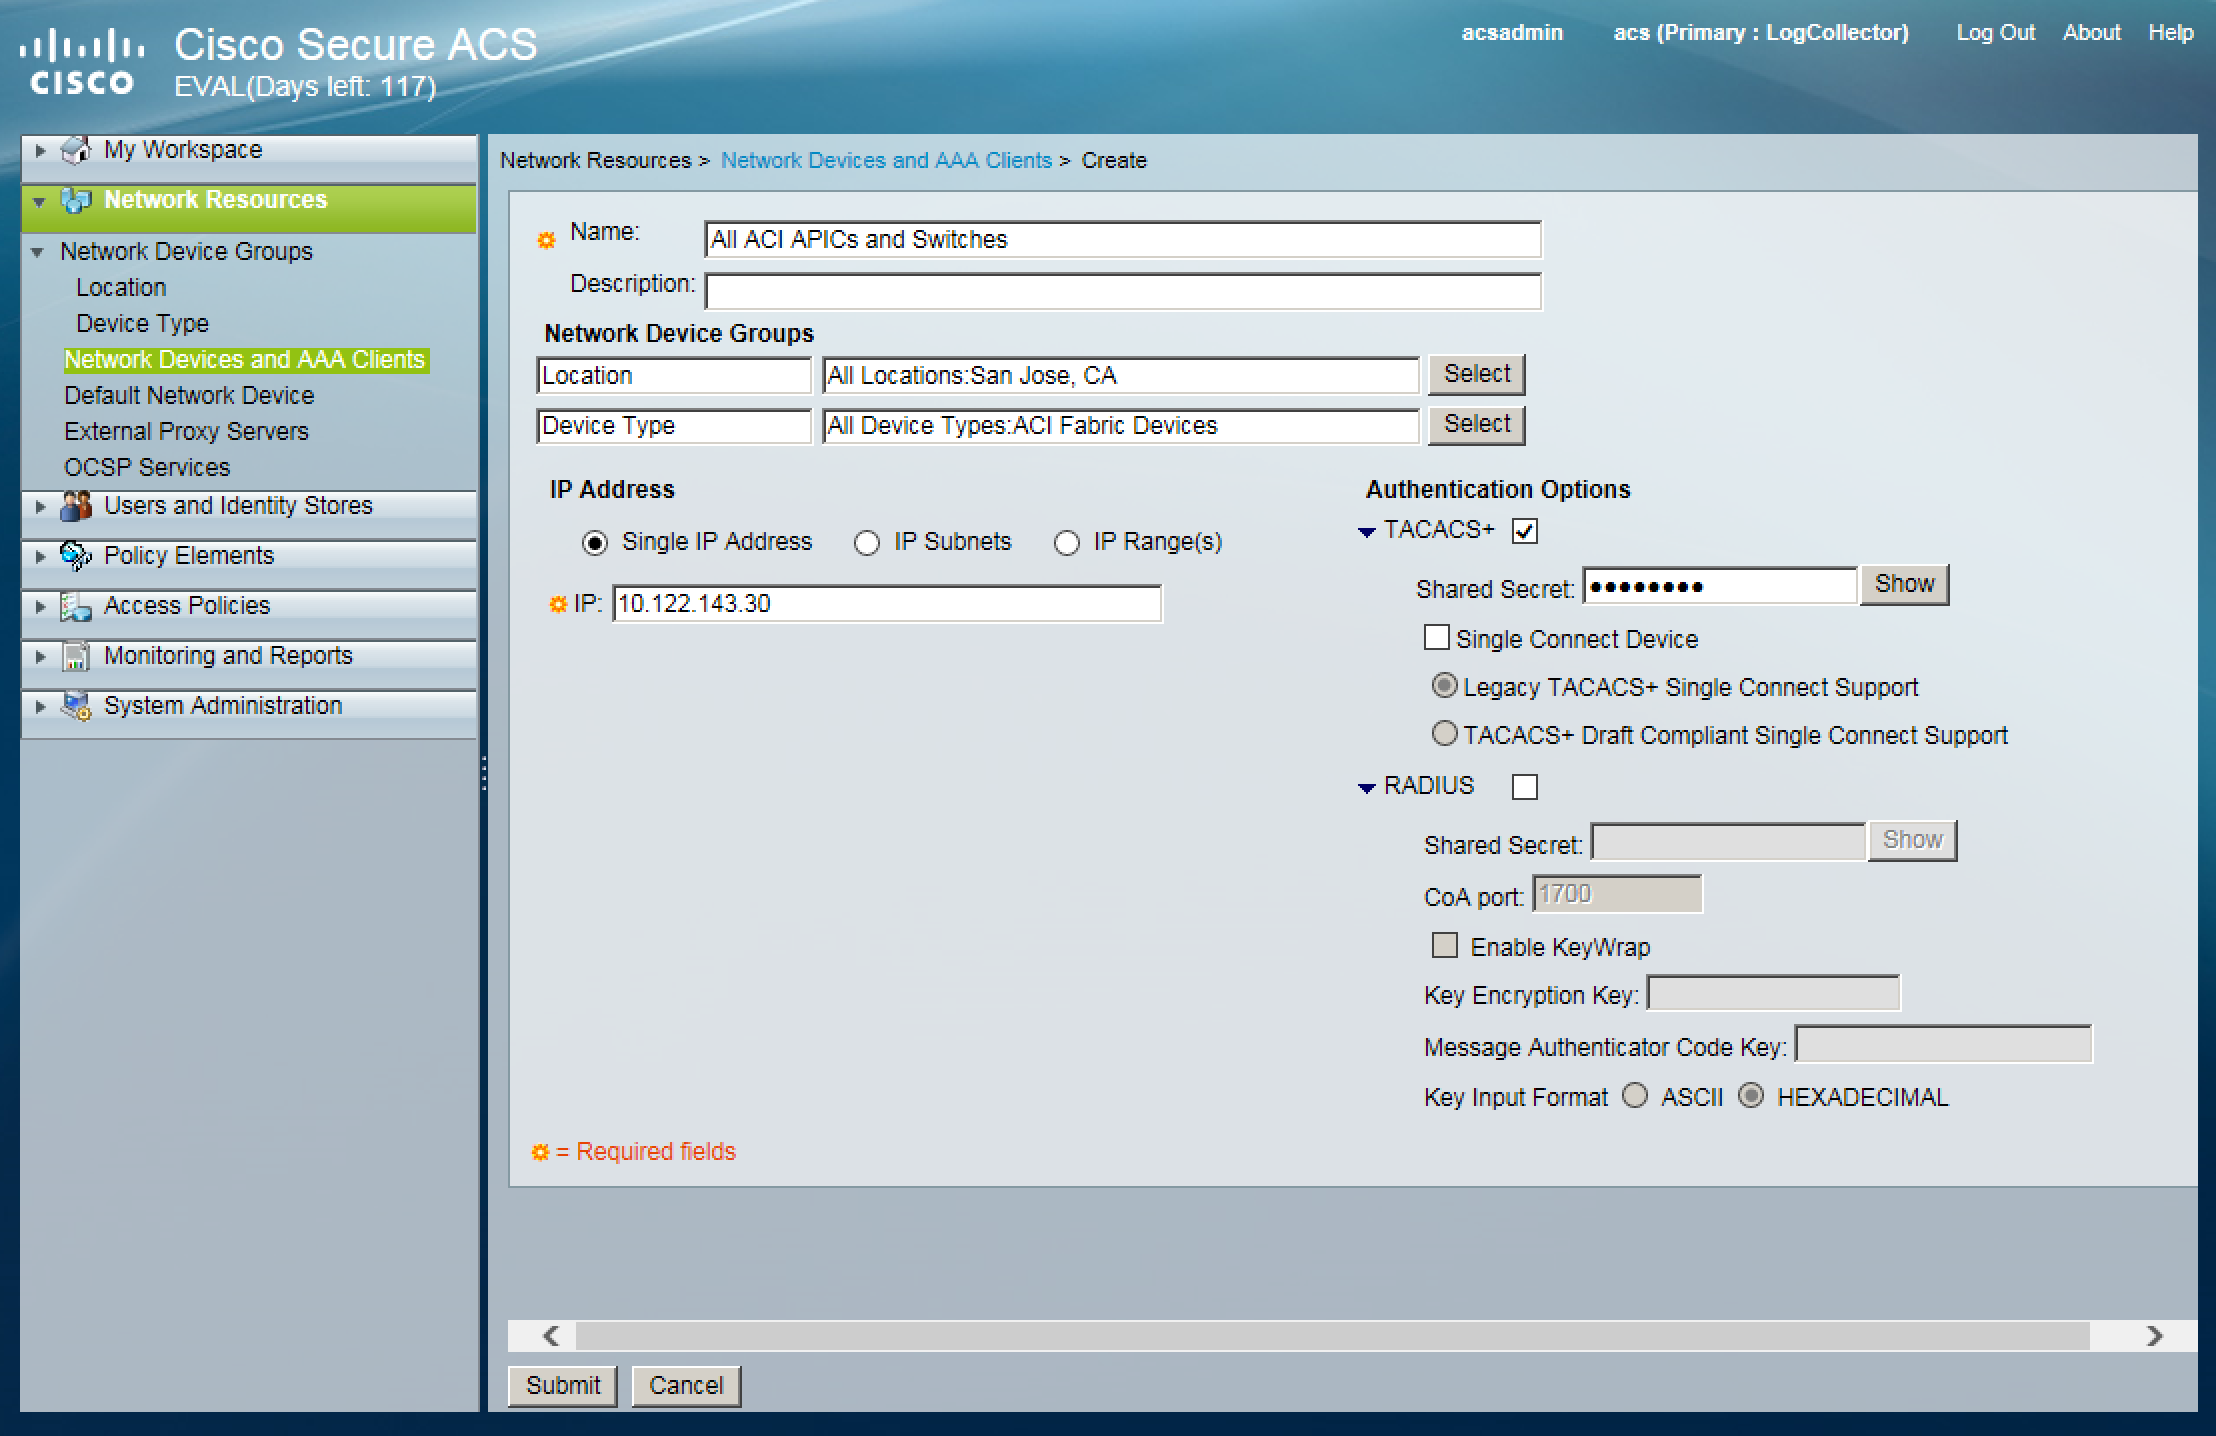
From here we can go ahead and assign a name to our network device group, assign the Location and Device Type, enable TACACS+ authentication using the same Shared Secret as you did when creating the ACI TACACS Provider, and assign the IP addresses of the APICs and fabric switches. For demo purposes I am just going to assign the IP of my APIC-1 which has an Out-of-Band IP address of 10.122.143.30. Our configuration will look like such:
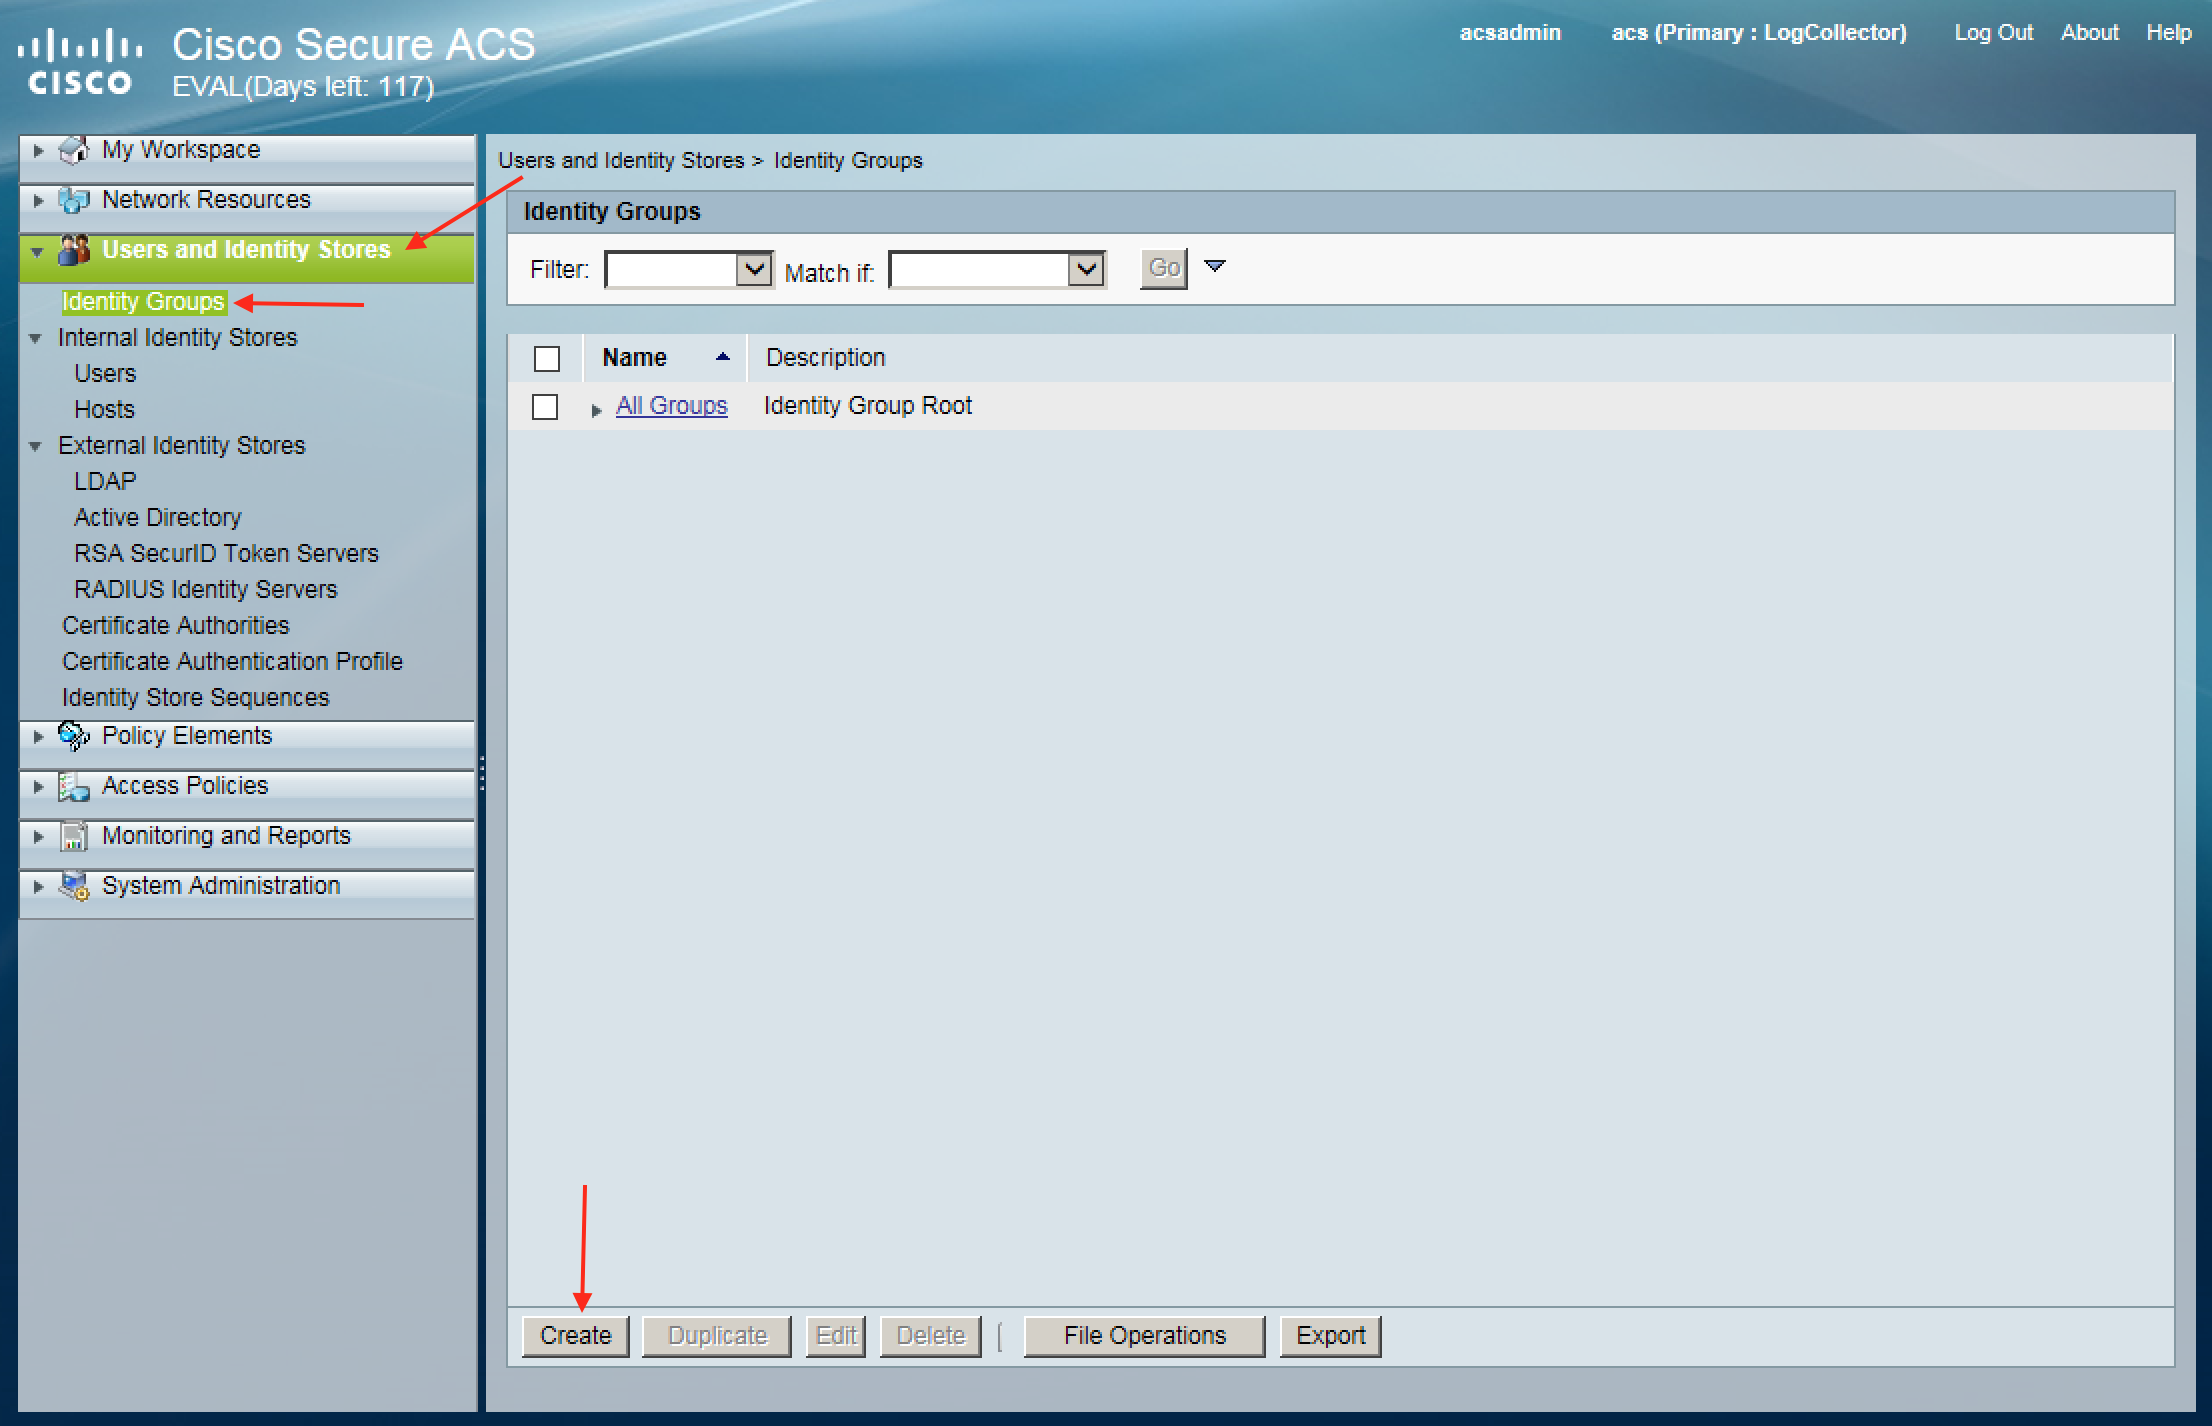
After submitting the changes the next step is to create a Identity Group to assign the local users to, which we will be creating after. To create the Identity Group navigate to the following ACS web GUI path:
Users and Identity Stores -> Identity Groups -> Create
From here we can go ahead and assign a name to our Identity Group. For our purposes we will create two Identity Groups, ACI Admin and ACI Read-Only. Our configuration for ACI Admin will look like such:

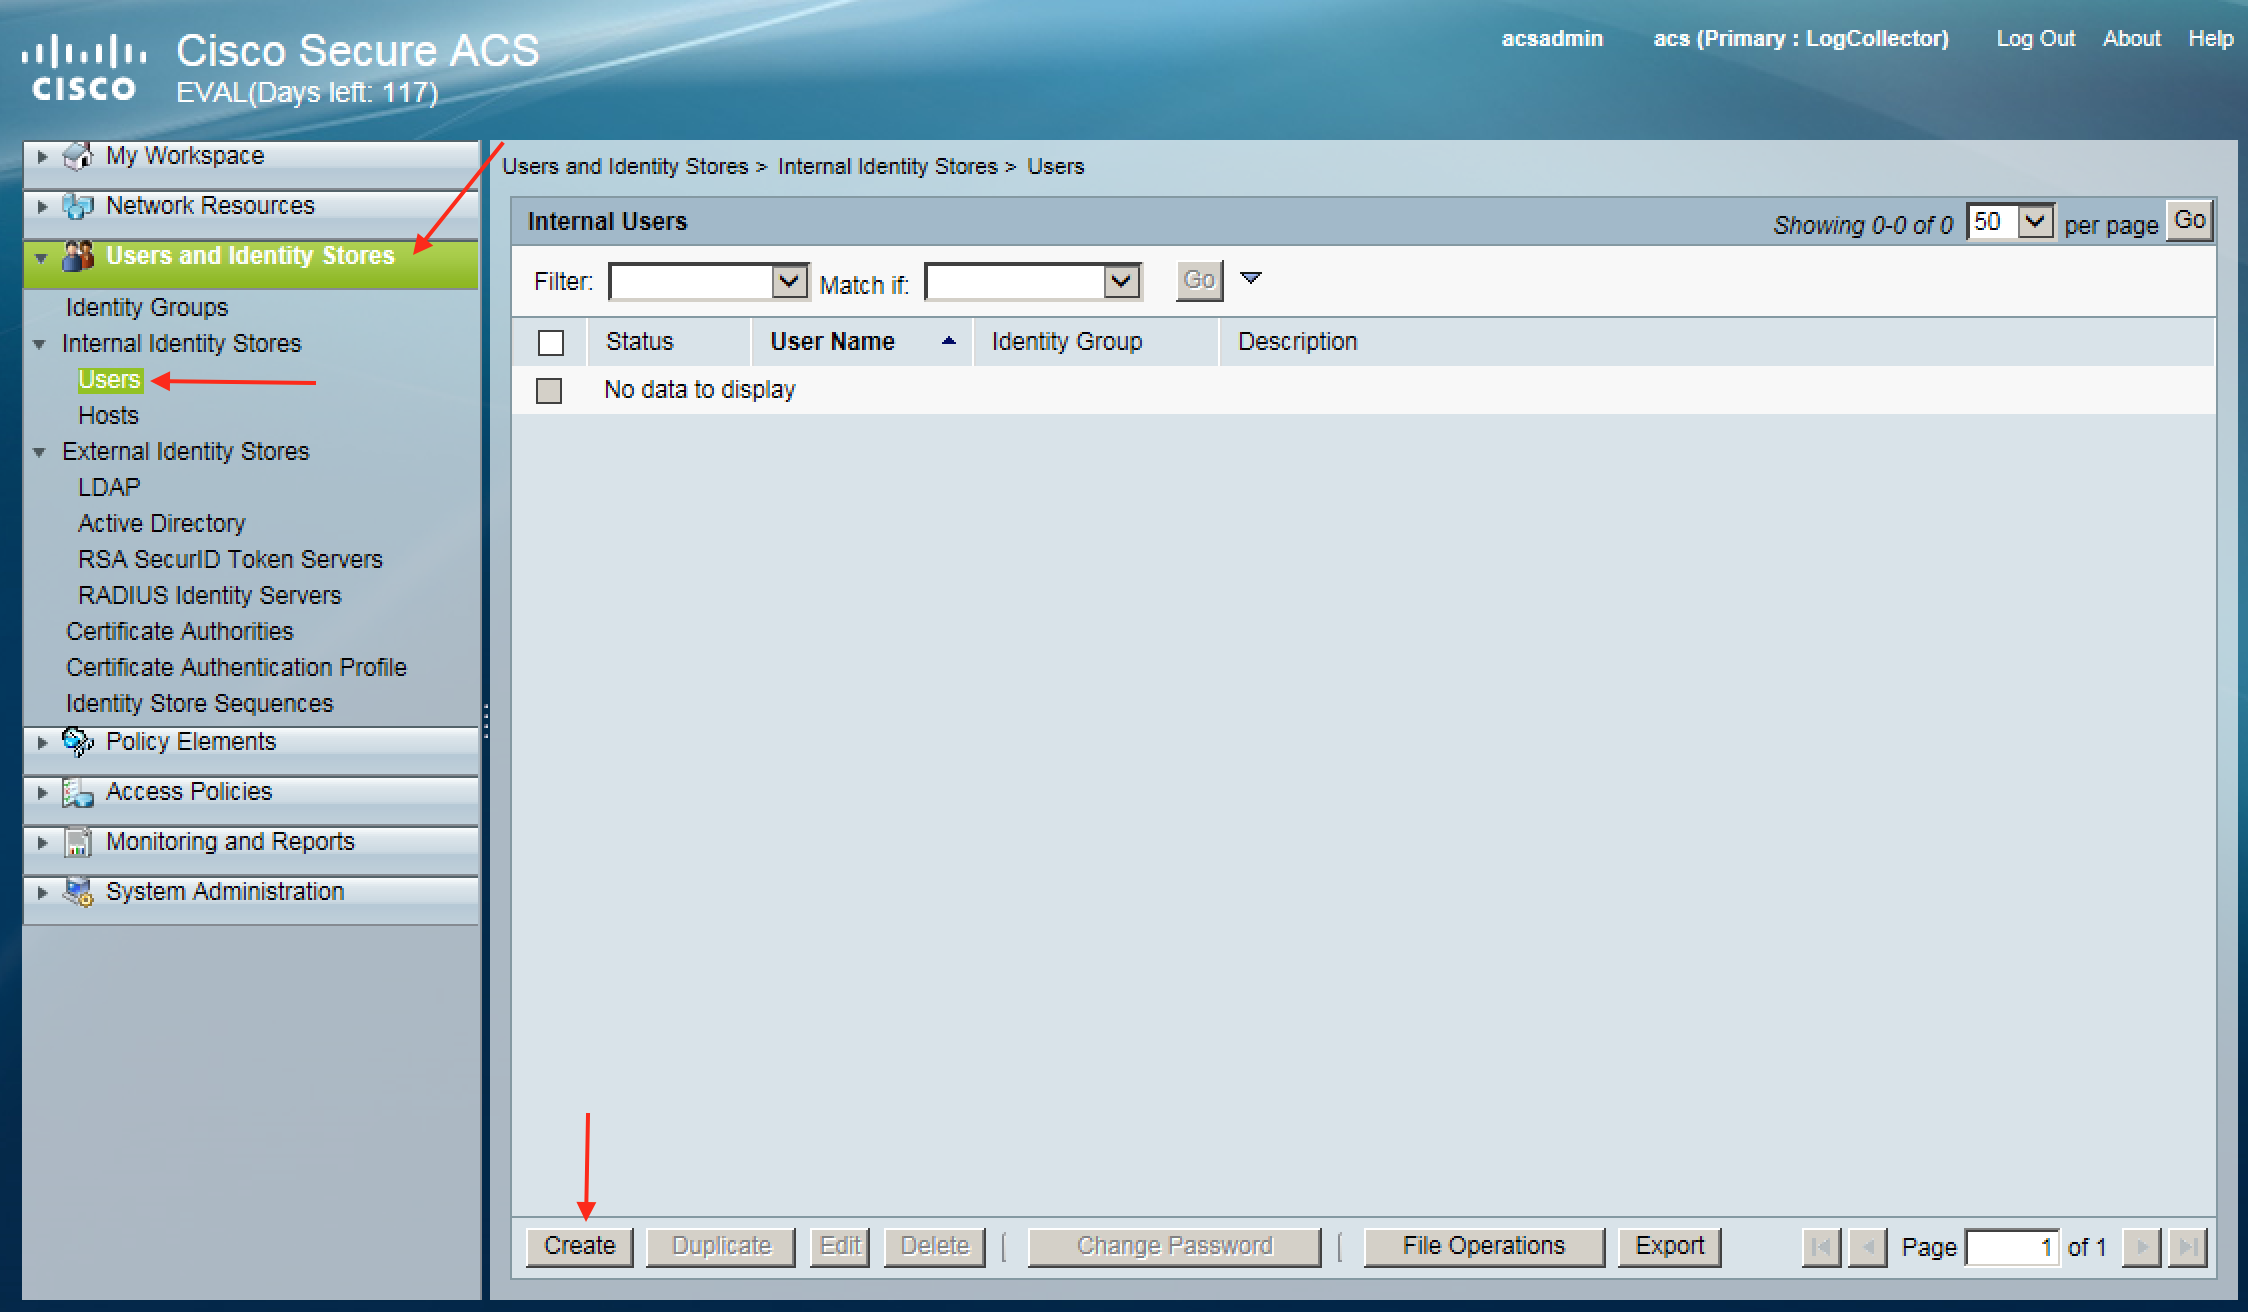
After submitting the changes the next step is to create a local user account to authenticate TACACS against. This user will be associated to the newly created Identity Group. Of course you can associate ACS to an external identity store, such as LDAP so that local users on ACS are not required, however for demo simplicity we will create a local ACS user. To create a local user account navigate to the following ACS web GUI path:
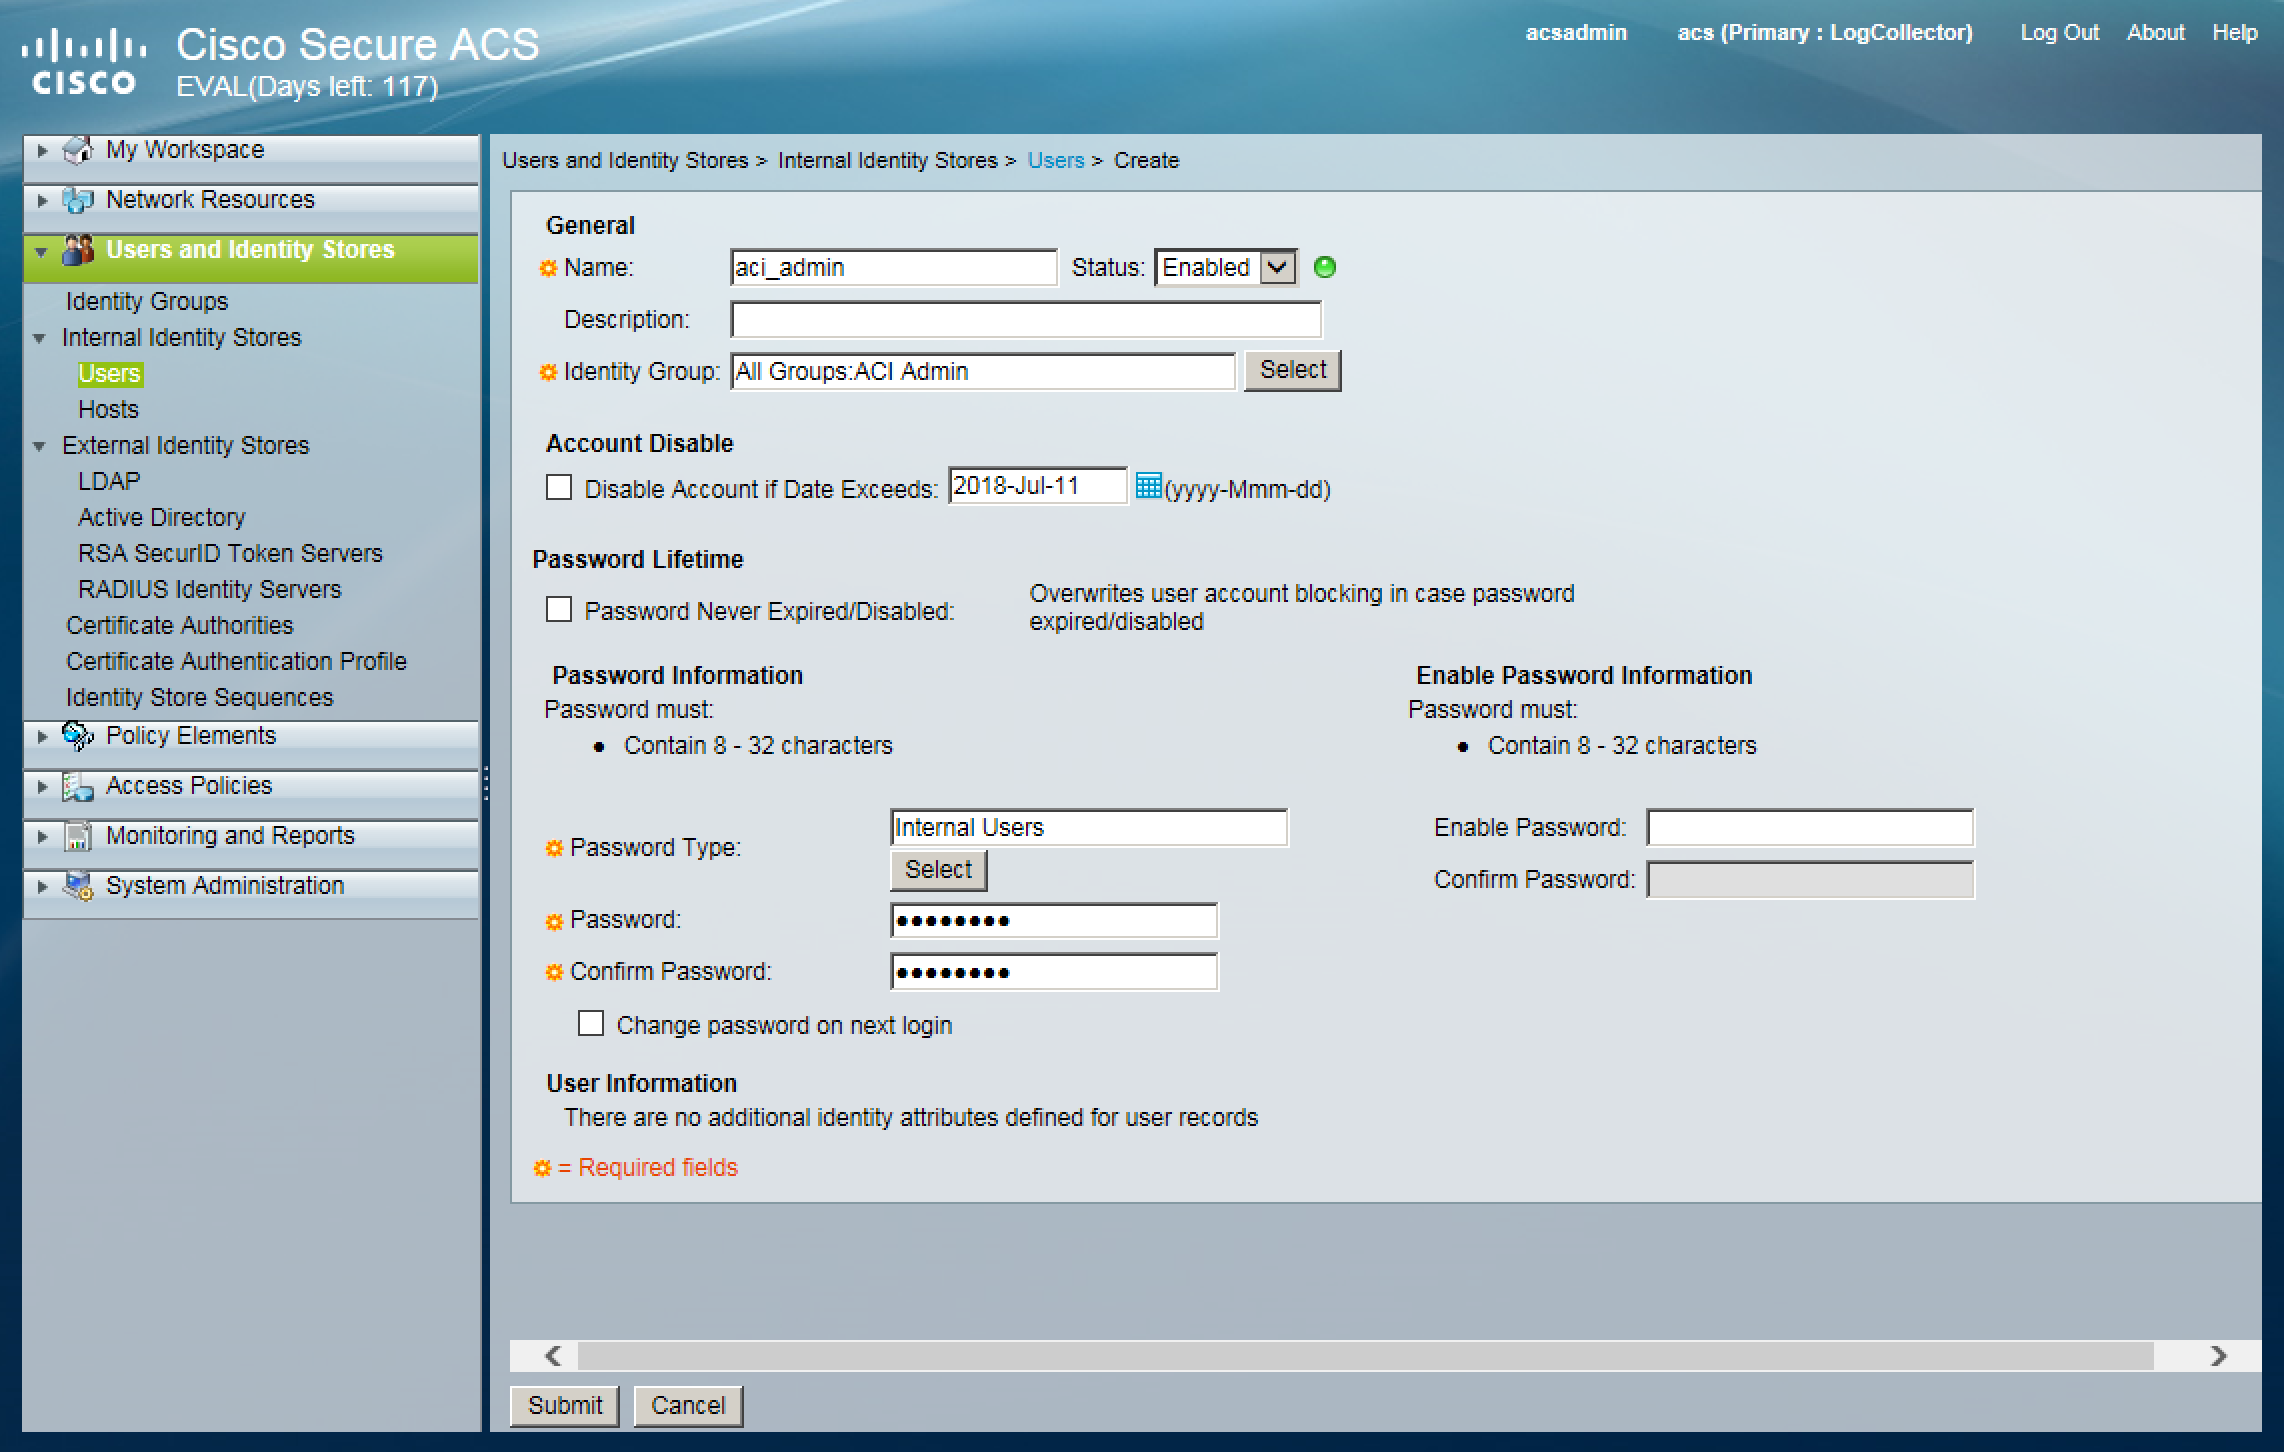
Users and Identity Stores -> Internal Identity Stores -> Users -> Create
From here we can go ahead and assign a username, password, and Identity Group to our user. For our purposes we will create two users, aci_admin and aci_readonly. Each will be assigned to their respective newly created Identity Group. Our configuration for the aci_admin user will look like such:
Repeat the process for any additional users you want to add.
The next step is to create the shell profile for our users. The shell profile consists of a value known as an AVPair which determines what access is give to ACI users such as full administrative privileges or read-only privileges. To create the shell profile navigate to the following ACS web GUI path:
Policy Elements -> Authorization and Permissions -> Device Administration -> Shell Profiles -> Create

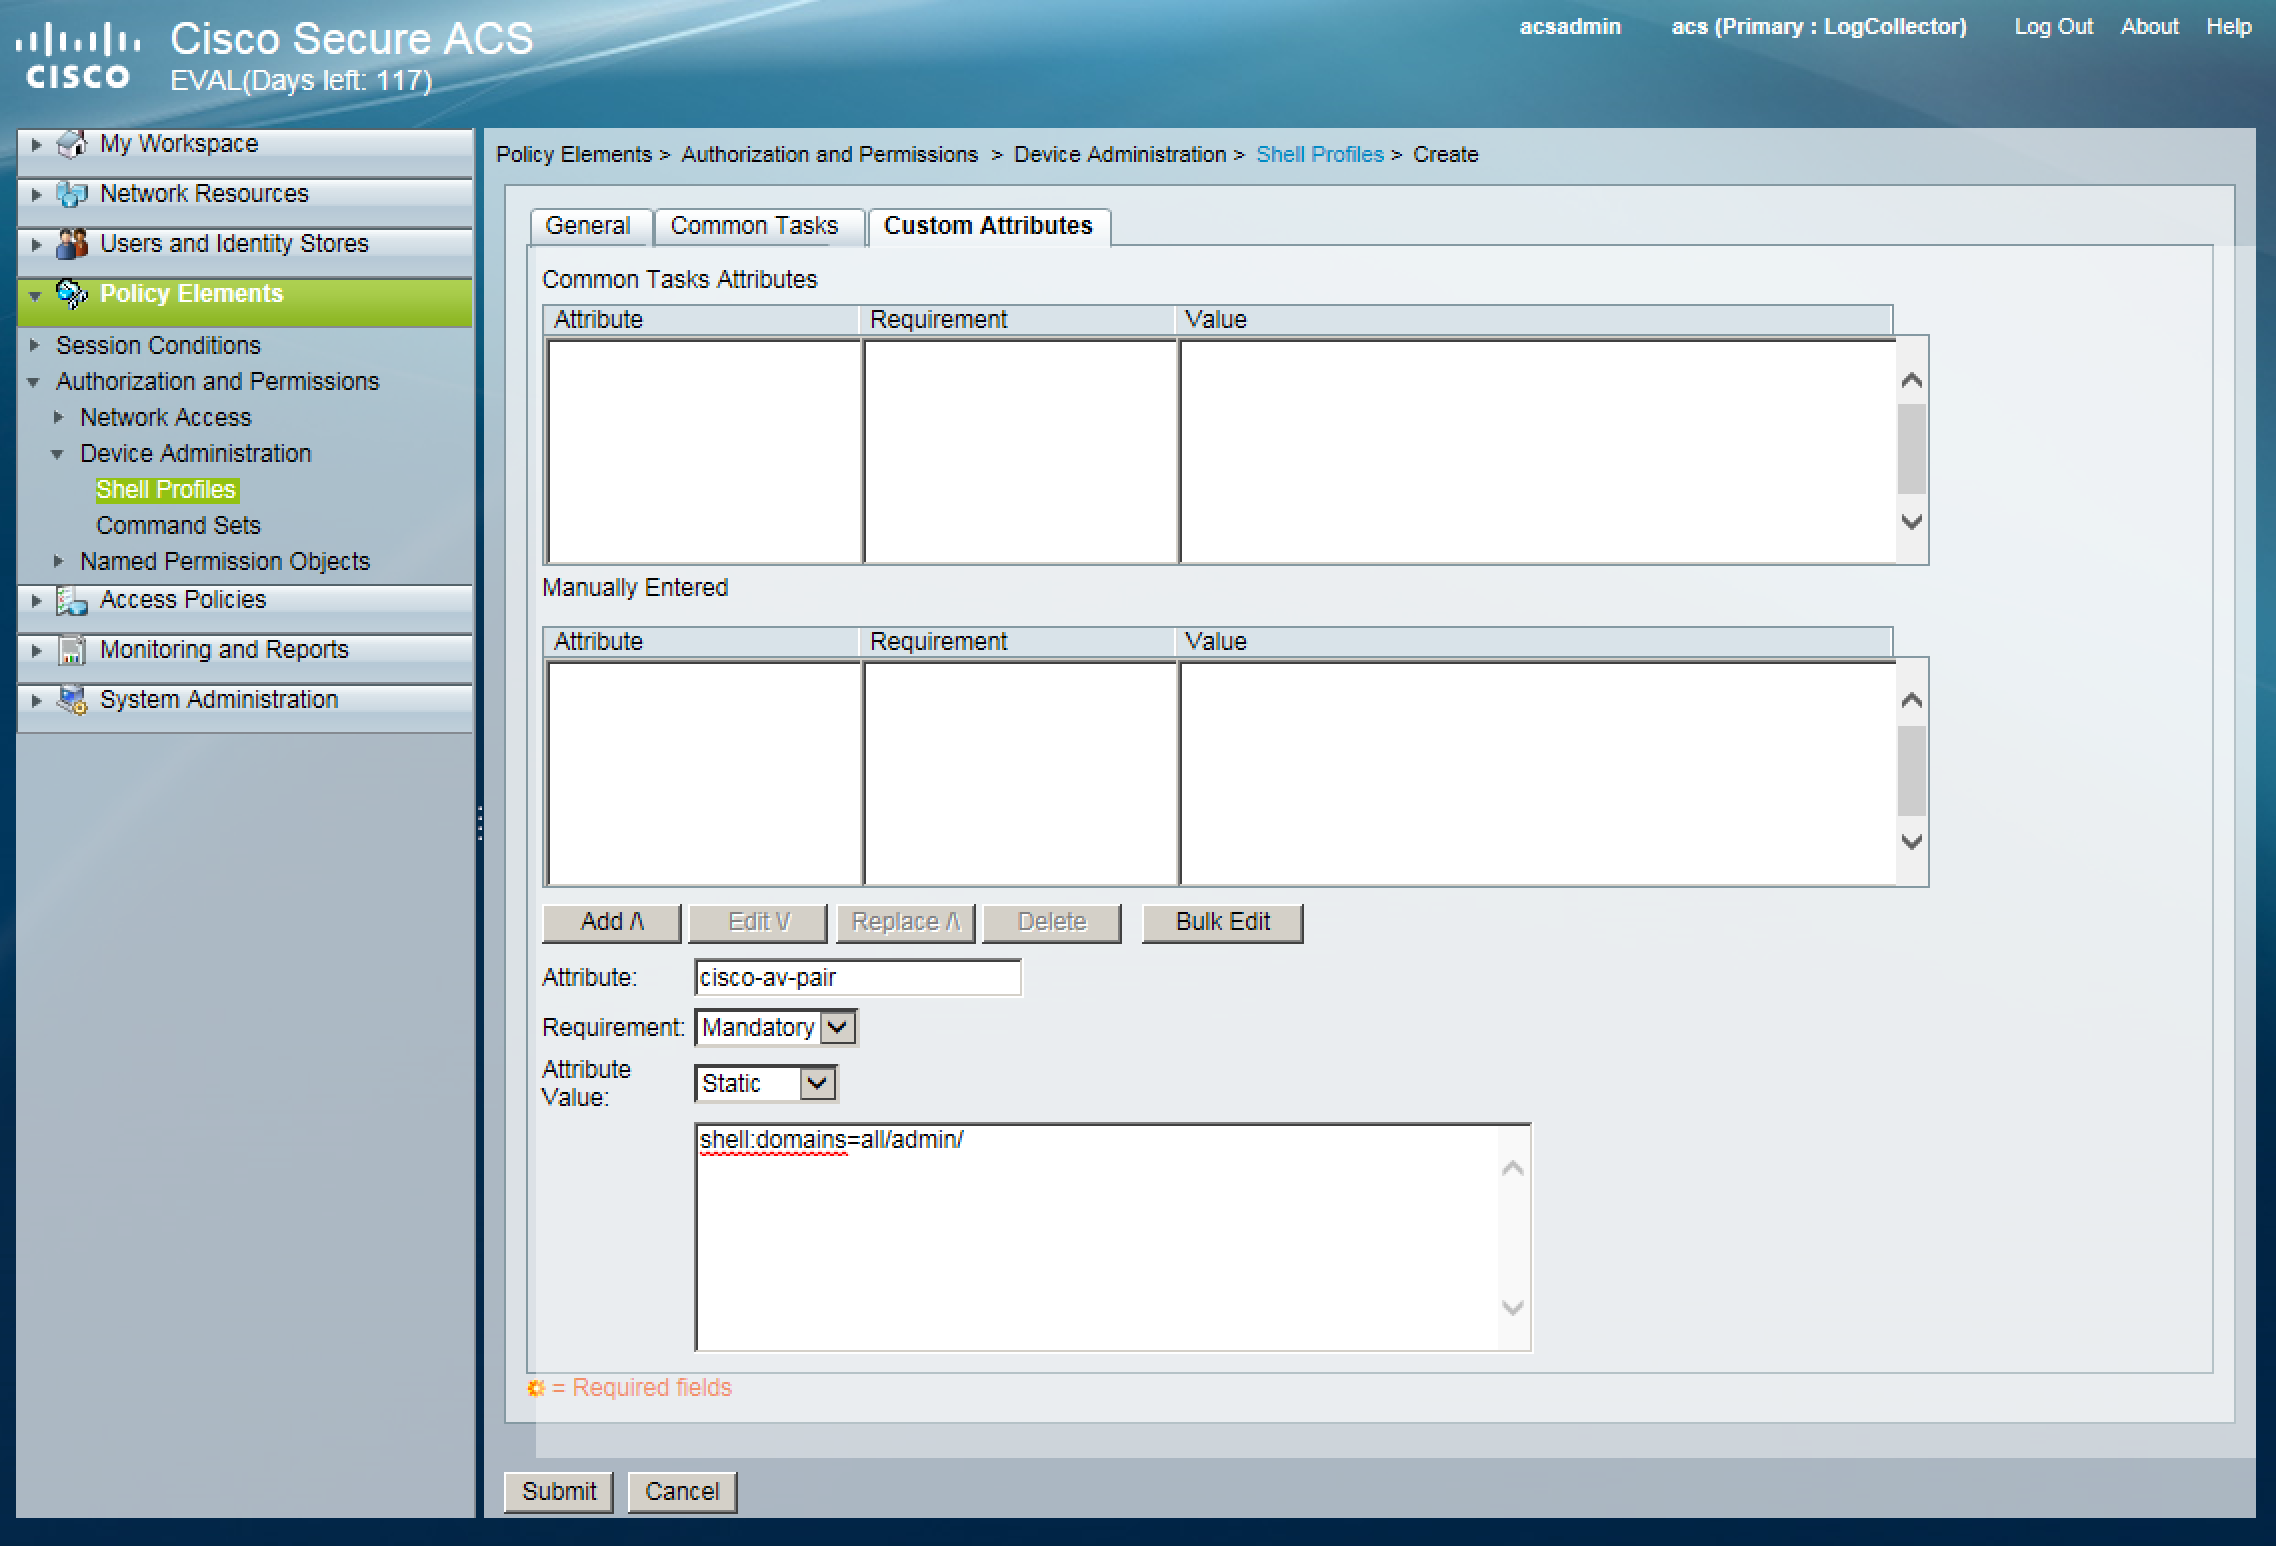
From here we can go ahead and assign a name to our shell profile. For our purposes we will create two different shell profiles, Read-Write-All and ReadOnly-All. Other than a Name, we also need to assign a Custom Attribute to each shell profile. This Custom Attribute will be what contains our AVPair. The only section of the Custom Attribute we care about is seen below in the screenshot with the red border:
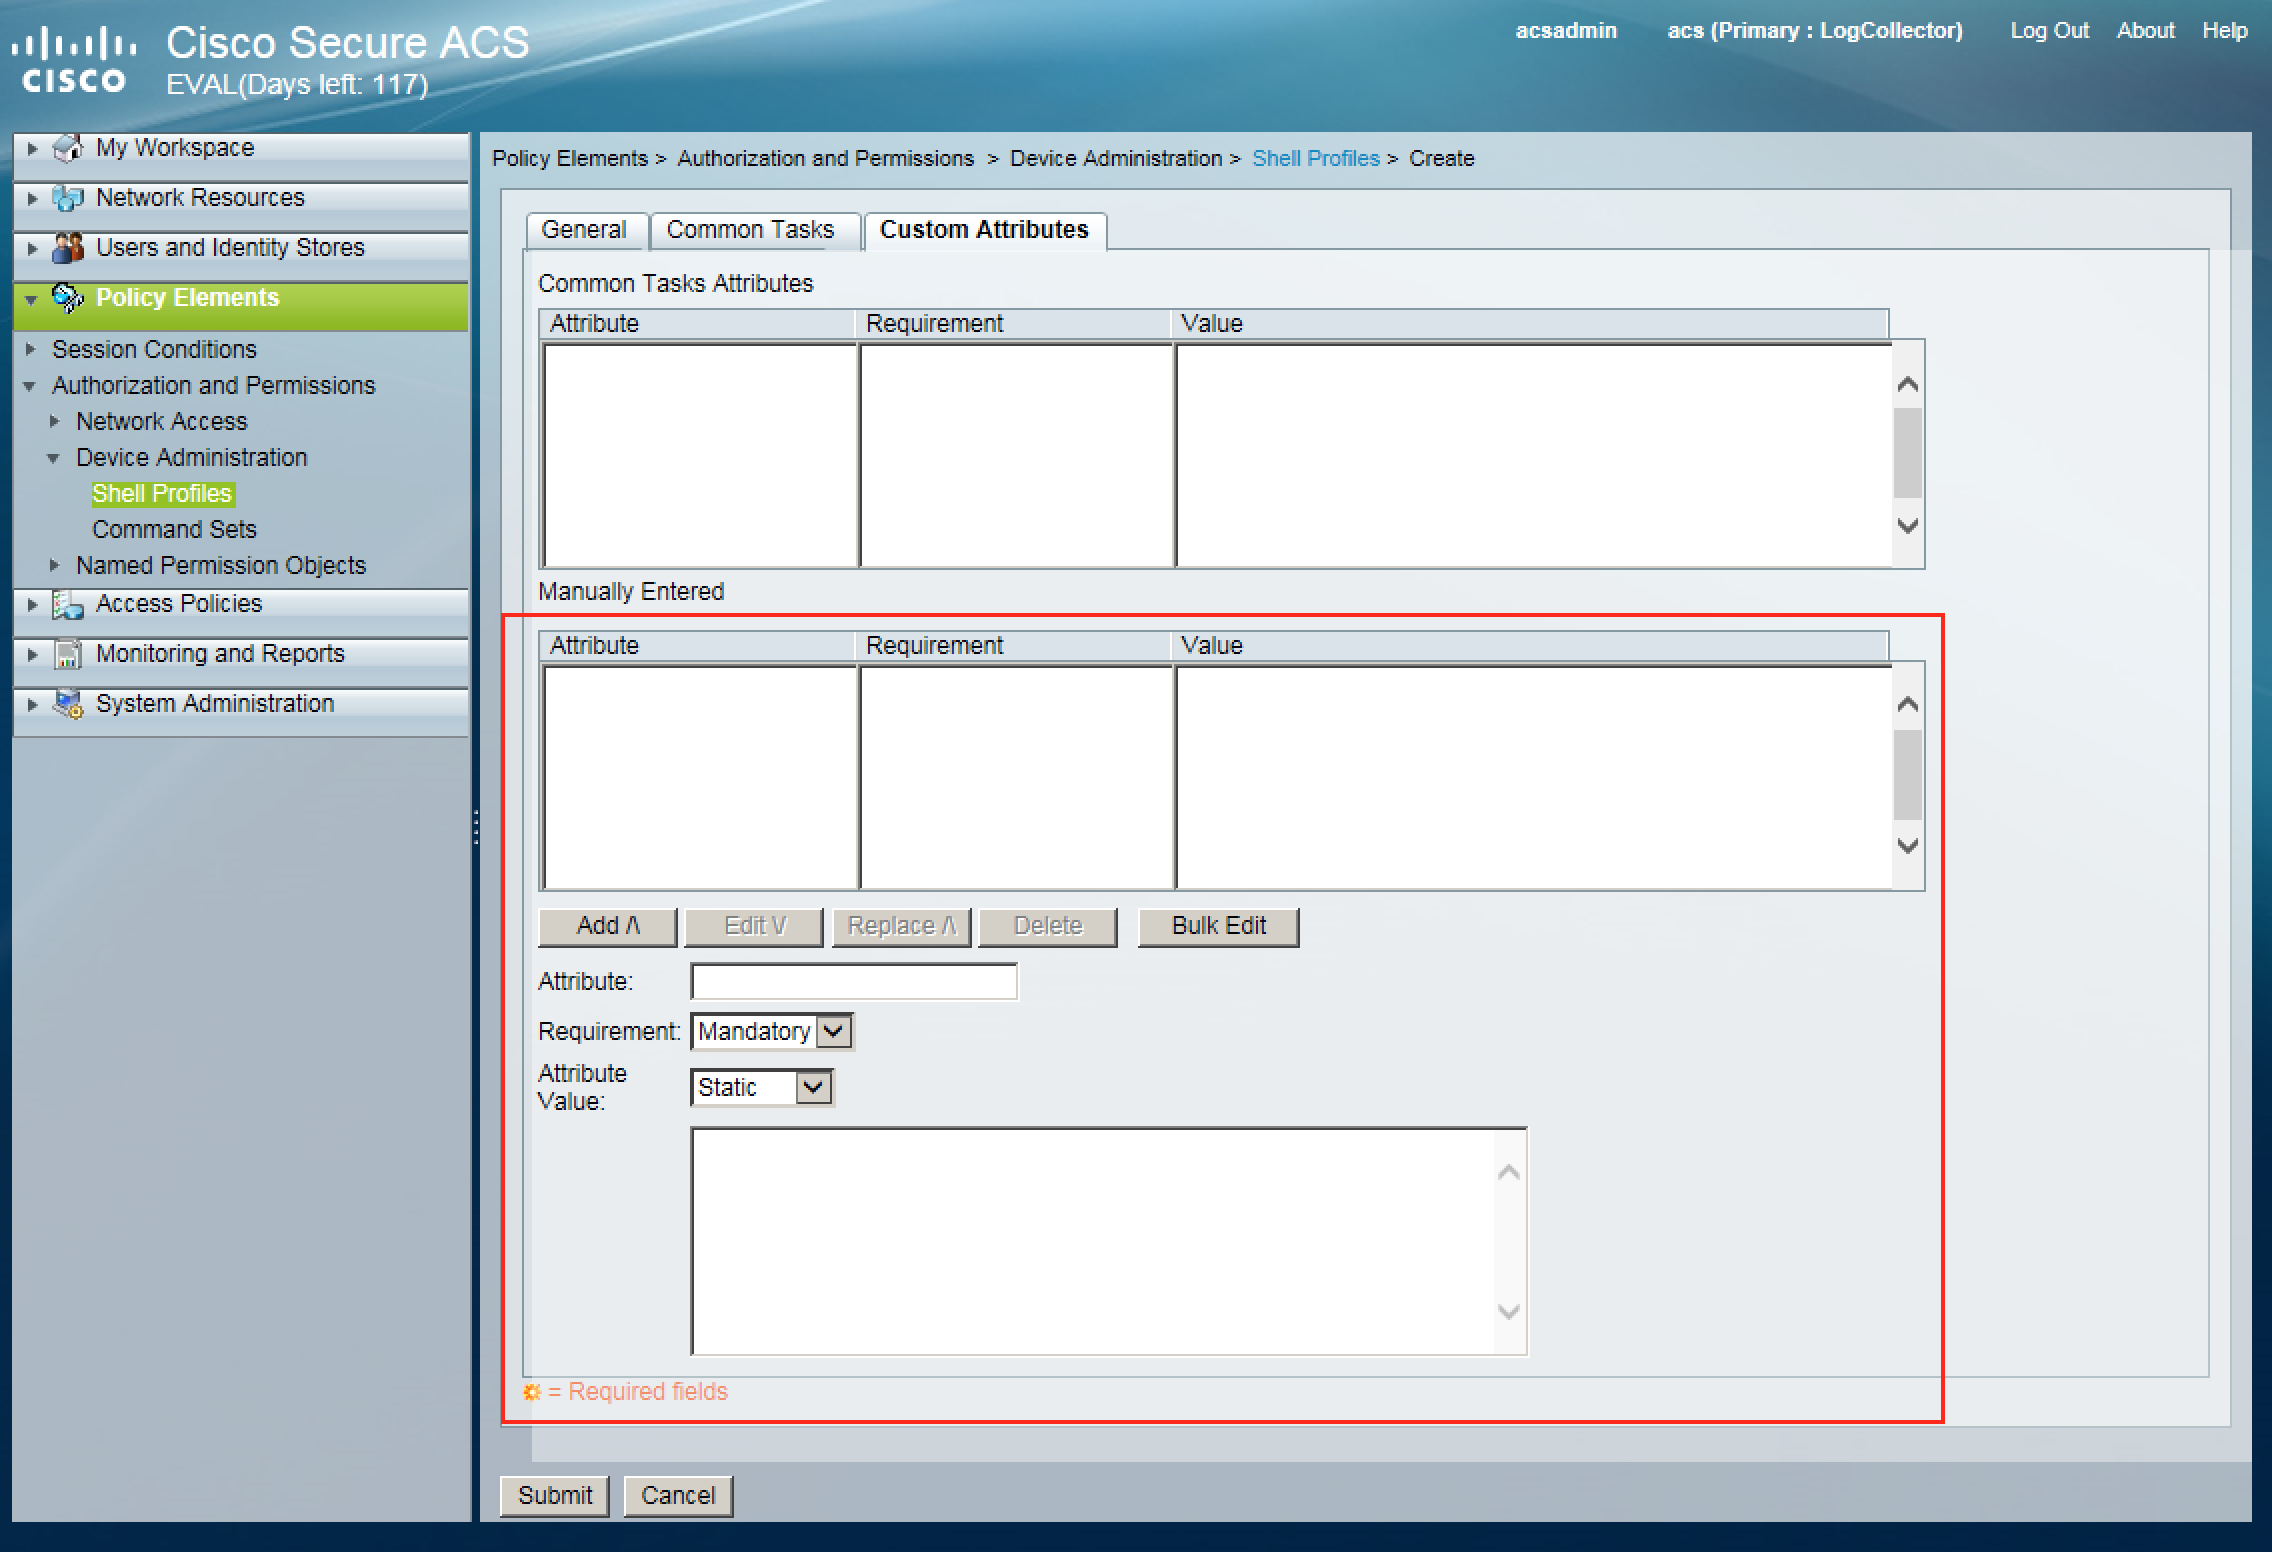
Right now we are creating our Read-Write-All shell profile, so we will want to assign an attribute which will allow read and write access to all of ACI. The custom attribute we need to assign has two important values, Attribute and Attribute Value. All Attributes need to have a value of cisco-av-pair. That value must not be different. The Attribute Value, known as the AVPair, is what actually determines user permissions. AVPairs have the below syntax’s depending if you want to assign read of write privileges:
Write Privileges: shell:domains=ACI_SECURITY_DOMAIN_HERE/ACI_USER_ROLE_HERE/
Read Privileges: shell:domains=ACI_SECURITY_DOMAIN_HERE//ACI_USER_ROLE_HERE
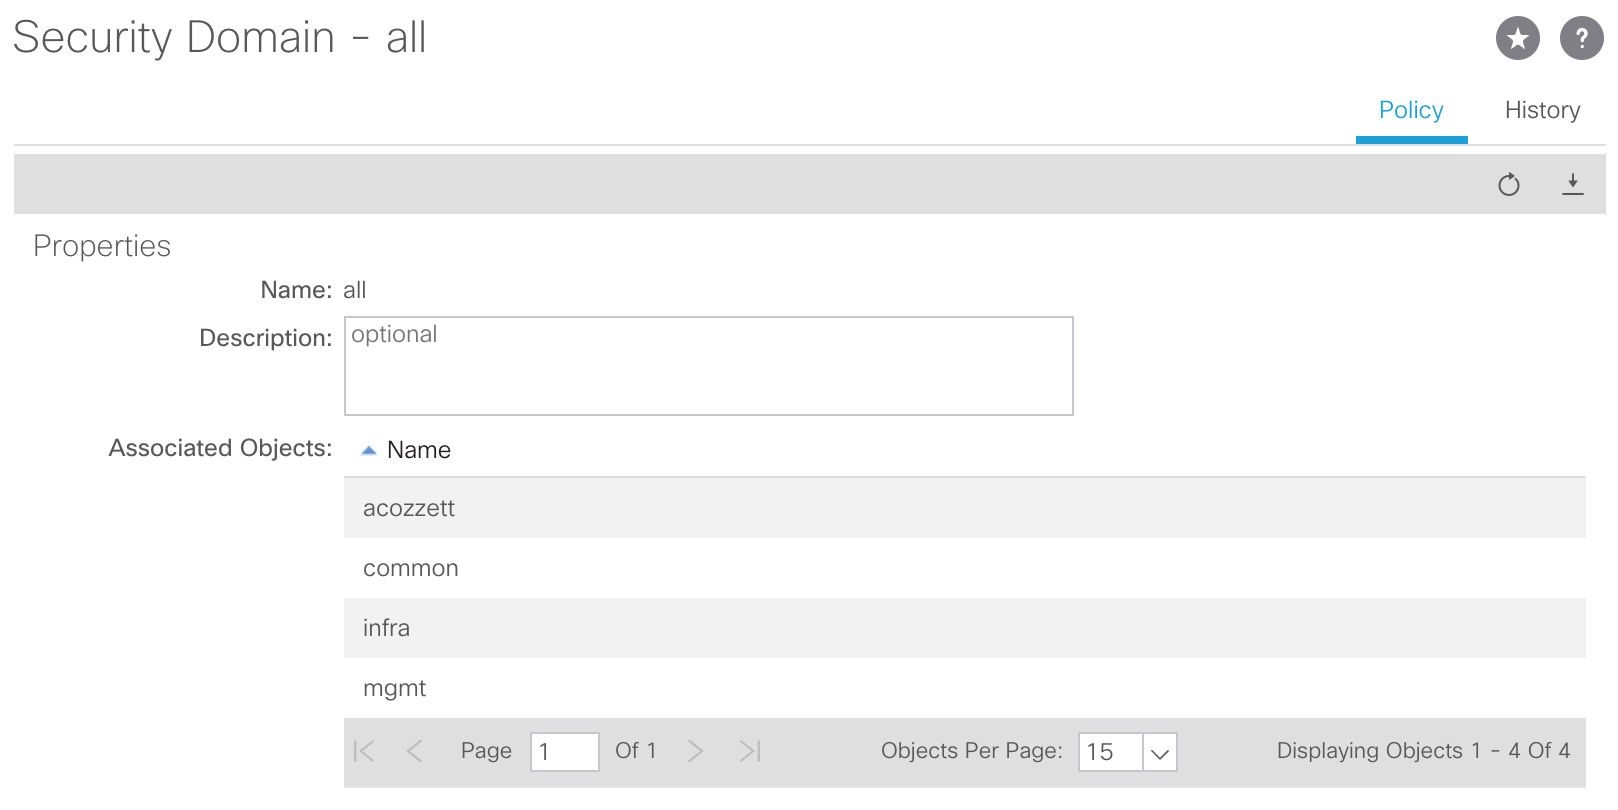
The ACI_SECURITY_DOMAIN_HERE value is that of the Security Domain local to ACI. ACI Security Domains are tied to specific objects such as tenants. All Security Domains and their associated objects can be located in the following APIC web GUI path:
Admin -> AAA -> Security Management -> Security Domains

From here you can select a specific security domain to see all the associated objects. Below is a screenshot of the all security domain which is tied to the default common, infra, mgmt, and my custom acozzett tenants:
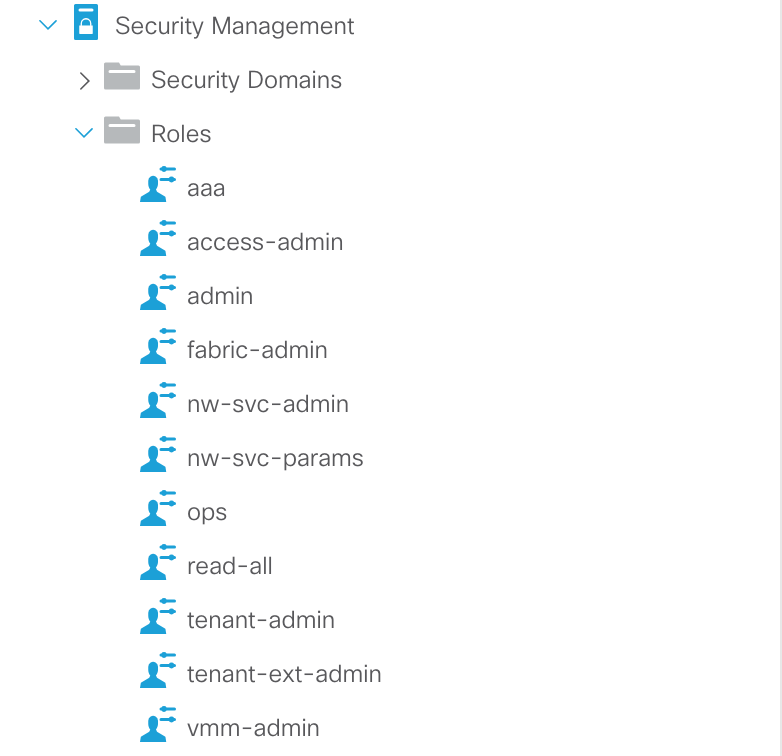
The ACI_USER_ROLE_HERE value is that of a role on ACI. Ultimately the role determines the privileges given to a security domain. All ACI roles can be found at the following ACI web GUI path:
Admin -> AAA -> Security Management -> Roles
For more information on ACI Security Domains and Roles visit here:
For our Read-Write-All shell profile we want to assign admin privileges to all objects. To do this we will use the following AVPair:
shell:domains=all/admin/
all refers to the all ACI Security Domain, and admin refers to the admin role in ACI.
Our shell profile configuration for Read-Write-All will look like such:
Make sure to click Add and Submit for the changes to be applied.
For our aci_readonly shell profile we will use AVPair shell:domains=all//read-all
Our shell profile configuration for ReadOnly-All will look like such:

This will give read only access to any objects in the all ACI Security Domain using the read-all role.
For more information on AVPair syntax and including users in more than one domain visit here.
Note: You will see a lot of ACI TACACS and RADIUS documentation with a UNIX ID defined in the AVPair, such as:
shell:domains=all/read-all(16001)
You do NOT want to define the UNIX ID. Doing so can cause permission issues and usernames to be mismatched. A UNIX ID will be dynamically assigned by ACI and verified that a UNIX ID is not already in use by another user.
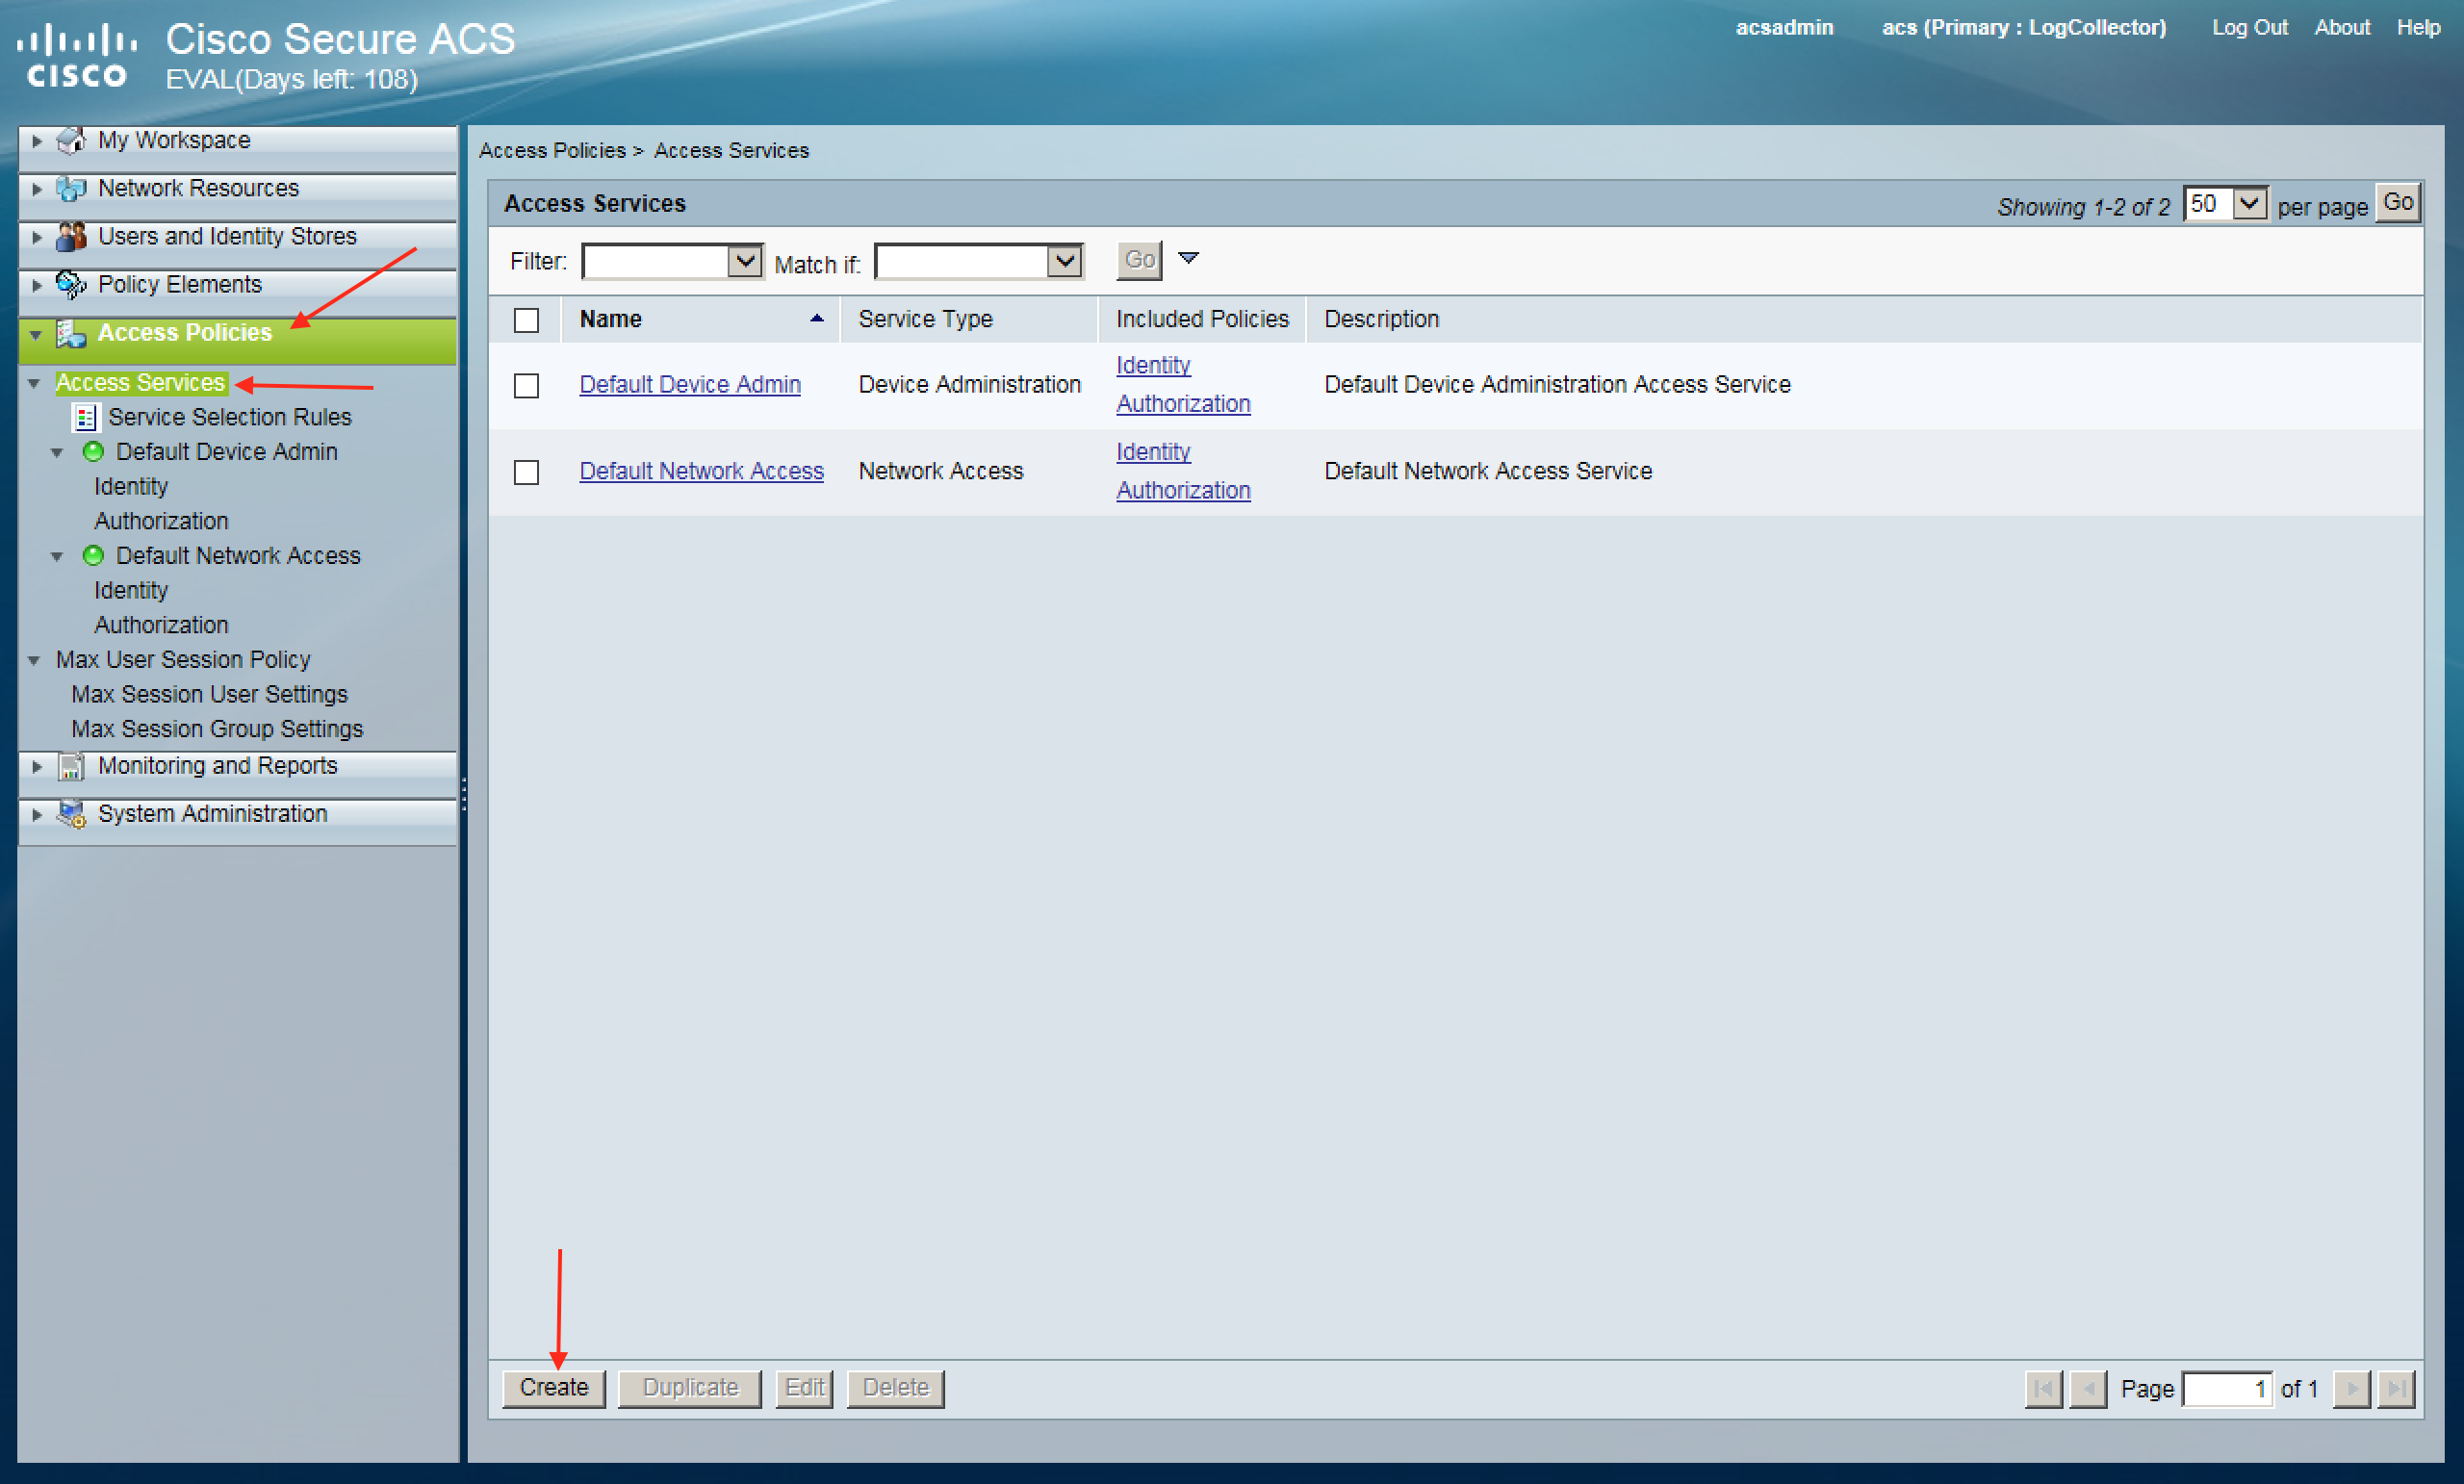
The final step in the ACS configuration is to create the Device Administration Authorization Policy to tie together all the ACS policies we previously created. The first step in tying all our policies together is to create the Access Service. To create the Access Service navigate to the following ACS web GUI path:
Access Policies -> Access Services -> Create
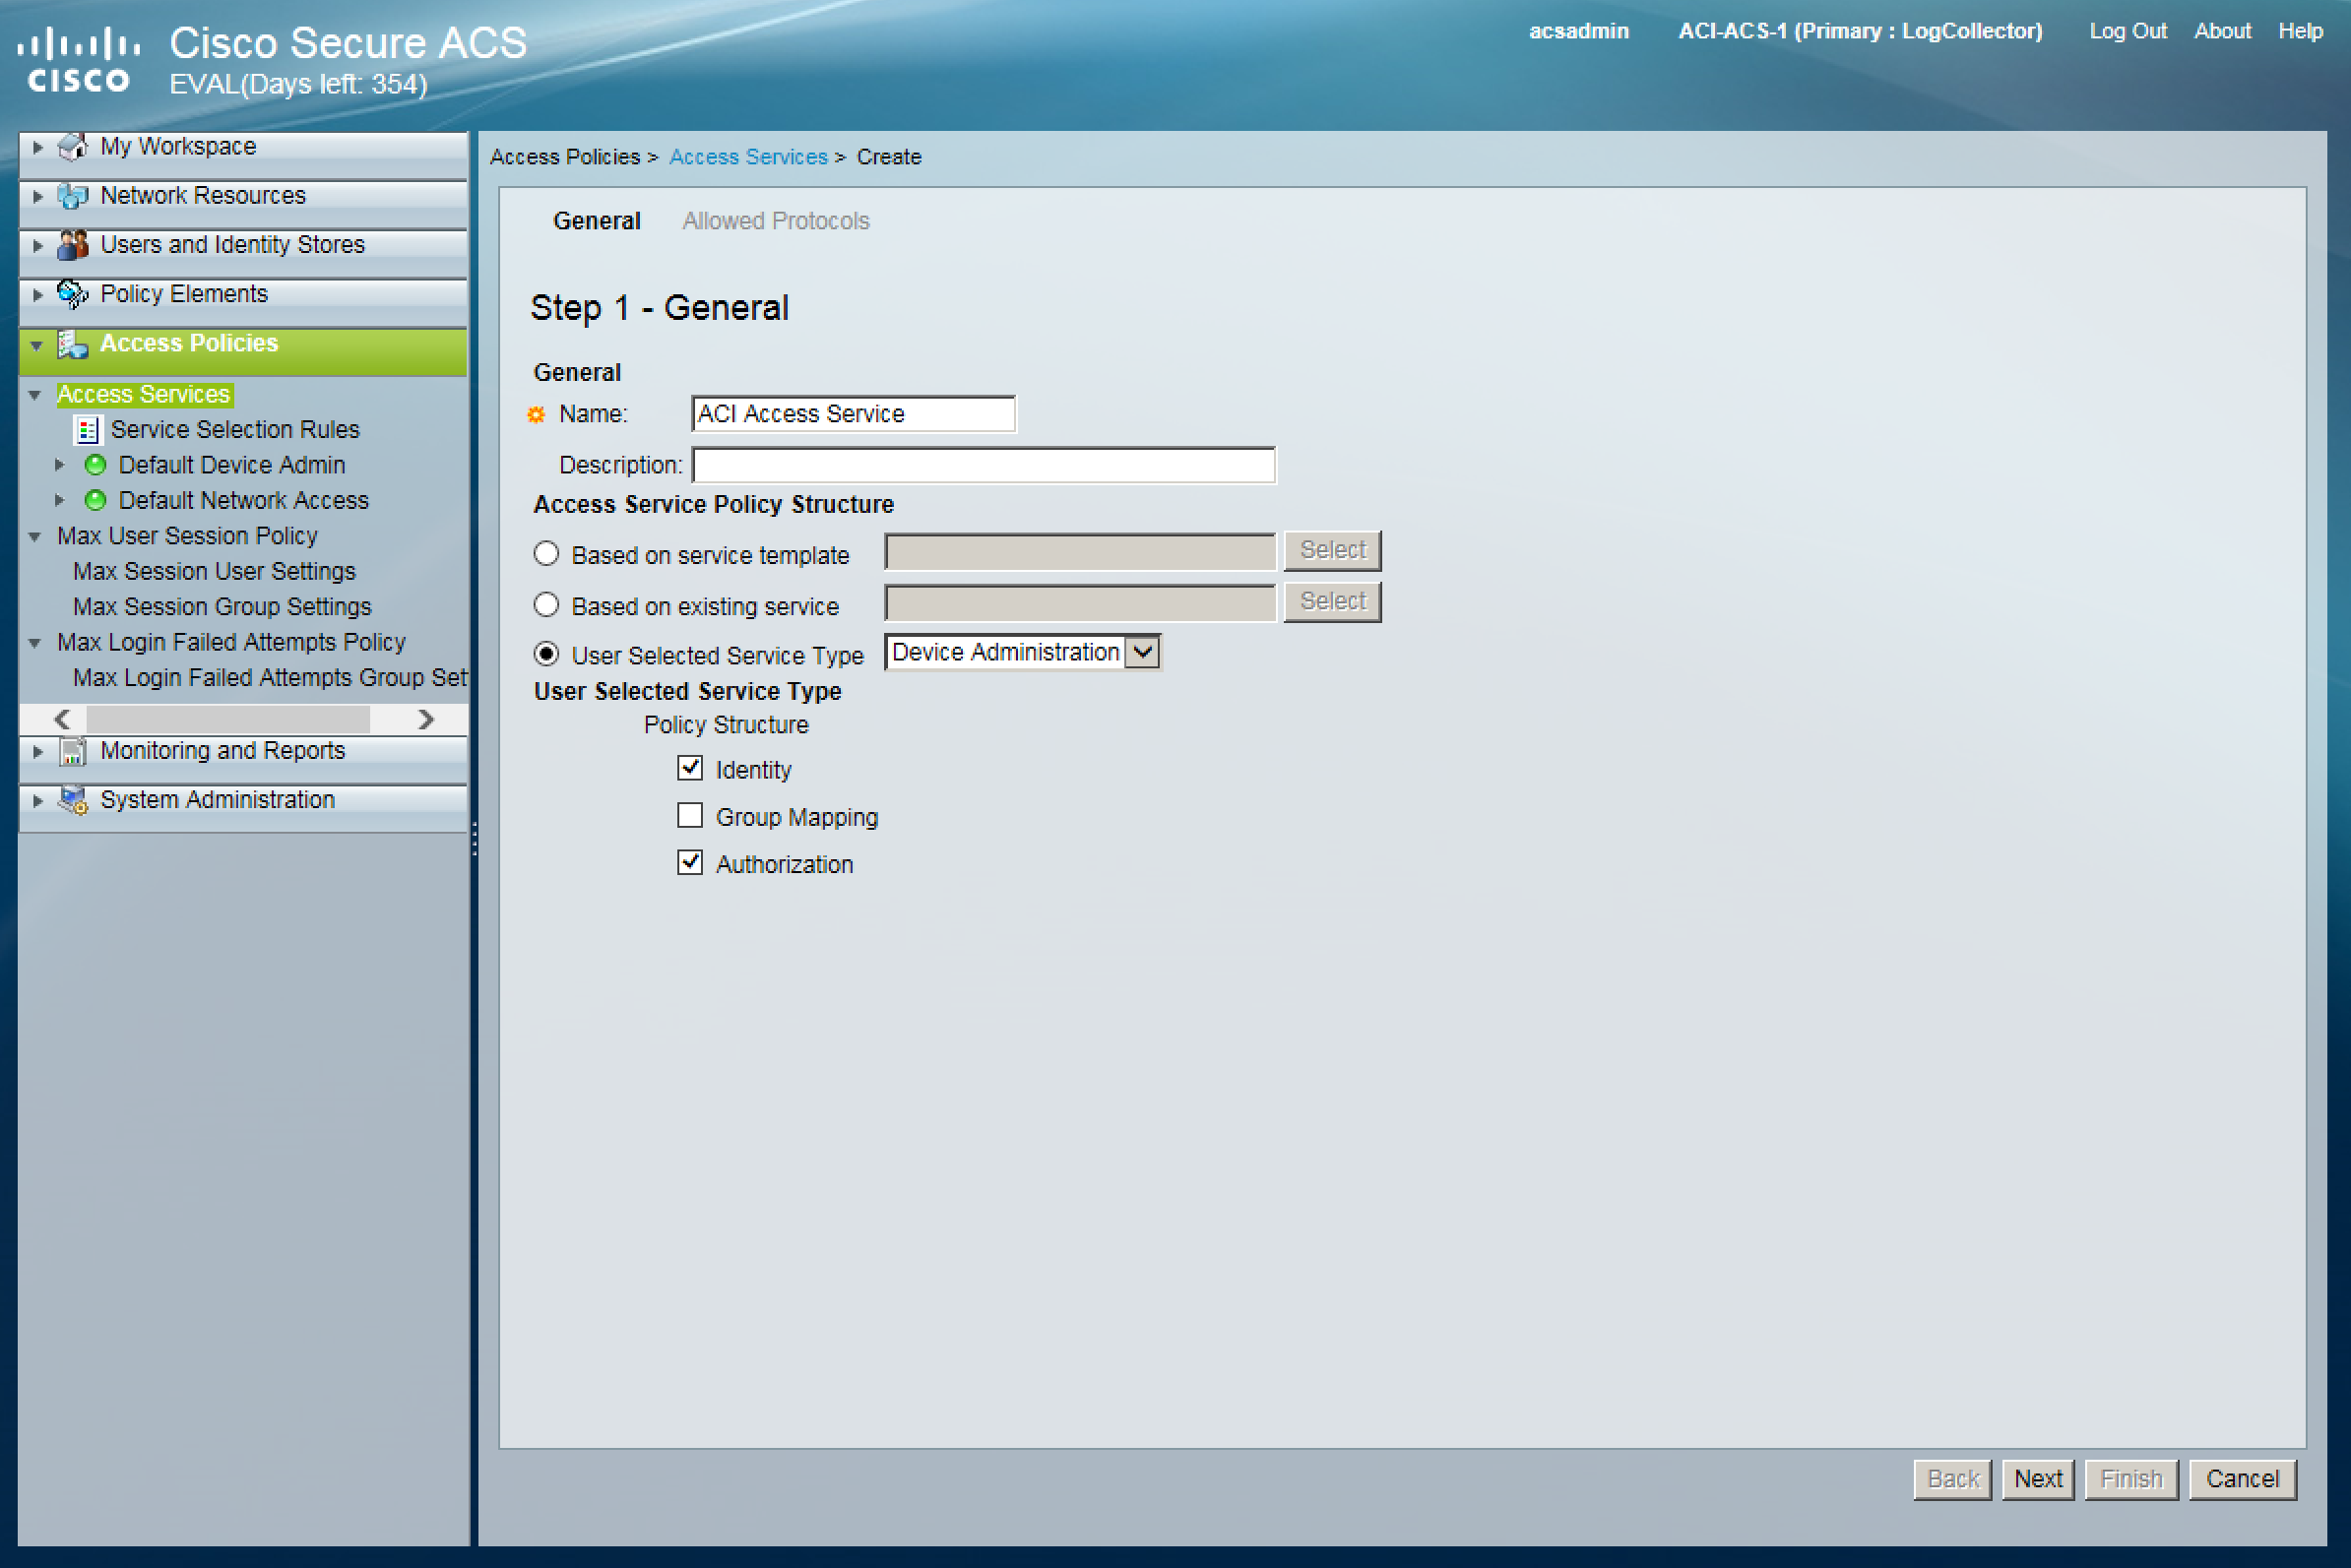
For our purposes we will call our Access Service ACI Access Service and select User Selected Service Type and set it to Device Administration:
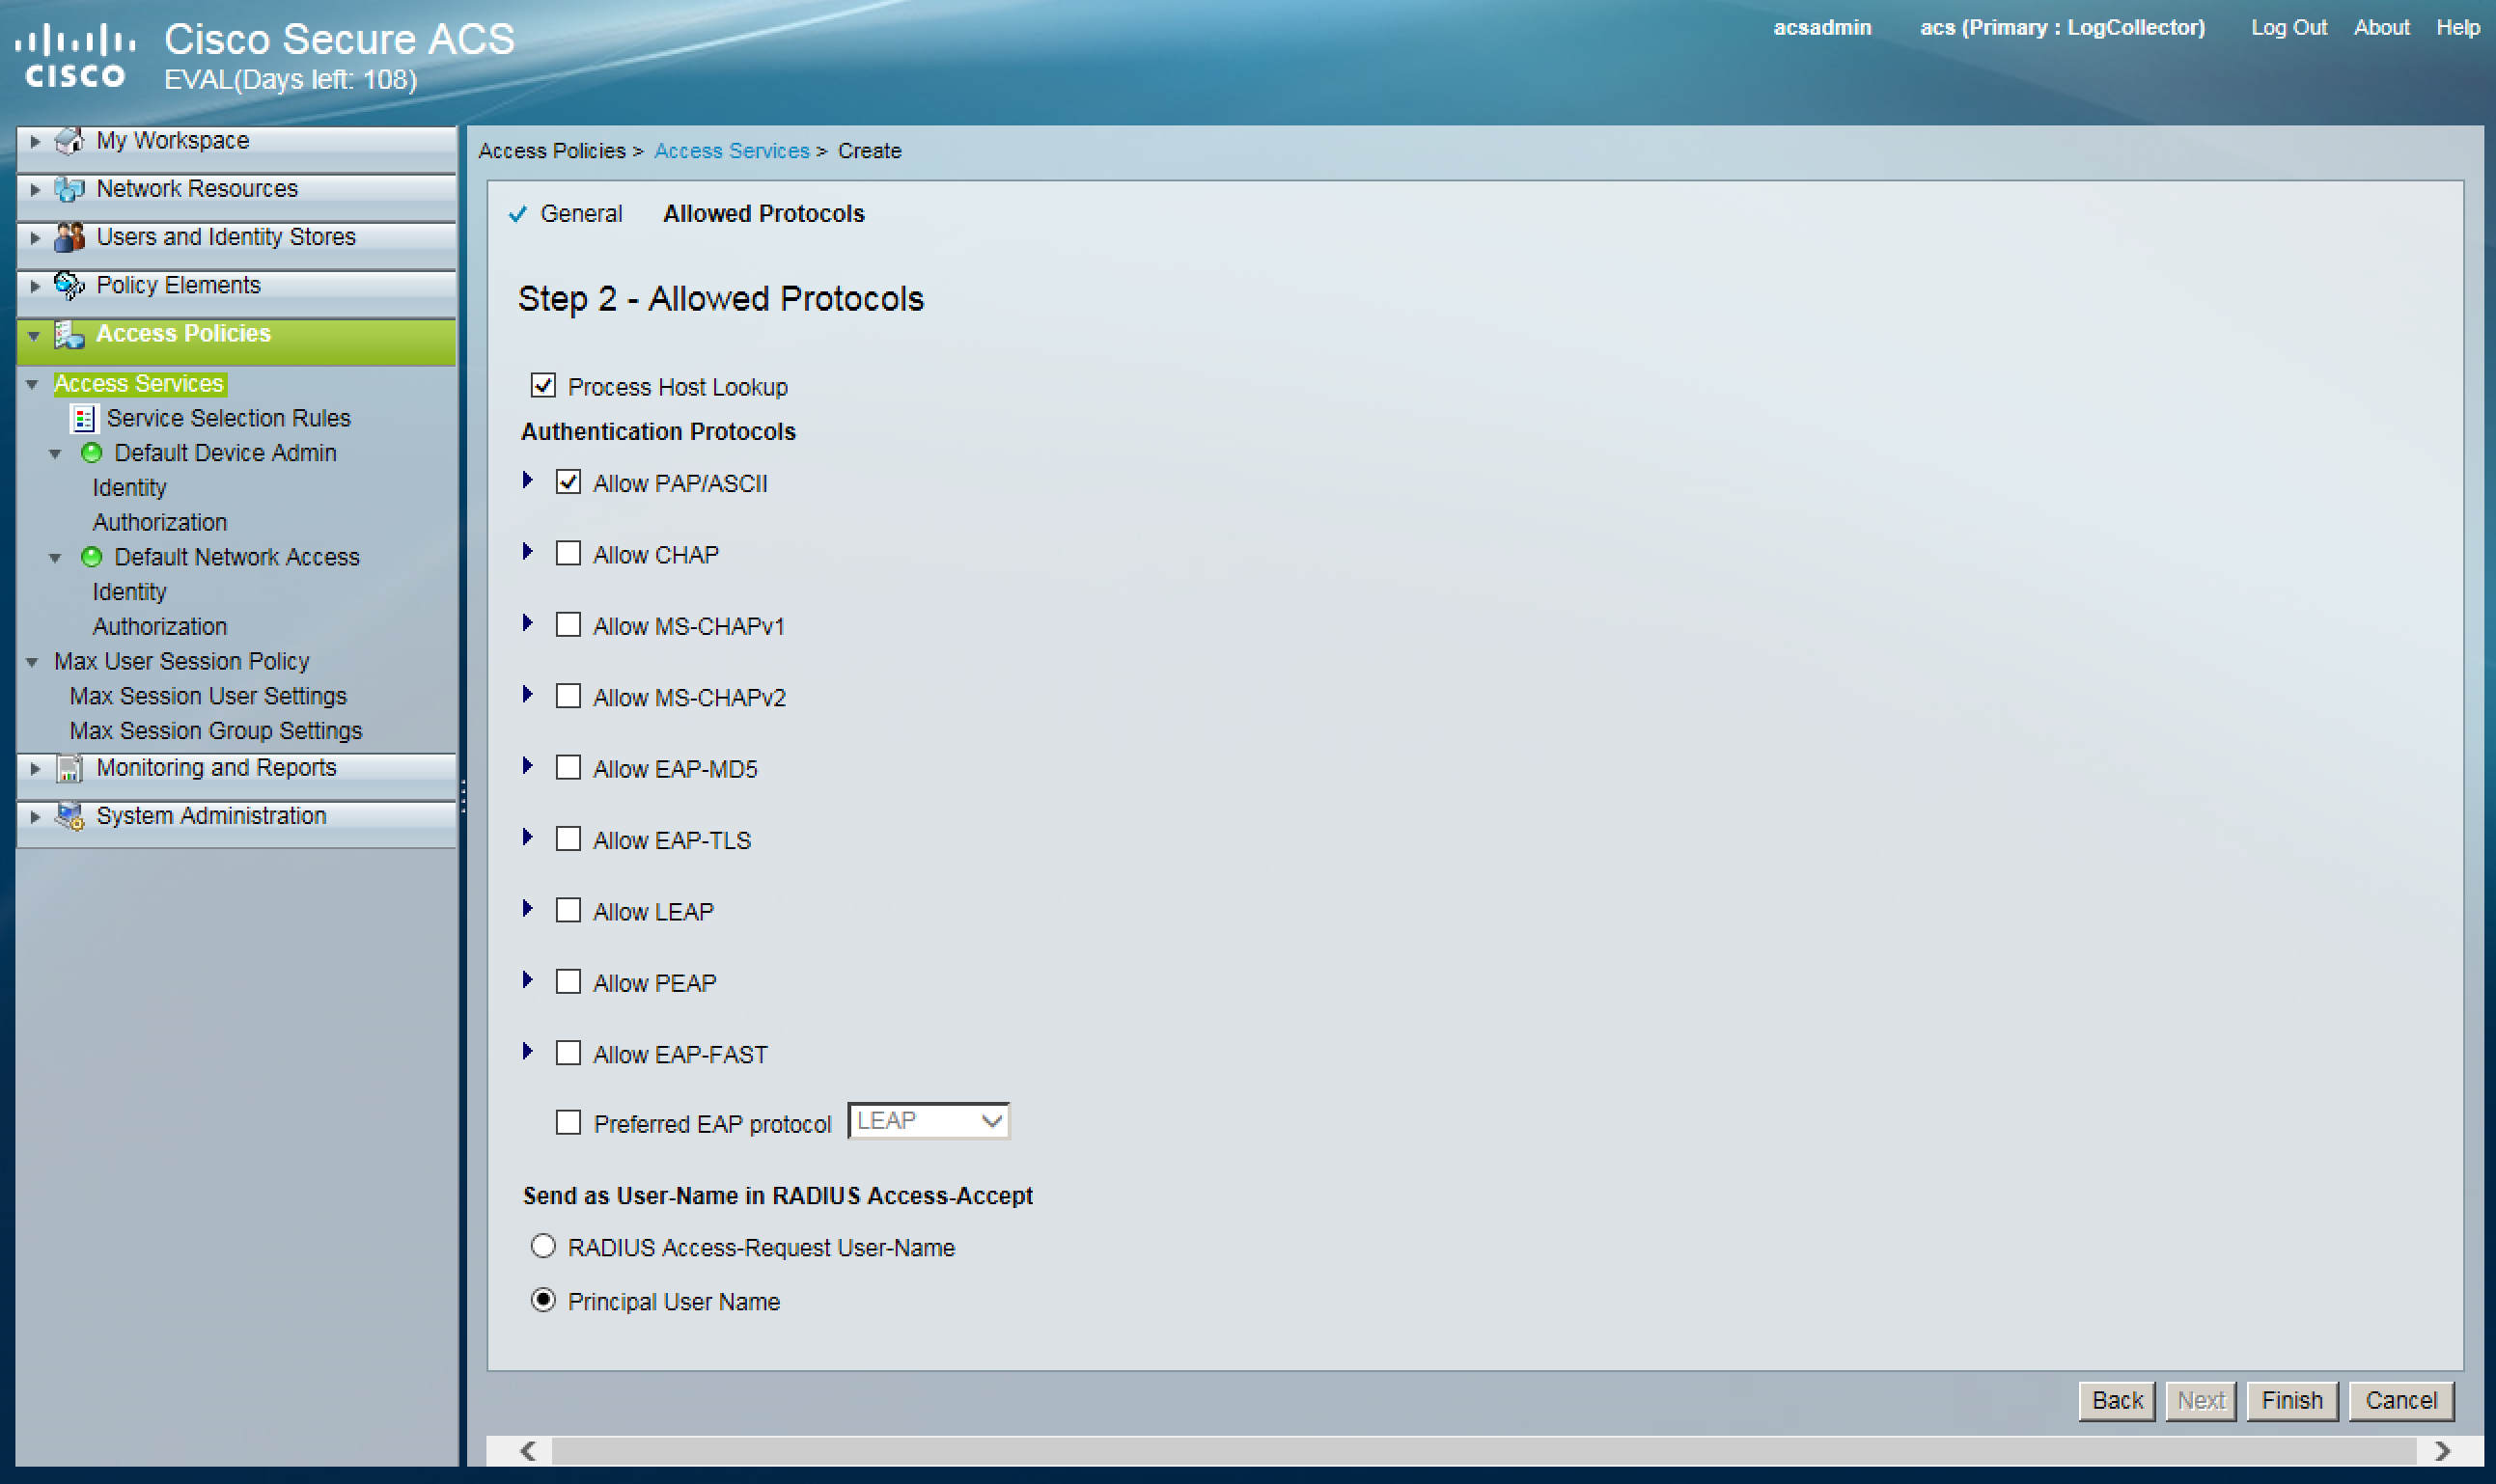
Next we need to select the Allowed Protocols. In our prior ACI configuration we selected to use PAP authentication, so we will select that here. You will want to choose the same Access Service Authentication Protocol as you did earlier in the ACI TACACS Provider Configuration. Our Allowed Protocols configuration will look like such:
After clicking Finish you will be prompted to modify the Service Selection policy:

You will want to select Yes. After selecting Yes you will need to actually create the Service Selection Rule. You should be automatically redirected to the area in the GUI where the Service Selection Rule is created, however if not, below is the ACS web GUI path to create the Service Selection Rule:
Access Policies -> Access Services -> Service Selection Rules -> Create
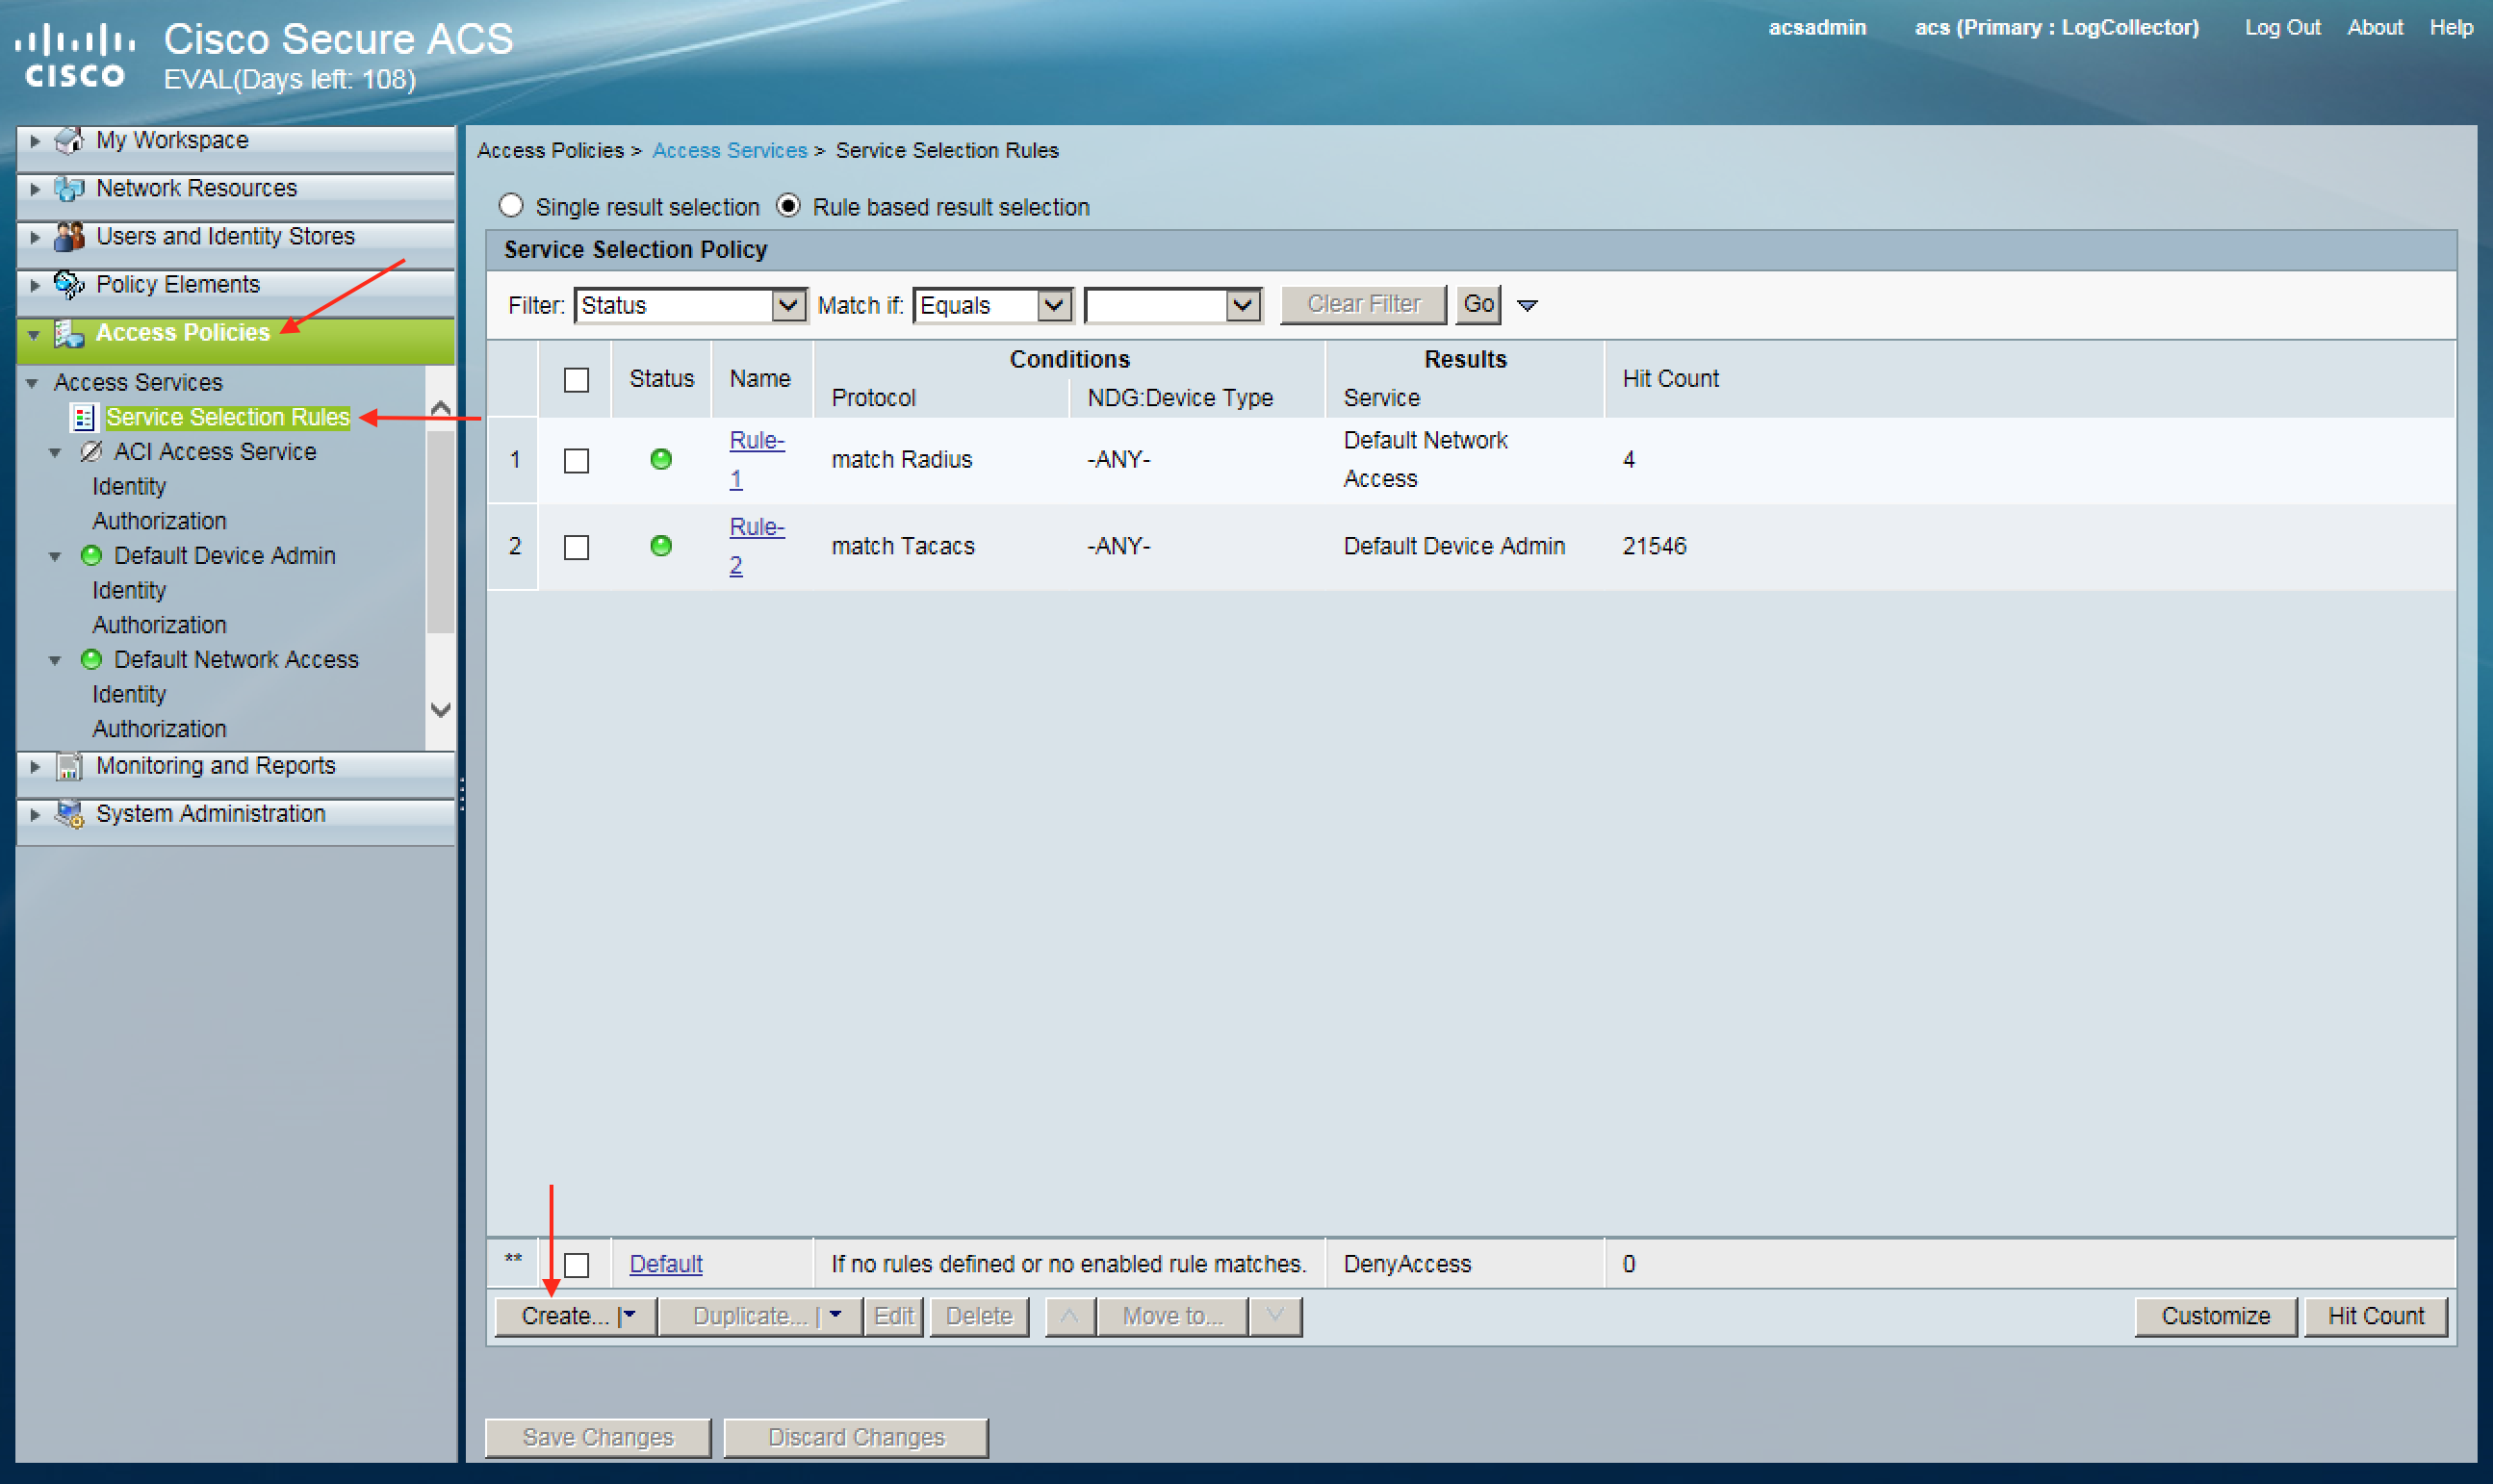
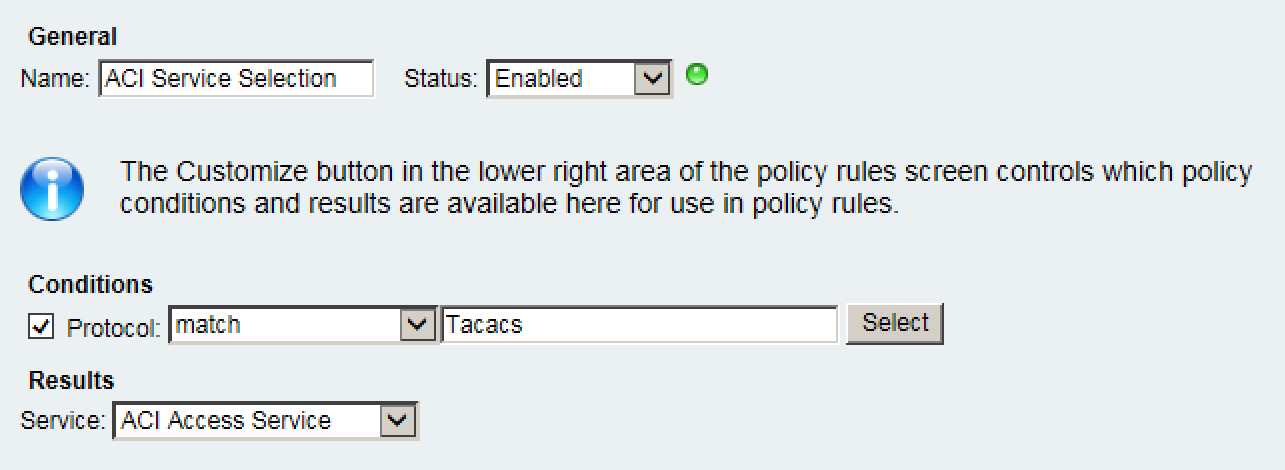
For our purposes we will call our Service Selection Rule ACI Service Selection. From here we will want to set the status to Enabled, the Protocol to Tacacs and set the Service to our recently created Access Service ACI Access Service. Our configuration will look like the following:
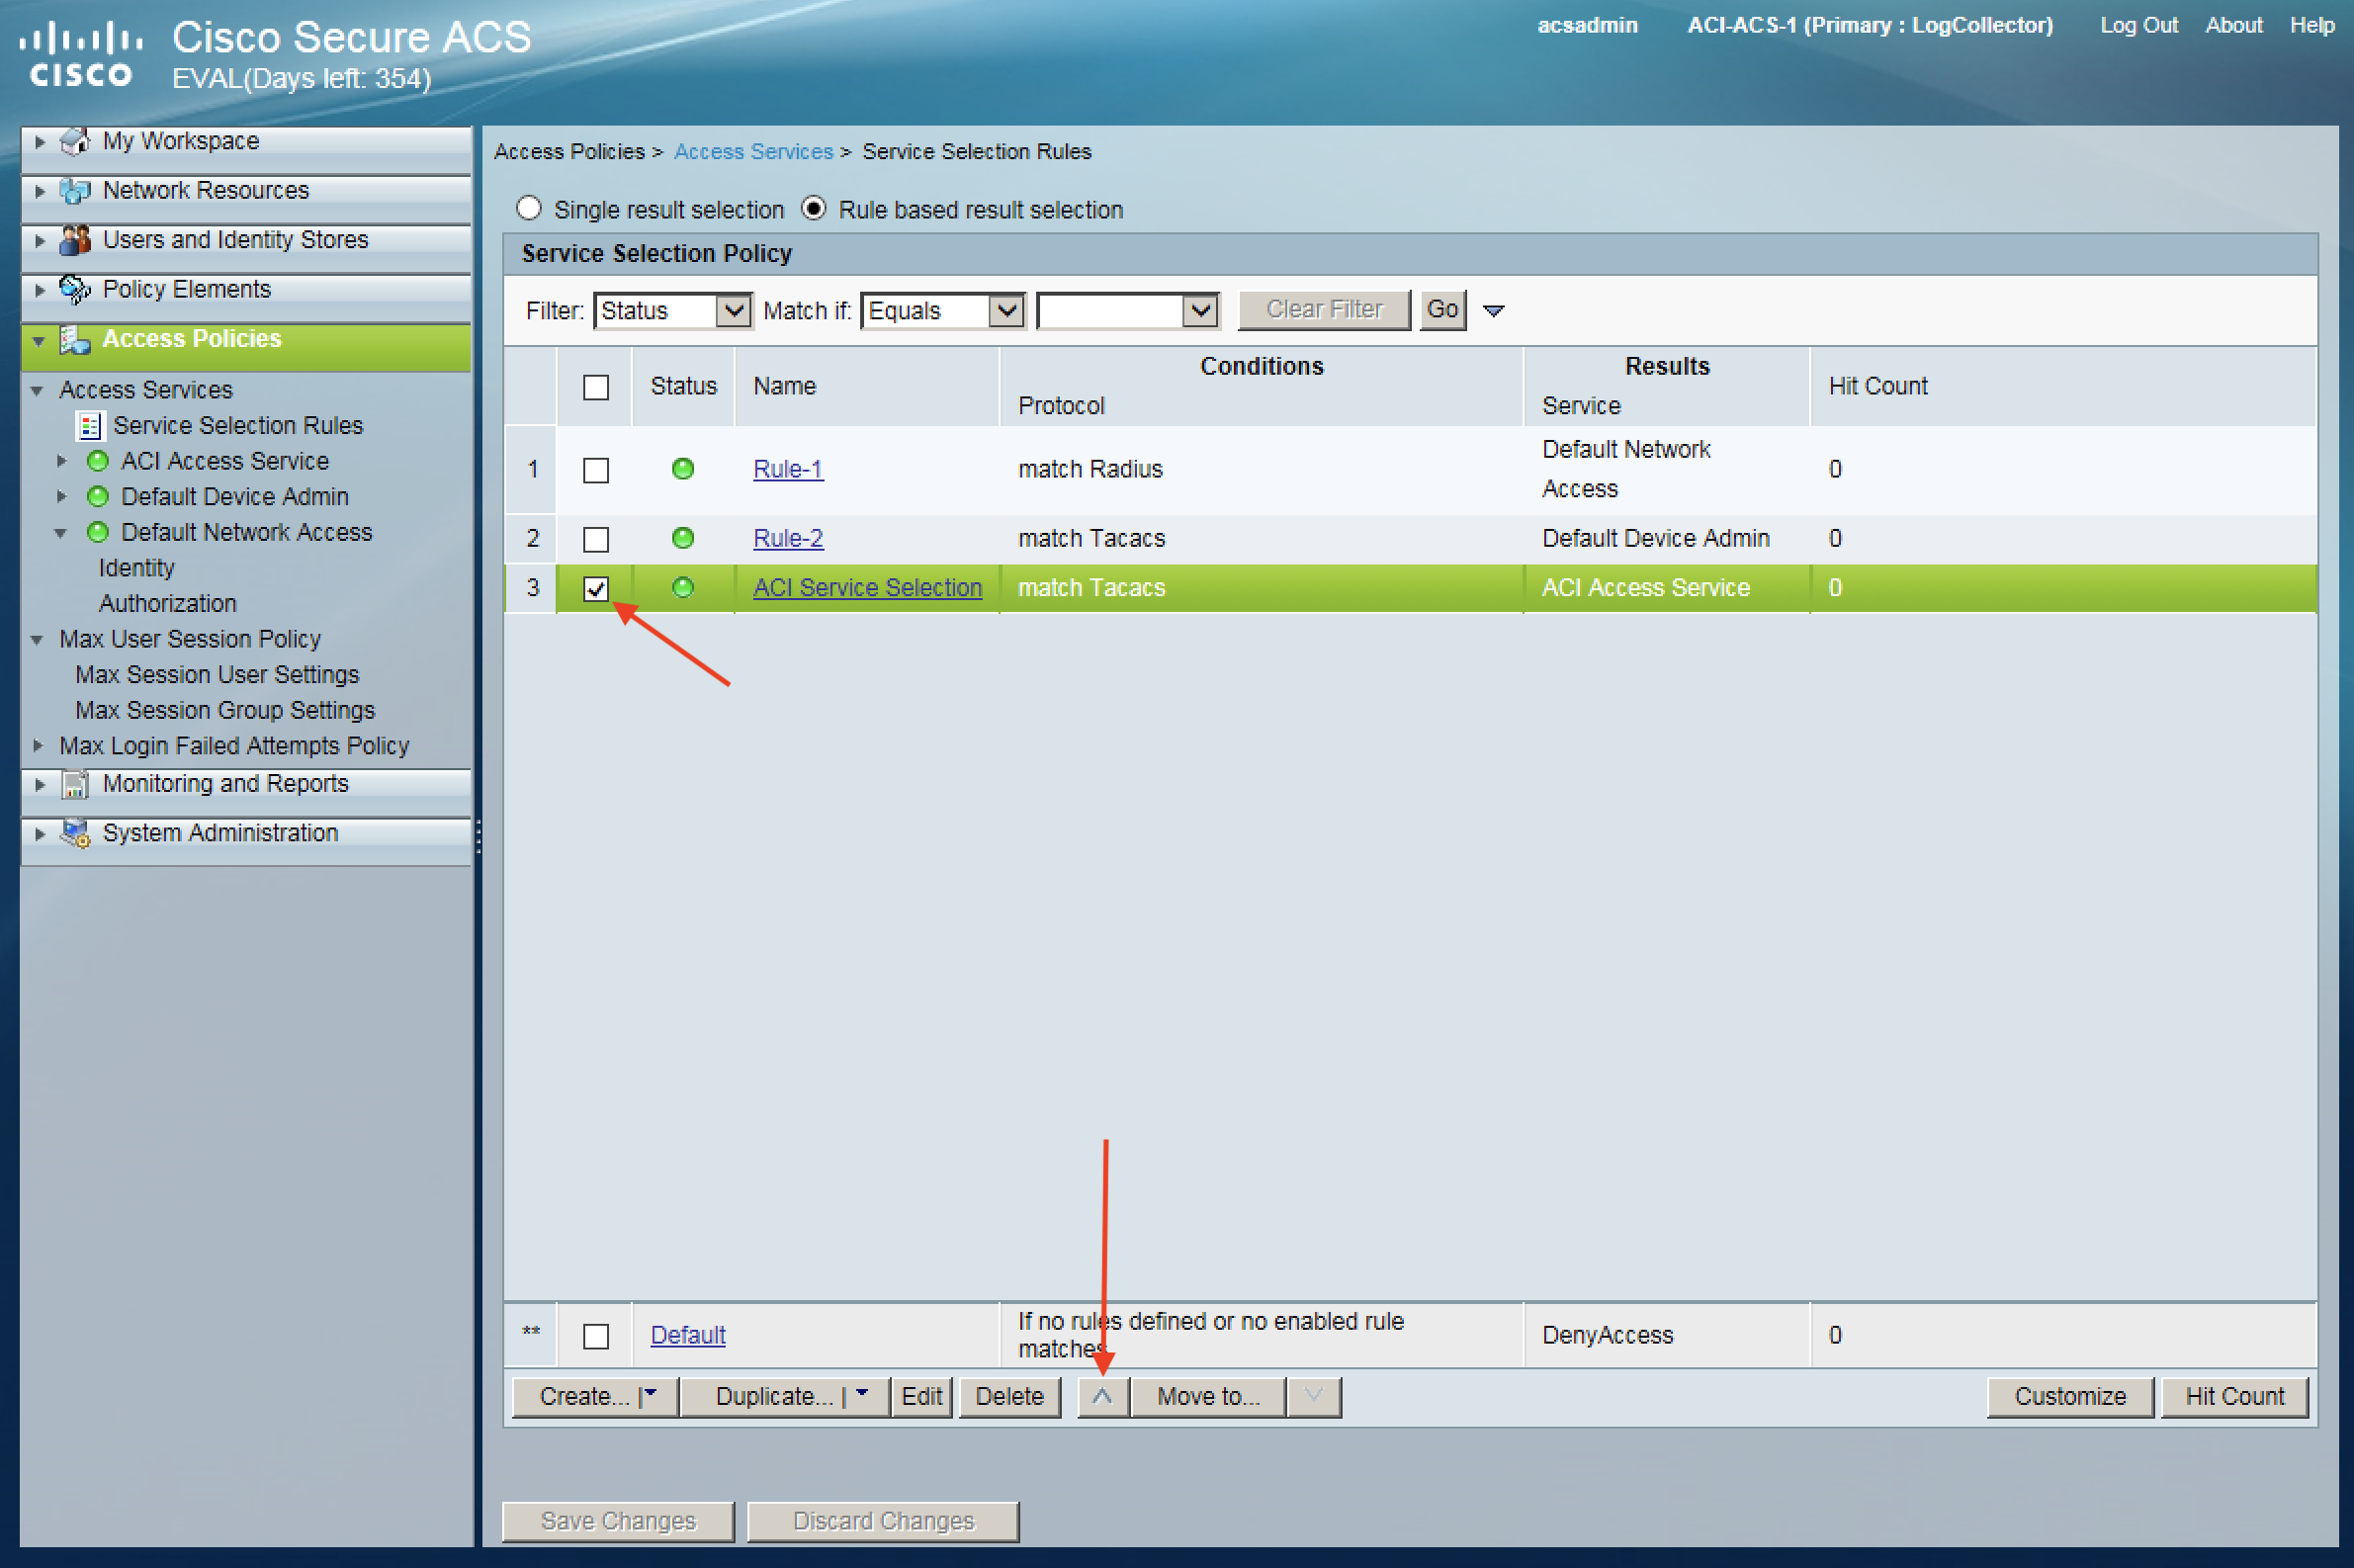
Select OK and Save Changes to commit the configuration. You should see your newly created Service Selection Rule in the list:

We will need to move ACI Service Selection up to the very top of the the Rule List, since we need our specific rule to be hit first. If we do not move it to the top, it will hit Rule-2 which will cause a failed login. To move ACI Service Selection to the top, check the box and use the arrow to move it to the very top:
Select Save Changes to commit the configuration.
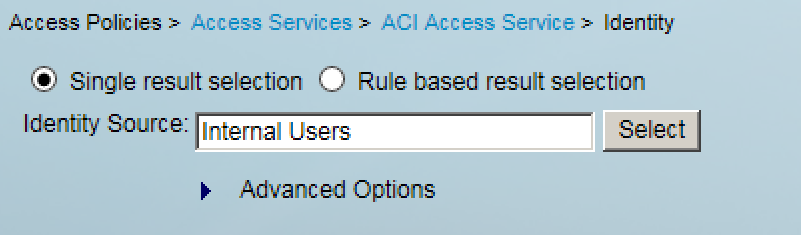
Next we need to configure our new Access Service ACI Service Selection to use our local user internal Identity Source. To set the correct Identity Source navigate to the following ACS web GUI path:
Access Policies -> Access Services -> YOUR_ACCESS_SERVICE_HERE -> Identity

From here set the Identity Source to Internal Users:
Select Save Changes to commit the configuration.
The last ACS configuration is to create an Authorization Policy for our ACI Access Service policy. The purpose of these Authorization Rules is to apply a specific Shell Profile to a specific Identity Group consisting of users. To create the Authorization Policy navigate to the following ACS web GUI path:
Access Policies -> Access Services -> YOUR_ACCESS_SERVICE_HERE -> Authorization -> Create

Here we will create two rules, Read-Write-All-Rule and ReadOnly-All-Rule.
Below is the following configuration for Read-Write-All-Rule:
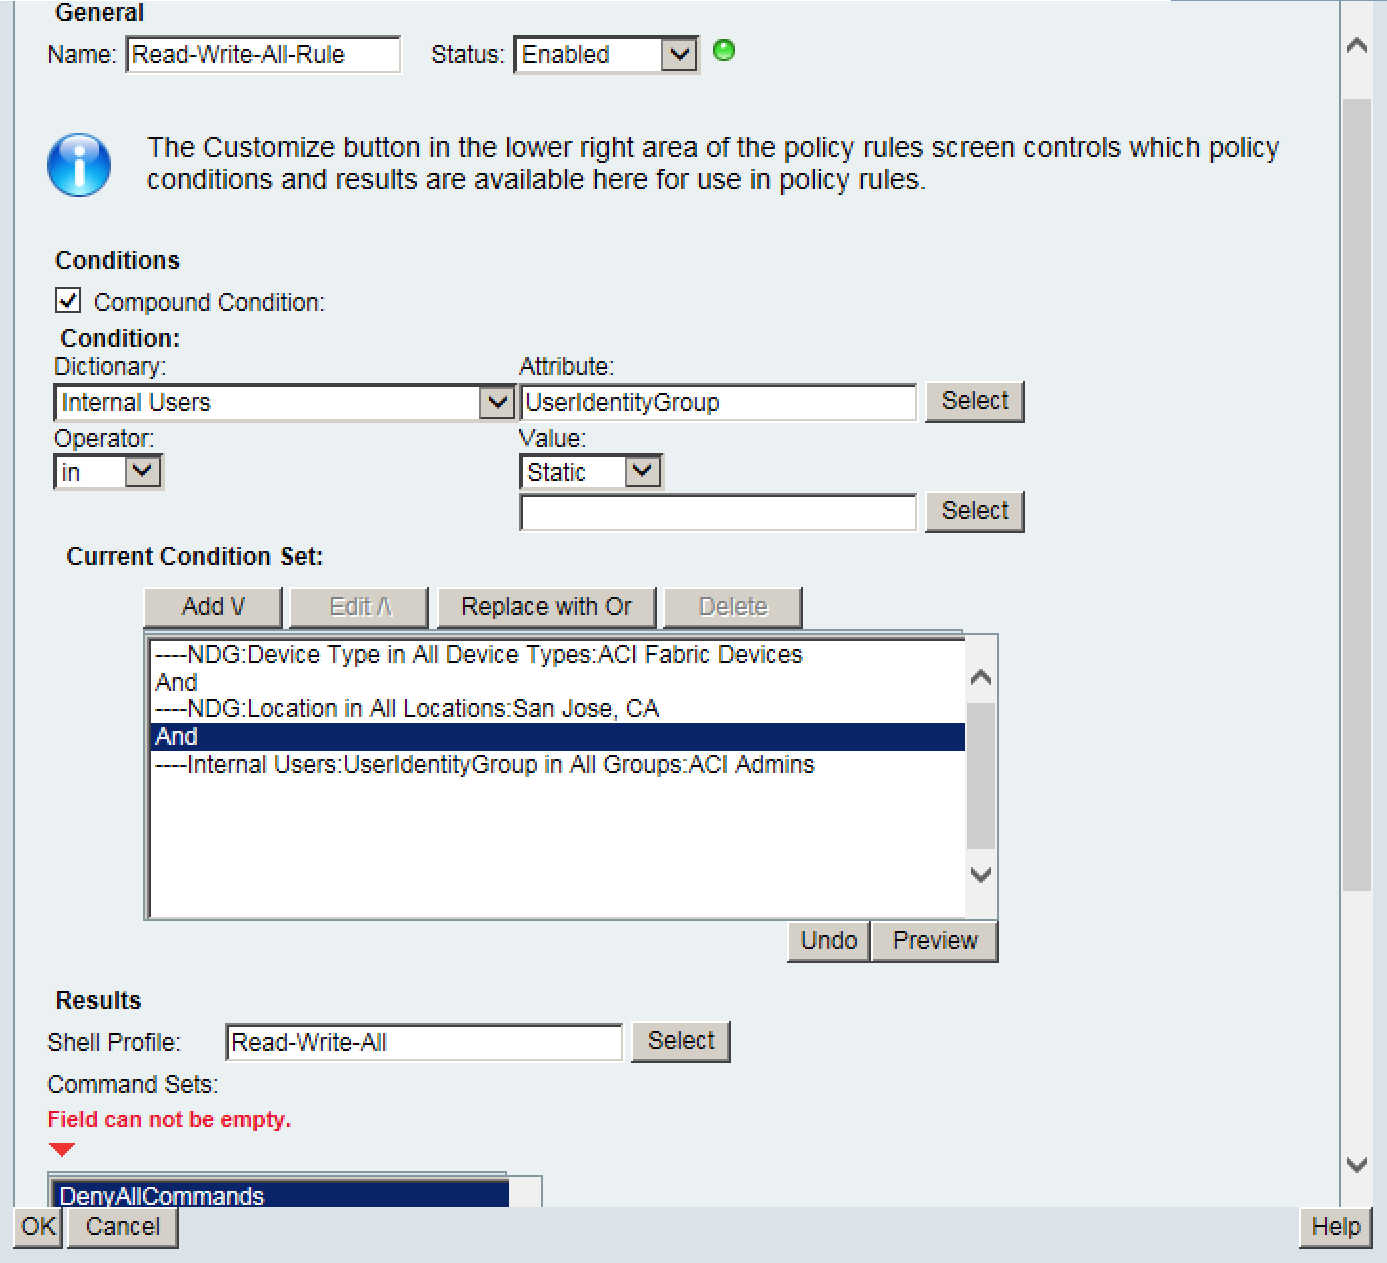
Below is the following configuration for ReadOnly-All-Rule:

Select OK to submit your configuration and select Save Changes to commit the configuration.
You should now be able to login with users and verify that the correct permissions are given from the configured Shell Profile.
Configuring TACACS Policies in ISE 2.0:
Configuration Overview:
* Create Network Device Location
* Create Network Device Type
* Create Network Device
* Create Identity Group
* Create Local Identities
* Create TACACS Profile with AVPair
* Create TACACS Admin Policy Set
The first step in the ISE TACACS configuration is to create the Network Device Location to help categorize where our devices are located. To create the Network Device Location navigate to the following ISE web GUI path:
Administration -> Network Resources -> Network Device Groups -> Groups -> All Locations -> Add

From here we can go ahead and assign a name to our Device Location.
After submitting our changes, the next step is to create the Network Device Type. To do this navigate to the following ISE web GUI path:
Administration -> Network Resources -> Network Device Groups -> Groups -> All Device Types -> Add

From here we can go ahead and assign a name to our Device Type. For our purposes we will use the following configuration:

After submitting our changes the next step is to create our Network Devices, where we will define what APICs and fabric switches we want to use TACACS with. To do this navigate to the following ISE web GUI path:
Administration -> Network Resources -> Network Devices -> Add
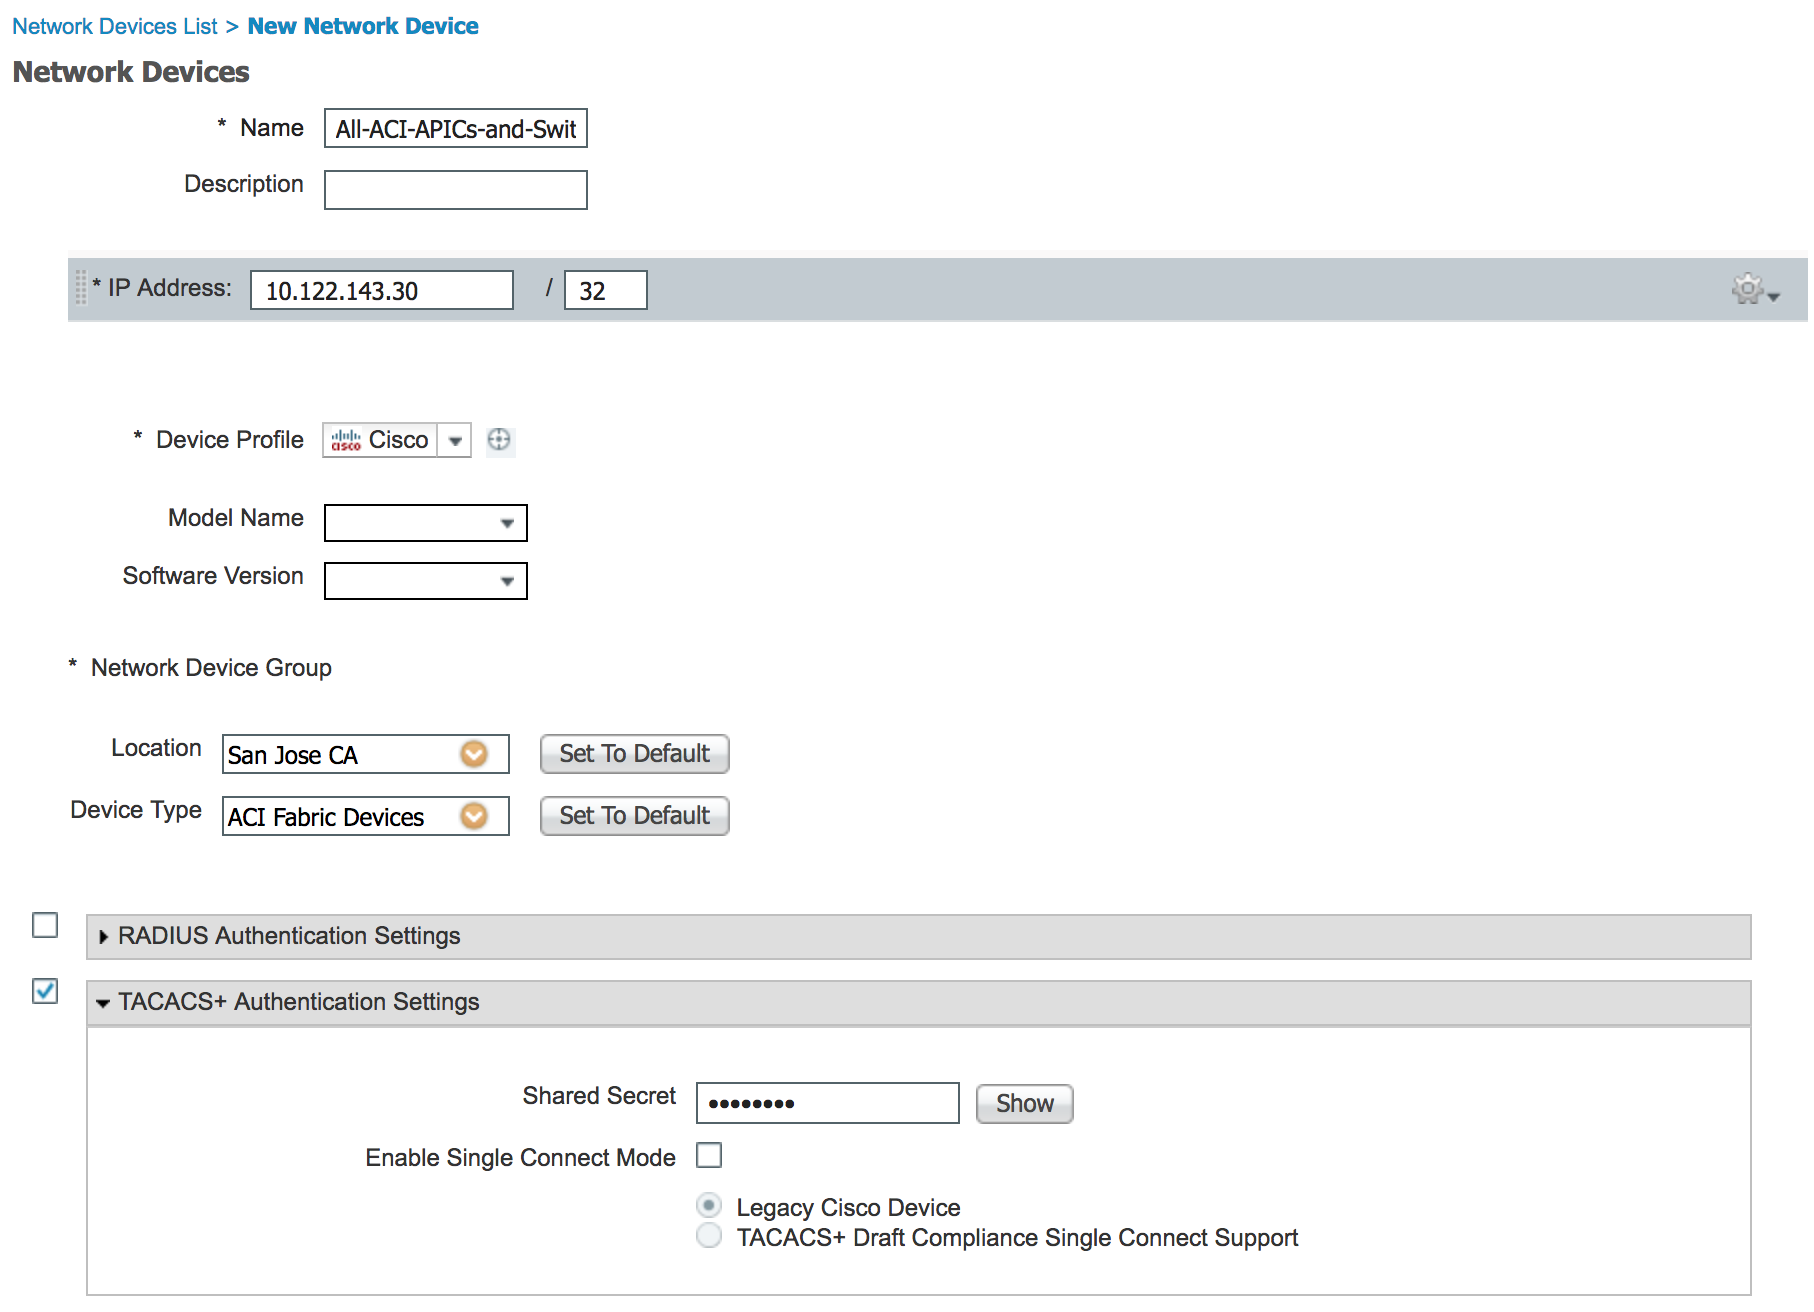
From here we can go ahead and assign a name to our Network Device, assign the Location and Device Type, enable TACACS+ authentication using the same Shared Secret as you did when creating the ACI TACACS Provider, and assign the IP addresses of the APICs and fabric switches. For demo purposes I am just going to assign the IP of my APIC-1 which has an Out-of-Band IP address of 10.122.143.30. Our configuration will look like such:
After submitting the changes the next step is to create a Identity Group to assign the local users to, which we will be creating after. To create the Identity Group navigate to the following ISE web GUI path:
Work Centers -> Device Administration -> User Identity Groups -> User Identity Group -> Add
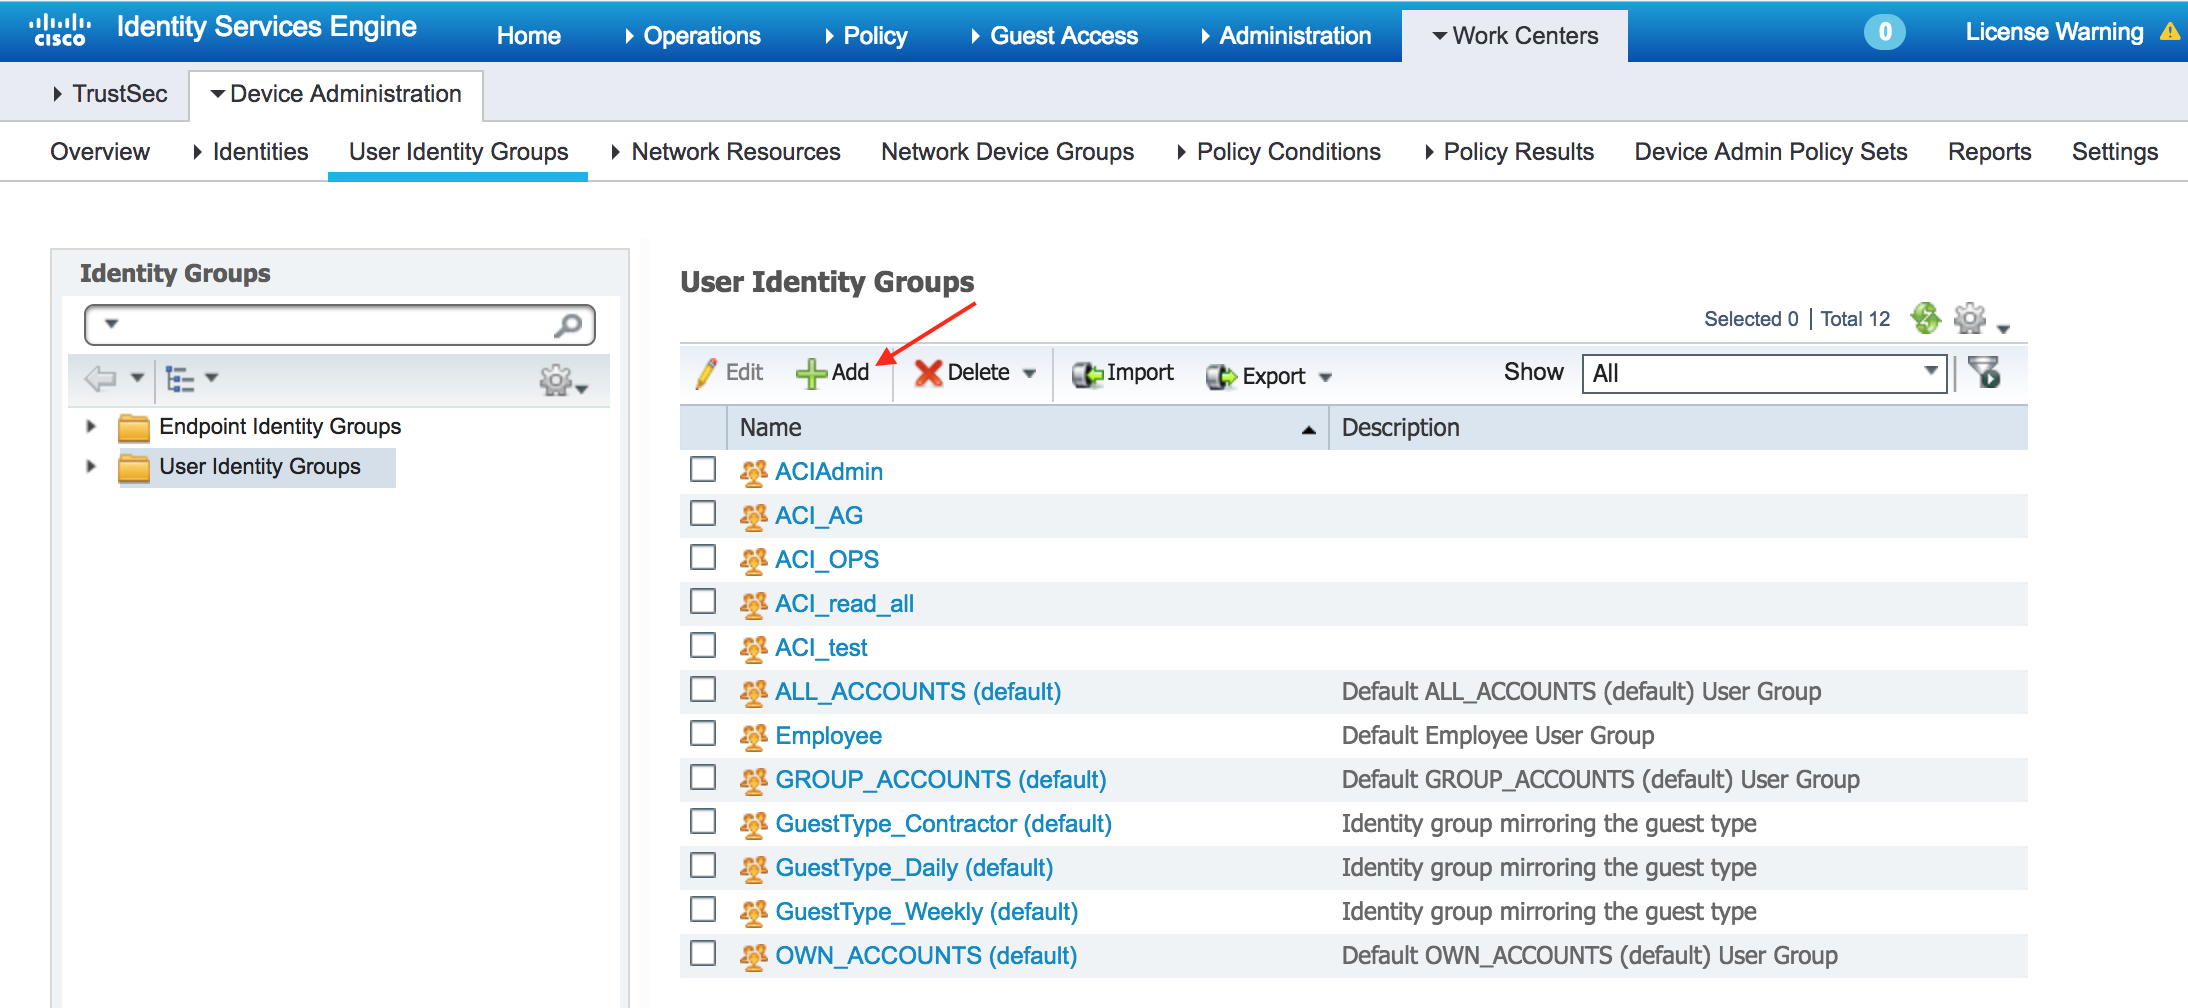
From here we can go ahead and assign a name to our Identity Group. For our purposes we will create two Identity Groups, ACI Admin and ACI Read-Only.
After submitting the changes the next step is to create a local user account to authenticate TACACS against. This user will be associated to the newly created Identity Group. Of course you can associate ISE to an external identity store, such as LDAP so that local users on ISE are not required, however for demo simplicity we will create a local ISE user. To create a local user account navigate to the following ISE web GUI path:
Work Centers -> Device Administration -> Identities -> Add

From here we can go ahead and assign a username, password, and Identity Group to our user. For our purposes we will create two users, aci_admin and aci_readonly. Each will be assigned to their respective newly created Identity Group. Our configuration for the aci_admin user will look like such:

Note that we will NOT be adding our AVPair here. We will come back to configuring the AVPair later.
The next step is to create our TACACS Profiles which will contain our AVPairs. To help understand the purpose of AVPairs and their syntax, read the above ACS section titled Create Shell Profile with AVPair. To create our TACACS Profiles navigate to the following ISE web GUI path:
Work Centers -> Device Administration -> Policy Results -> TACACS Profiles -> Add
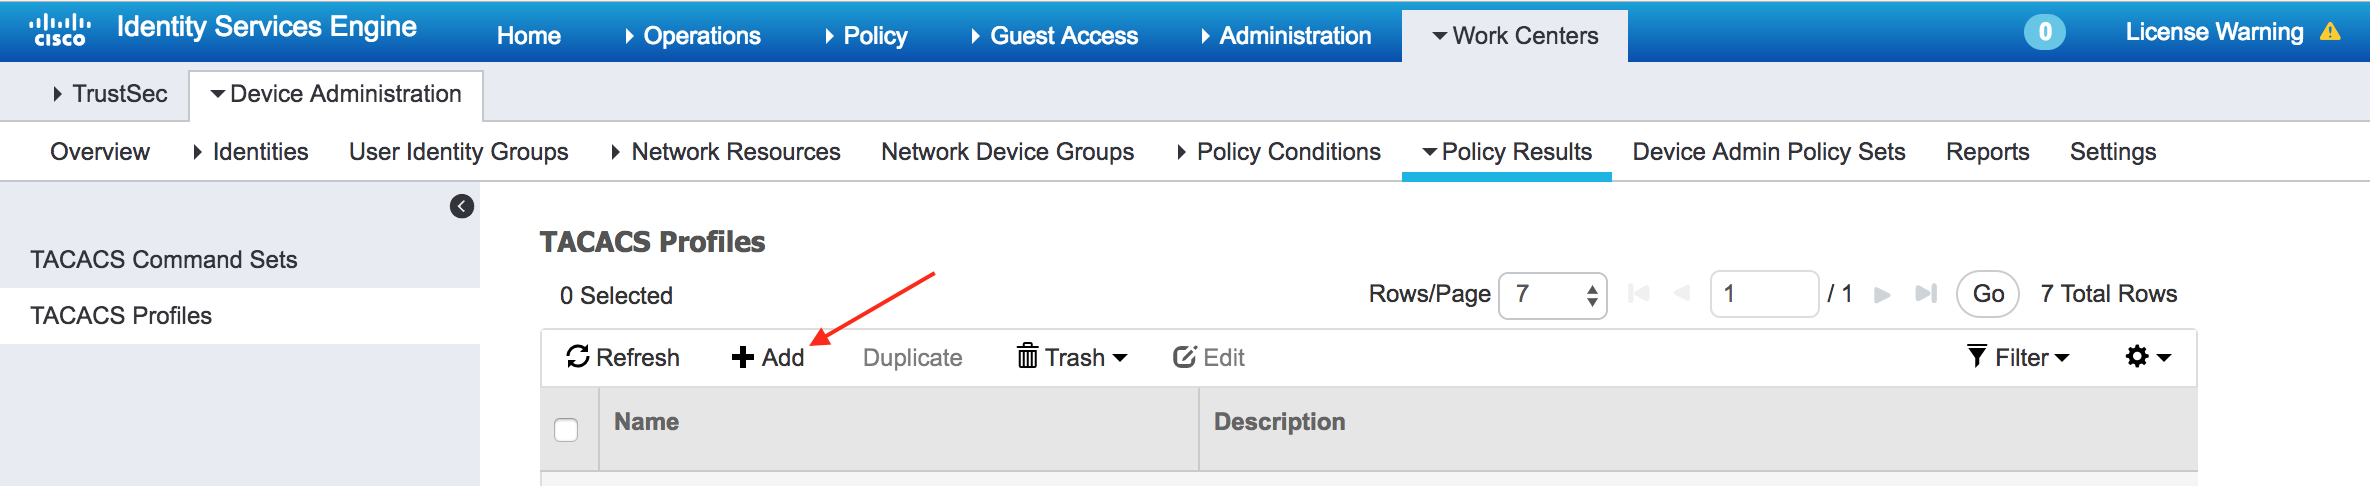
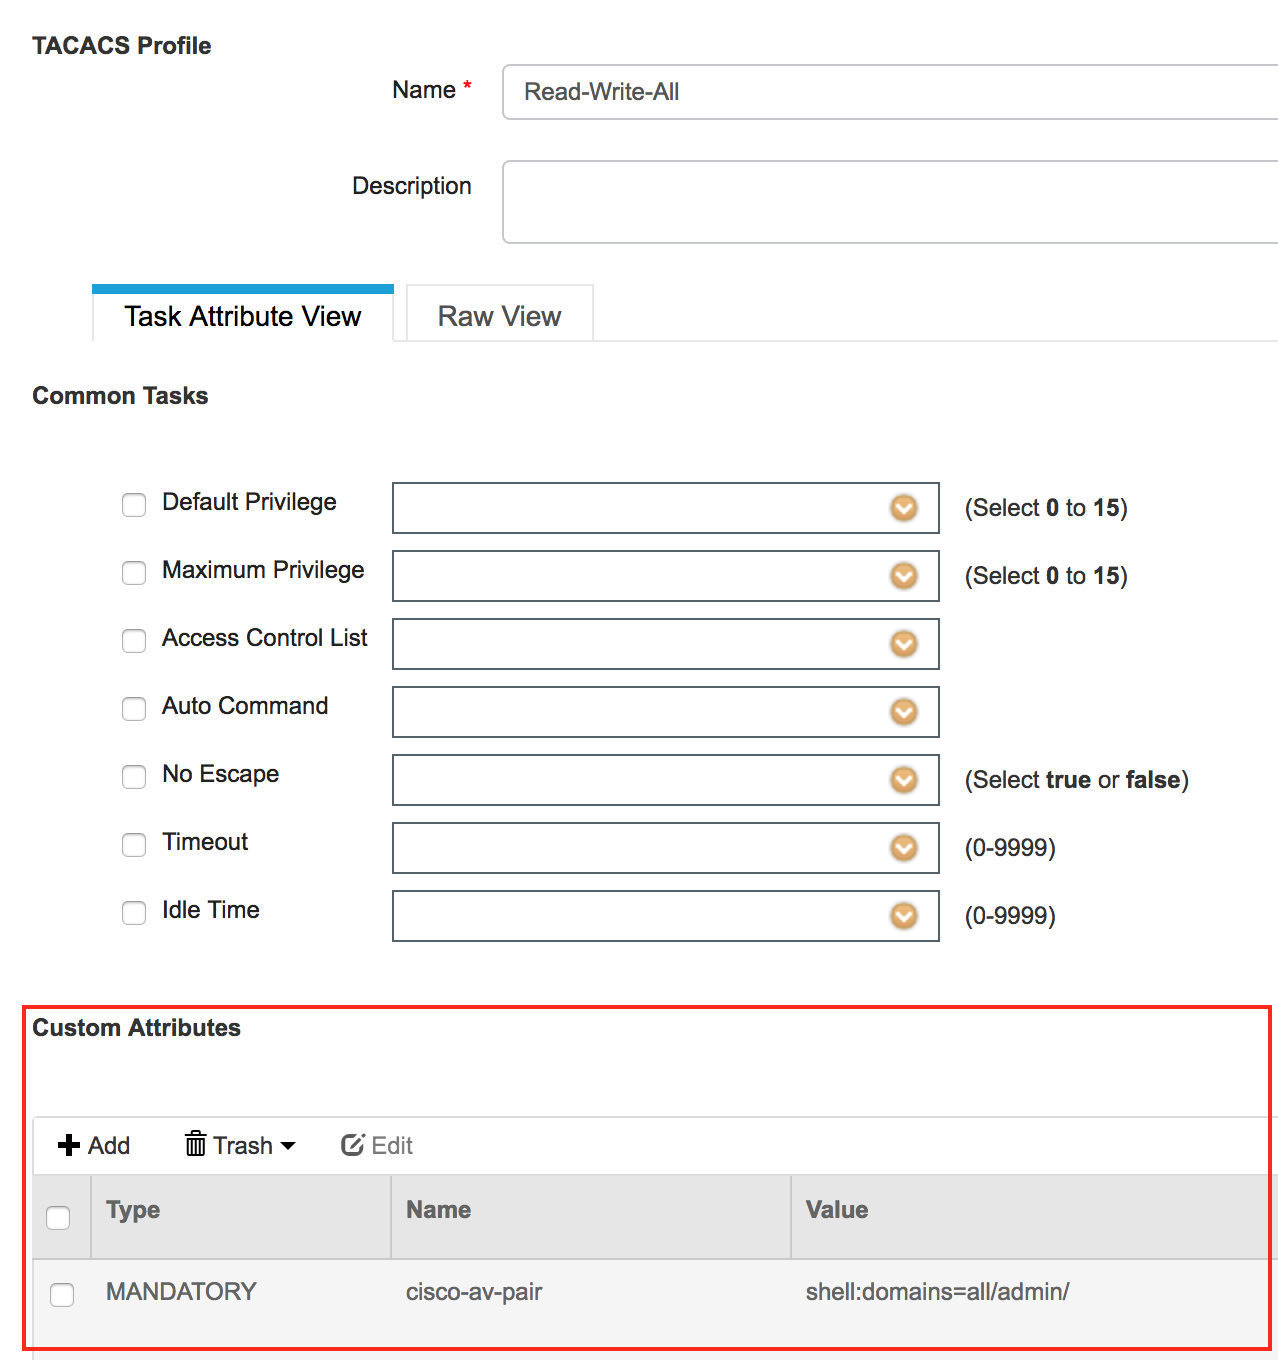
From here we can go ahead and assign a name to our TACACS Profile. For our purposes we will create two different TACACS Profiles, Read-Write-All and ReadOnly-All. Other than a Name, we also need to assign a Custom Attribute to each shell profile. This Custom Attribute will be what contains our AVPair. Directly below is our Read-Write-All TACACS Profile:
The next and final step is to create a TACACS Admin Policy Set to tie together all of our ISE policies. To create the TACACS Admin Policy Set navigate to the following ISE web GUI path:
Work Centers -> Device Administration -> Device Admin Policy Sets

We will then need to create our new Policy Set by selecting the green arrow in the upper left and selecting Create Above:
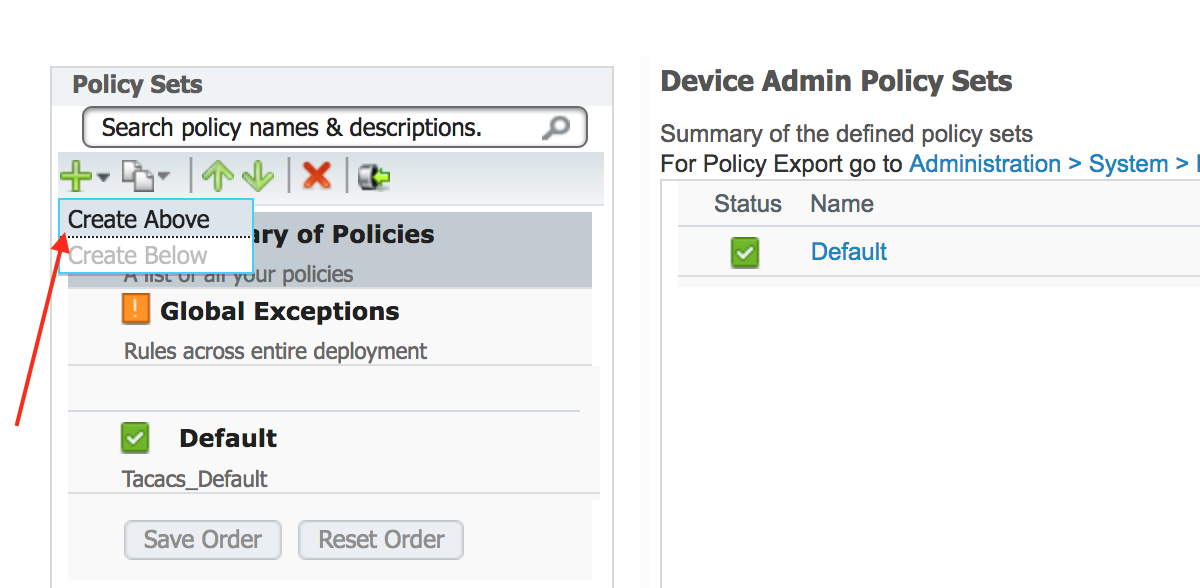
This will place our custom Policy Set above the already existing Default policy set so that our more specific rule is hit first.
The first step in creating our new Policy Set is to assign a Name and Condition. For our purposes we will call our Policy Set ACI-TACACS-Pol-Set. For our Condition we will want to create a new one, so from the Condition drop down list select Create New Condition

From here we will want to filter on the following conditions and values:
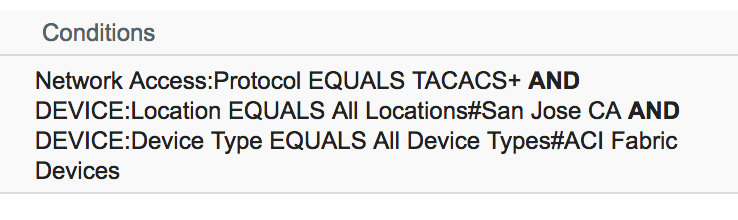
The San Jose CA and ACI Fabric Devices attributes were what we created earlier in this tutorial. These values will allow our policy set to be hit given only given the specific conditions.
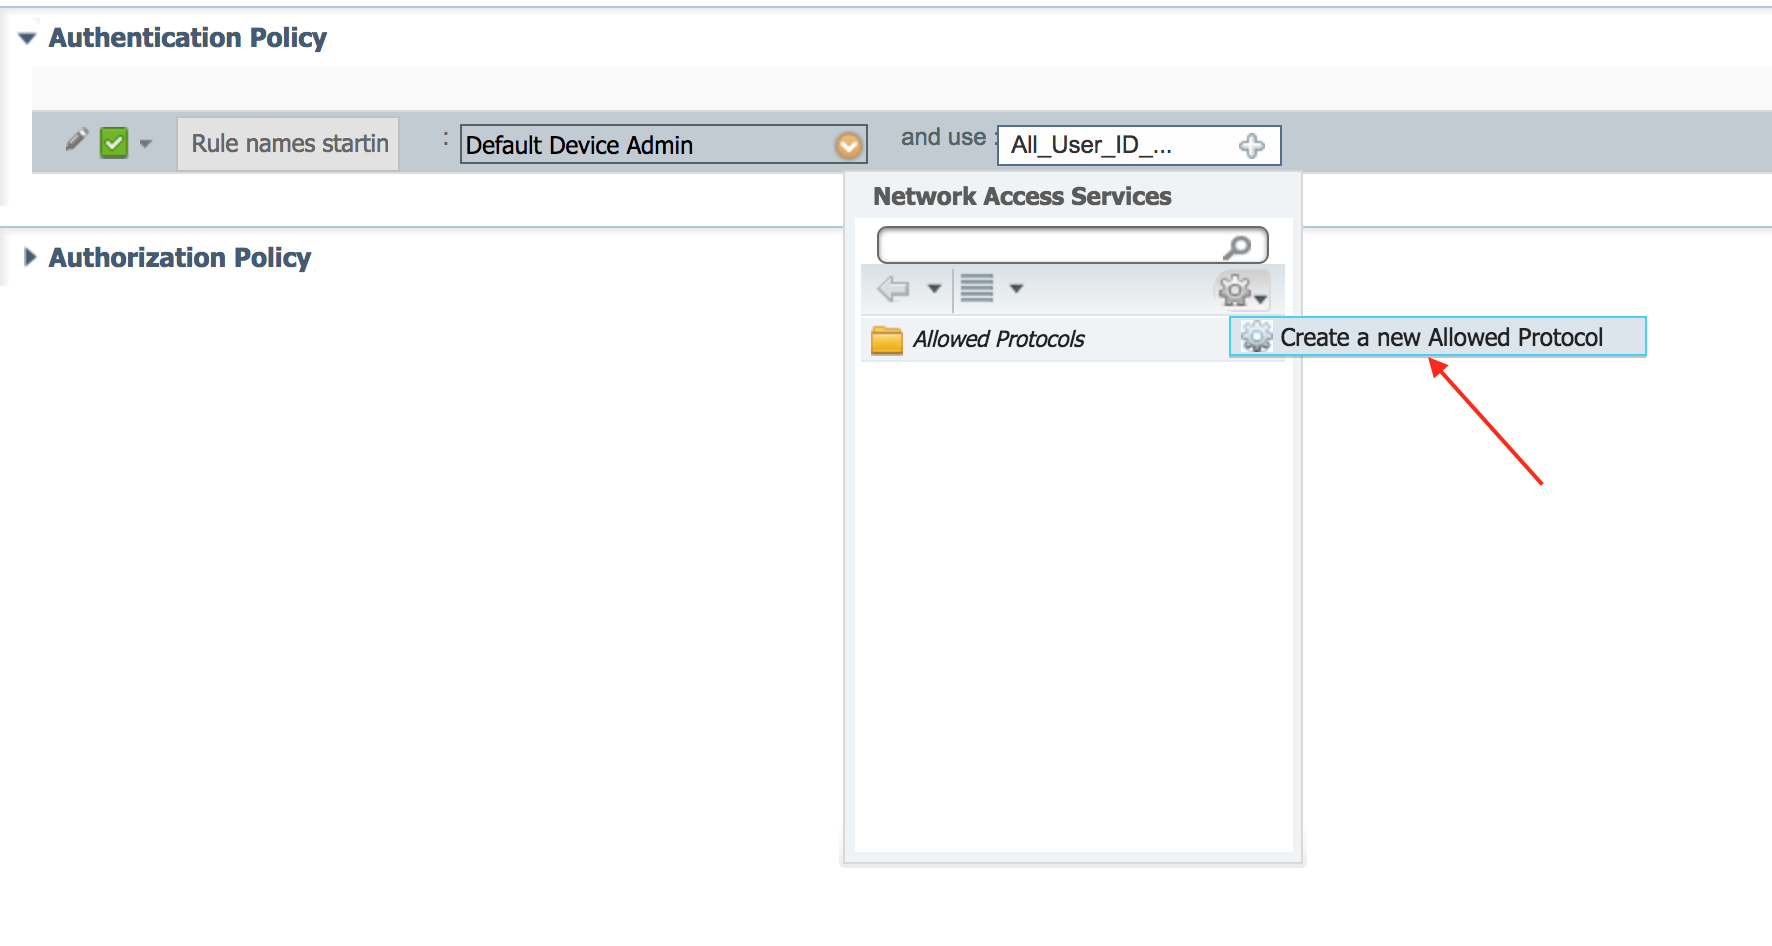
The next step in creating our policy set is to define the Authentication Policy. For our purposes we will use the Default Rule and apply further configuration to it. We will want to configure both the Allowed Protocols and Identity Source. From the Allowed Protocols list we have the ability to create a new protocol:
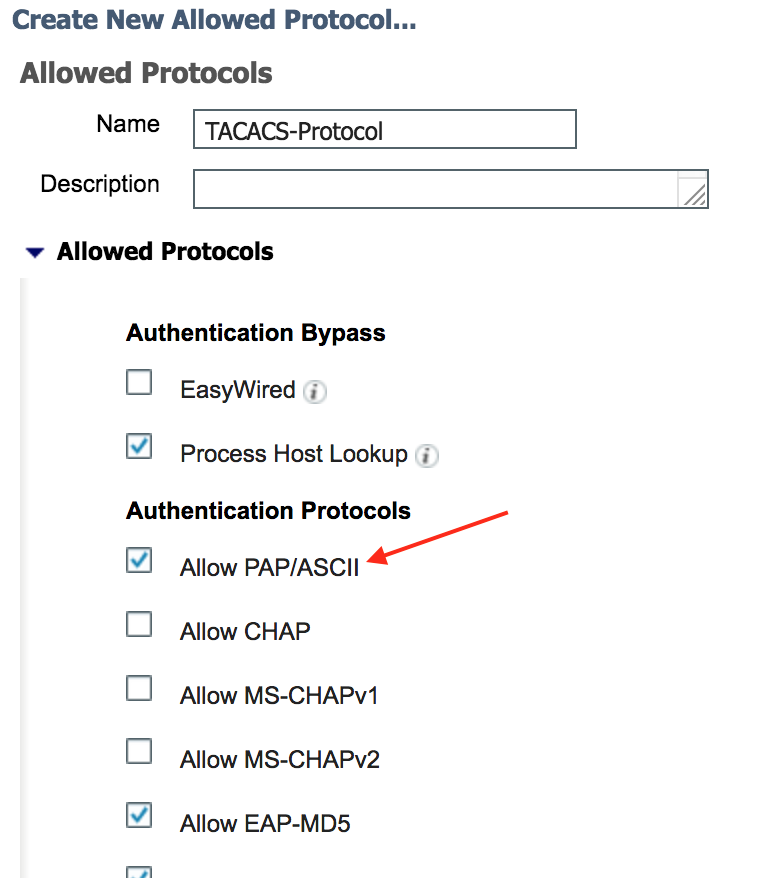
This protocol attribute will allow us to define what authentication protocols (PAP, CHAP, MS-CHAP, etc) are allowed. For our purposes we will need to enable Allow PAP/ASCII since our ACI TACACS configuration is set to use PAP. Our configuration will look like such:
For our Identity Source we will want to select Internal Users since the identities we created earlier were local to ISE.
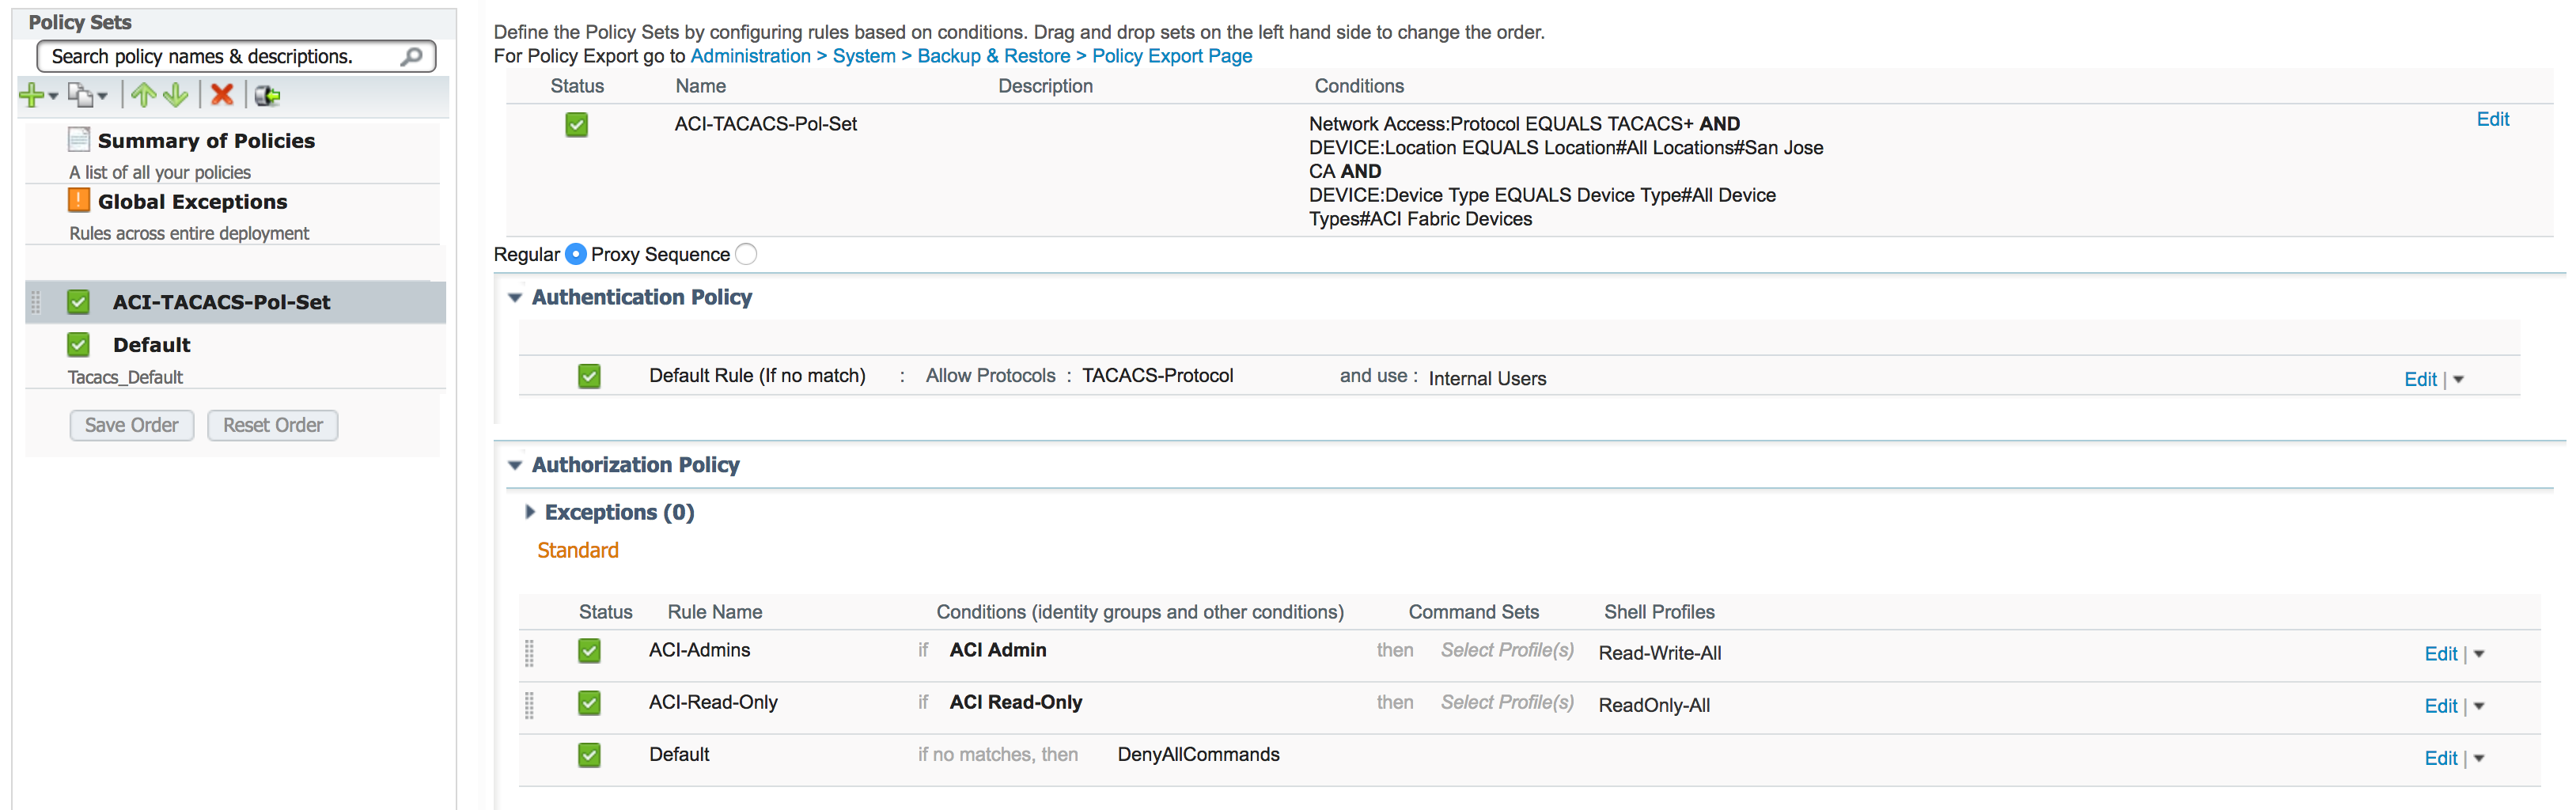
The next and final step in creating our policy set is to define the Authentication Policy is to configure the Authorization Policy. We will need to create a new rule which we need to place above the Default rule:

The only fields we will need to specify are the Name, Identity Group, and Shell Profile. For our purposes since we have two Identity Groups, ACI Admin and ACI Read-Only, we will want to assign the correct Shell Profiles to each. OurAuthorization Policy configuration will look like such:

Our entire Policy Set looks like such:
You should now be able to login with users and verify that the correct permissions are given from the configured Shell Profile.
