In this tutorial we will be going over how to configure Out-of-Band management for APICs and fabric switches. Functions such as querying the APIC and fabric switches via SNMP will not work unless Out-of-Band management IP addresses are configured.
Prerequisites:
* Fabric discovery completed
* Physical Out-of-Band connectivity to your APIC(s) and fabric switches
* Understanding of ACI contracts
My Setup:
* Running ACI version 3.1(2m)
Topics:
* Configuring Out-of-Band static IP addresses
* Configuring Out-of-Band contracts, contract filters, and contract subjects
Configuring Out-of-Band Static IP Addresses:
Navigate in your APIC web GUI to the following path:
Tenants -> mgmt -> Node Management Addresses -> Static Node Management Addresses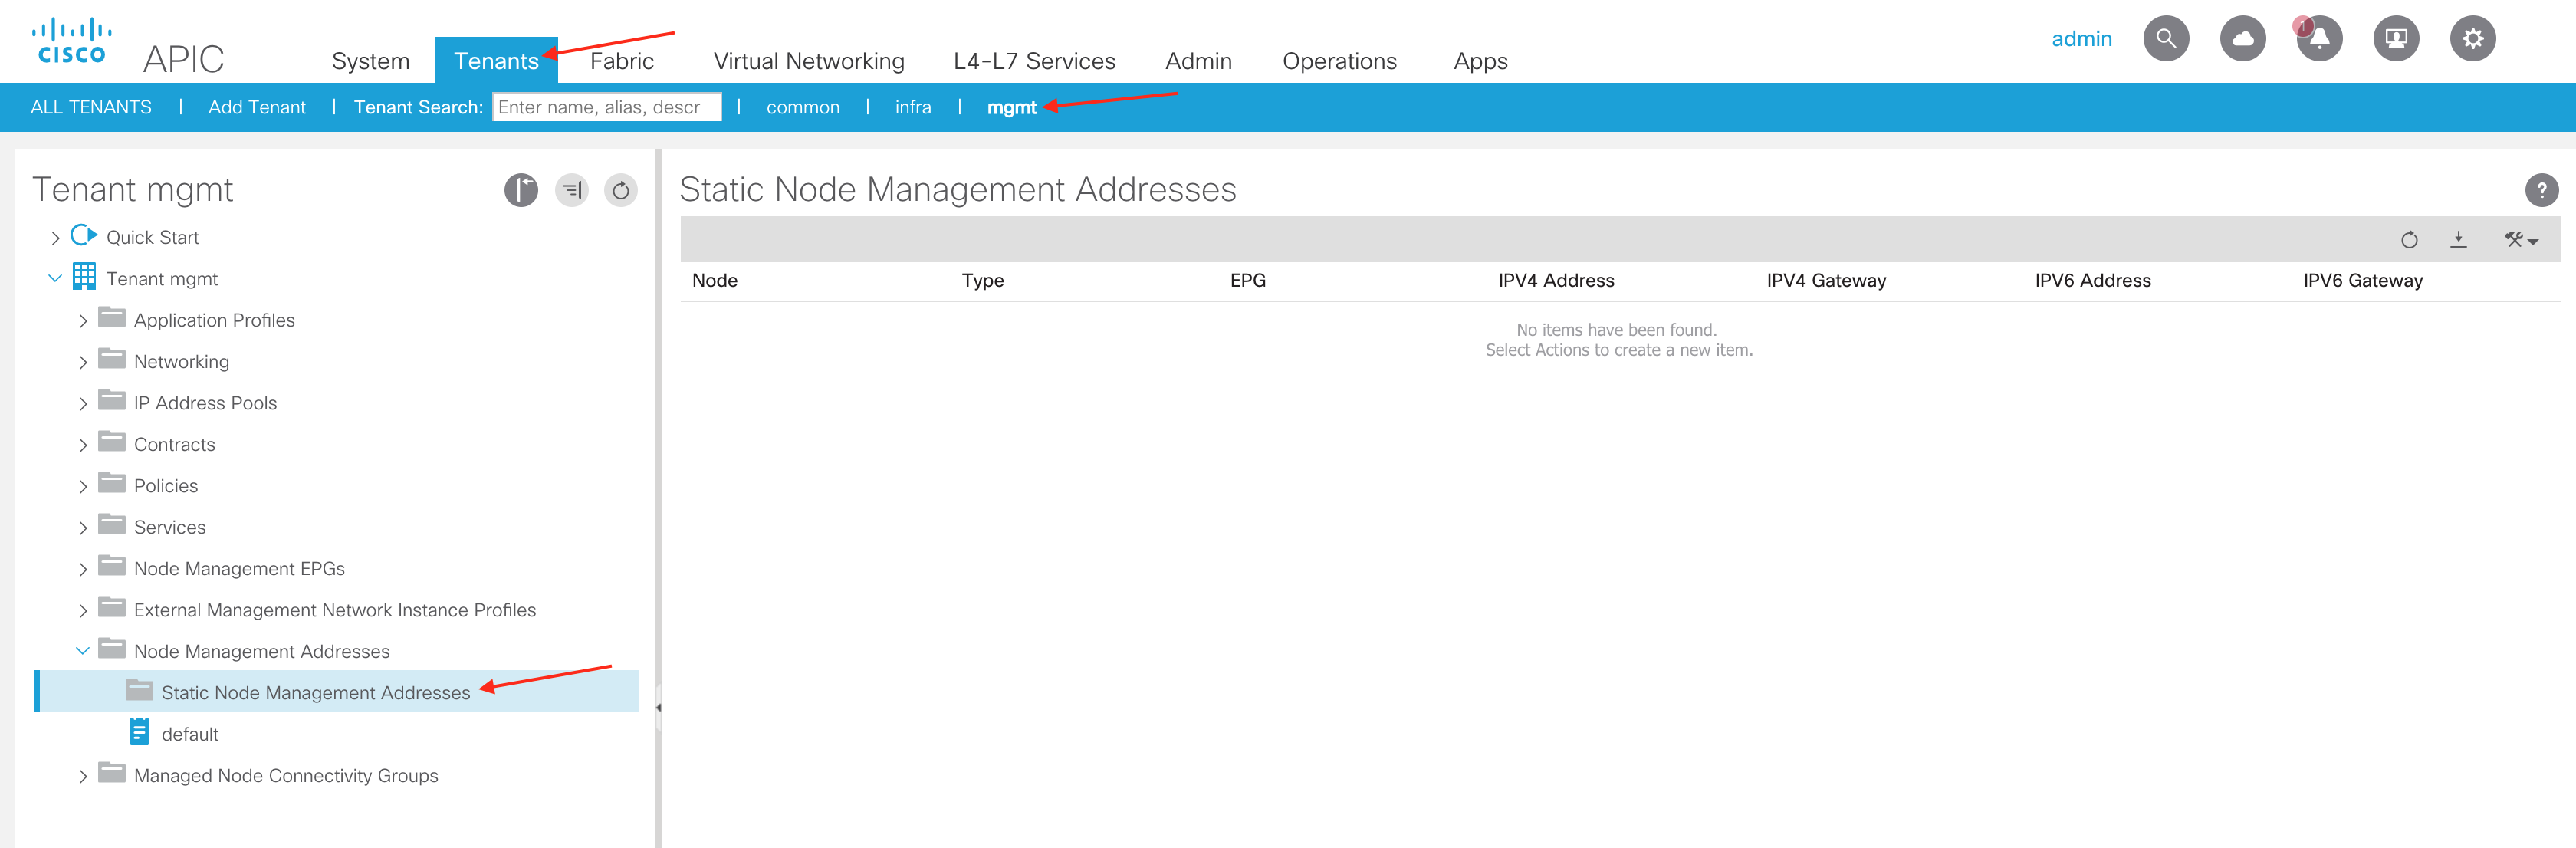
Right click Static Node Management Addresses and select Create Static Node Management Addresses
This is where we add the APIC and fabric switch Out-of-Band IP addresses:
You have the ability to add a range of node IDs, however I always like to configure my node Out-of-Band IPs one by one. Though this can be more tedious and time consuming it guarantees that a specific device receives the exact IP address I want to give it. To configure an IP for a specific node one by one just put the same node ID in the From and To fields for Node Range. Select or create your Out-of-Band Management EPG. In this tutorial we will be using the default policy. The Out-of-Band Management EPG will come into play later when applying contracts to allow specific Out-of-Band communications which are not implicitly allowed by default.
The below configuration will apply the Out-of-Band IP to APIC-1:

When prompted to proceed select Yes.

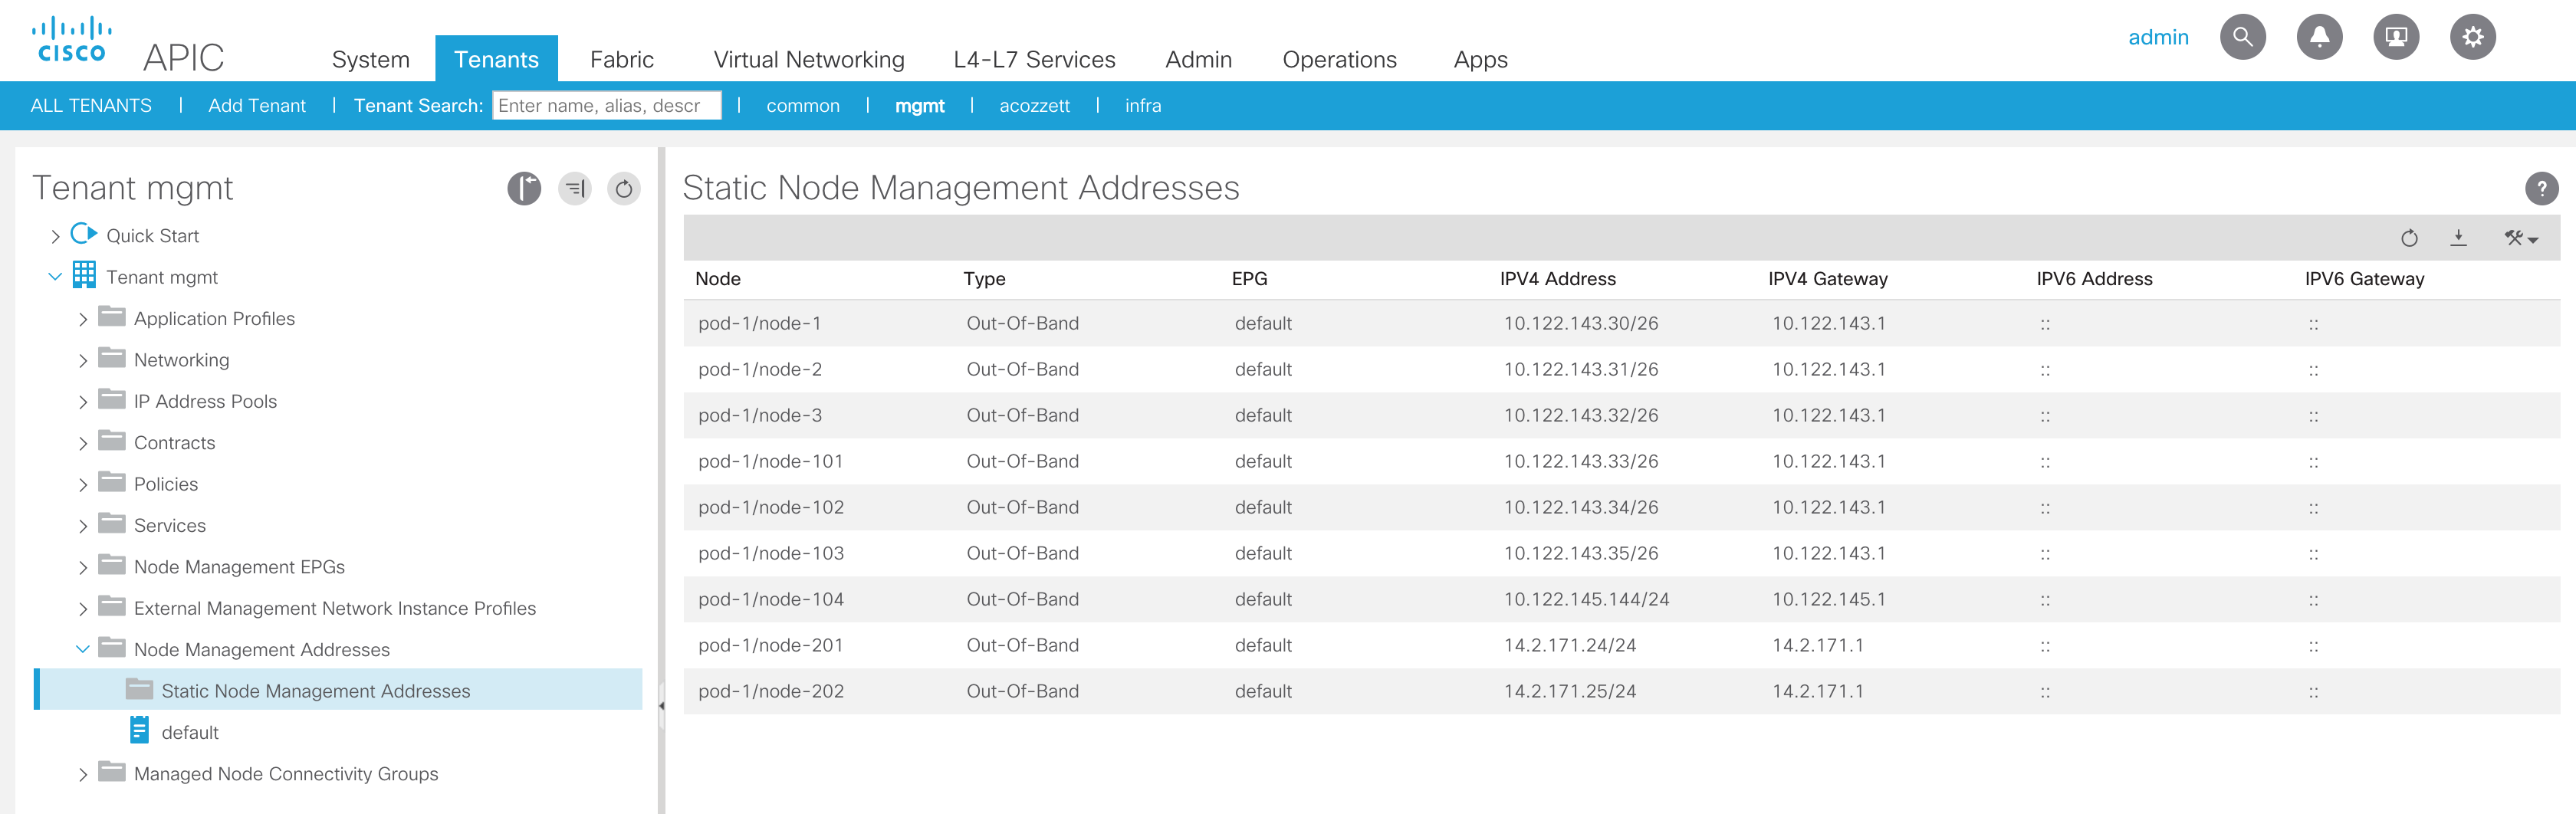
After configuring your APICs and nodes you will see them listed:
To verify the IP configuration on an APIC, console or SSH to the APIC and run the ifconfig oobmgmt command. In the command output you will see the oobmgmt interface with an IP address and configured netmask:
apic1# ifconfig oobmgmt
oobmgmt: flags=4163<UP,BROADCAST,RUNNING,MULTICAST> mtu 1500
inet 10.122.143.30 netmask 255.255.255.192 broadcast 10.122.143.63
inet6 fe80::eebd:1dff:fe69:9946 prefixlen 64 scopeid 0x20<link>
ether ec:bd:1d:69:99:46 txqueuelen 1000 (Ethernet)
RX packets 673354 bytes 249312978 (237.7 MiB)
RX errors 0 dropped 0 overruns 0 frame 0
TX packets 440480 bytes 411215249 (392.1 MiB)
TX errors 0 dropped 0 overruns 0 carrier 0 collisions 0
The verify the IP address configuration on a fabric switch run ifconfig eth0 (for leaves and non-modular spines) or ifconfig eth6 (for modular spines):
leaf1# ifconfig eth0
eth0 Link encap:Ethernet HWaddr 04:62:73:57:a8:2e
inet addr:10.122.143.33 Bcast:10.122.143.63 Mask:255.255.255.192
inet6 addr: fe80::662:73ff:fe57:a82e/64 Scope:Link
UP BROADCAST RUNNING MULTICAST MTU:1500 Metric:1
RX packets:546369 errors:0 dropped:0 overruns:0 frame:0
TX packets:127117 errors:0 dropped:0 overruns:0 carrier:0
collisions:0 txqueuelen:1000
RX bytes:68157736 (65.0 MiB) TX bytes:19588687 (18.6 MiB)
If a configured Out-of-Band IP address does not show up under the physical interface of the APIC or fabric switch you will need to verify that the physical NIC is connected. An IP address will not show up if the physical interface is down. Run the ethtool command to verify the physical Out-of-Band interface status of the APIC or fabric switch interface. If the interface is up you should receive similar output:
apic1# ethtool oobmgmt
<output trimmed>
Link detected: yes
leaf1# ethtool eth0
<output trimmed>
Link detected: yes
In the event Link detected is not set to yes, you will need to verify the physical connectivity of the Out-of-Band interface. This concludes the necessary IP address configuration for the APICs and fabric switches.
Configuring Out-of-Band Contracts:
By default services such as HTTPS and SSH access to APICs and fabric switches are implicitly allowed when no contacts are configured, however services such as SNMP and NTP will not work without configuring Out-of-Band contracts.
The first step in creating an Out-of-Band contract is to create the contract filter. The contract filter is responsible for defining the specific protocols and ports we want to explicitly allow. Ex: UDP ports 161 and 162 for SNMP
To configure an Out-of-Band contract filter navigate in your APIC web GUI to the following path:
Tenants -> mgmt -> Contracts -> Filters
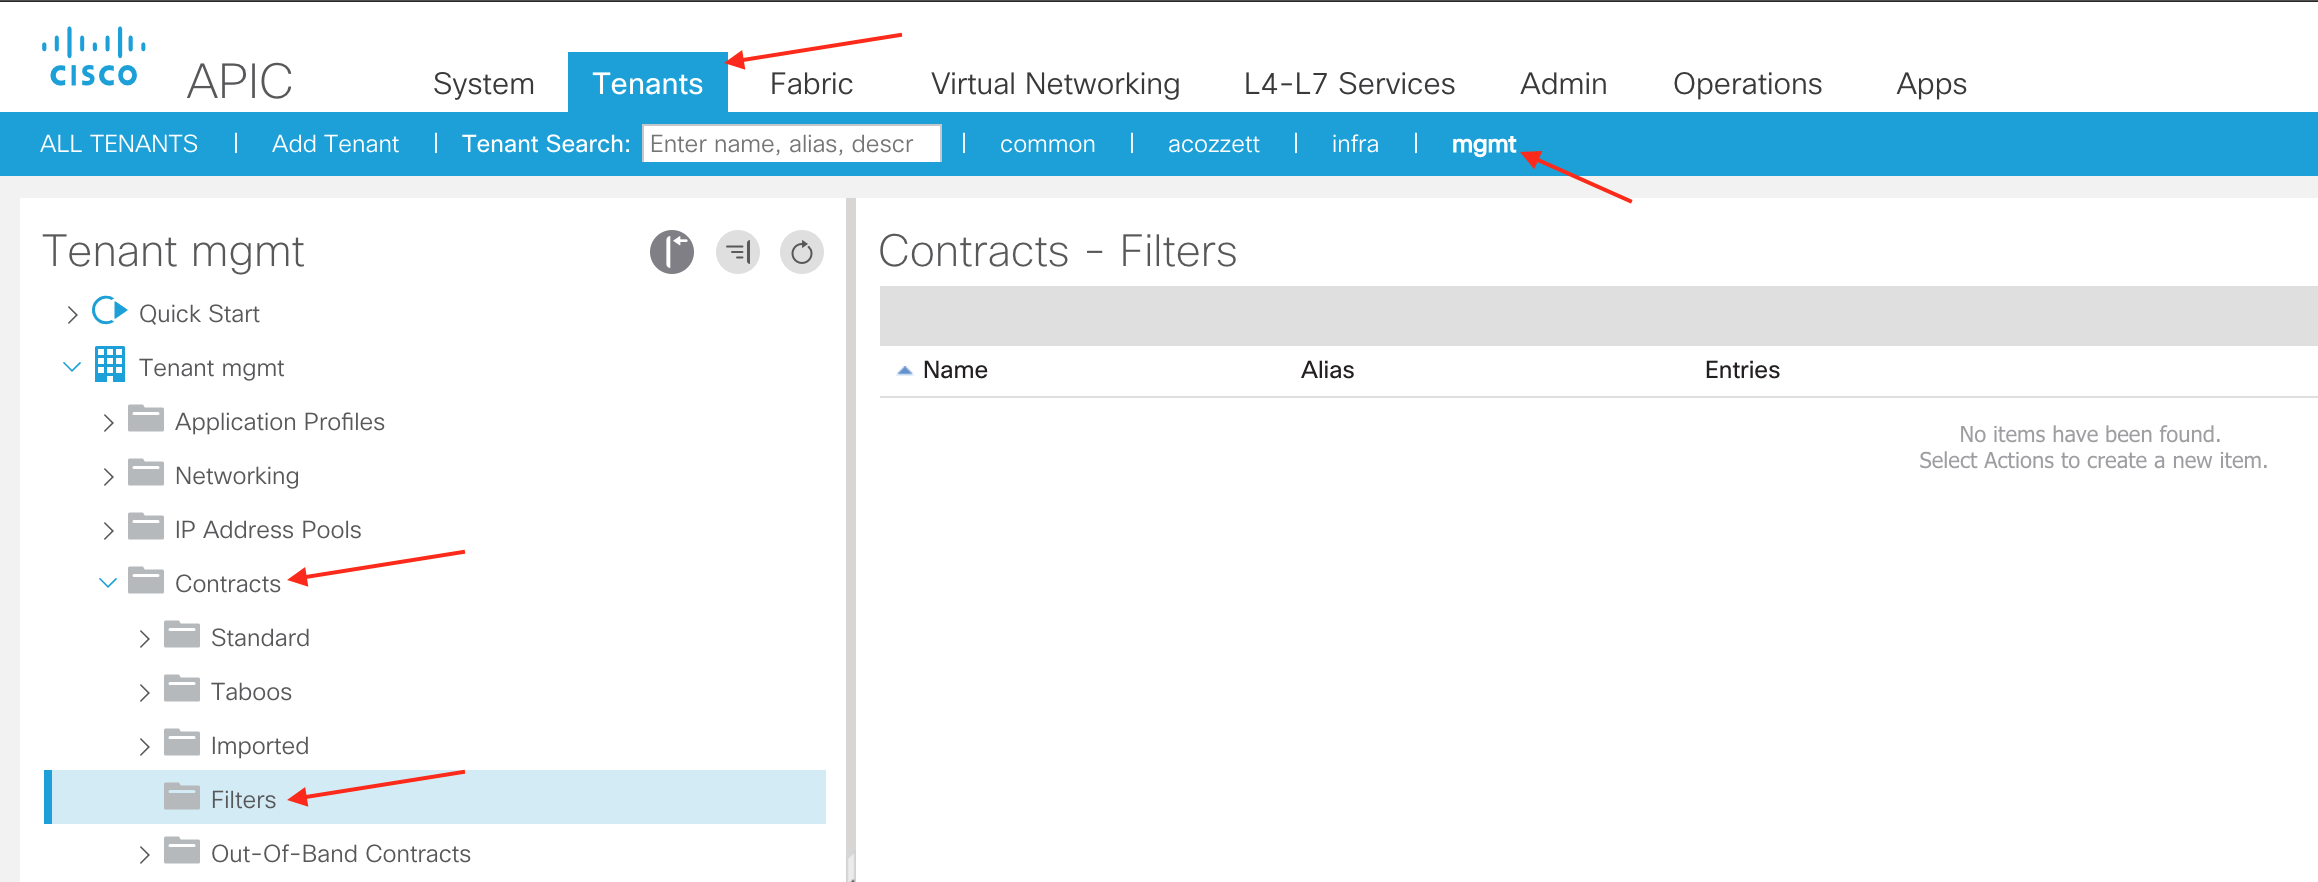
Right click Filters and select Create Filter
You will then be prompted with the screen to create the contract filter:
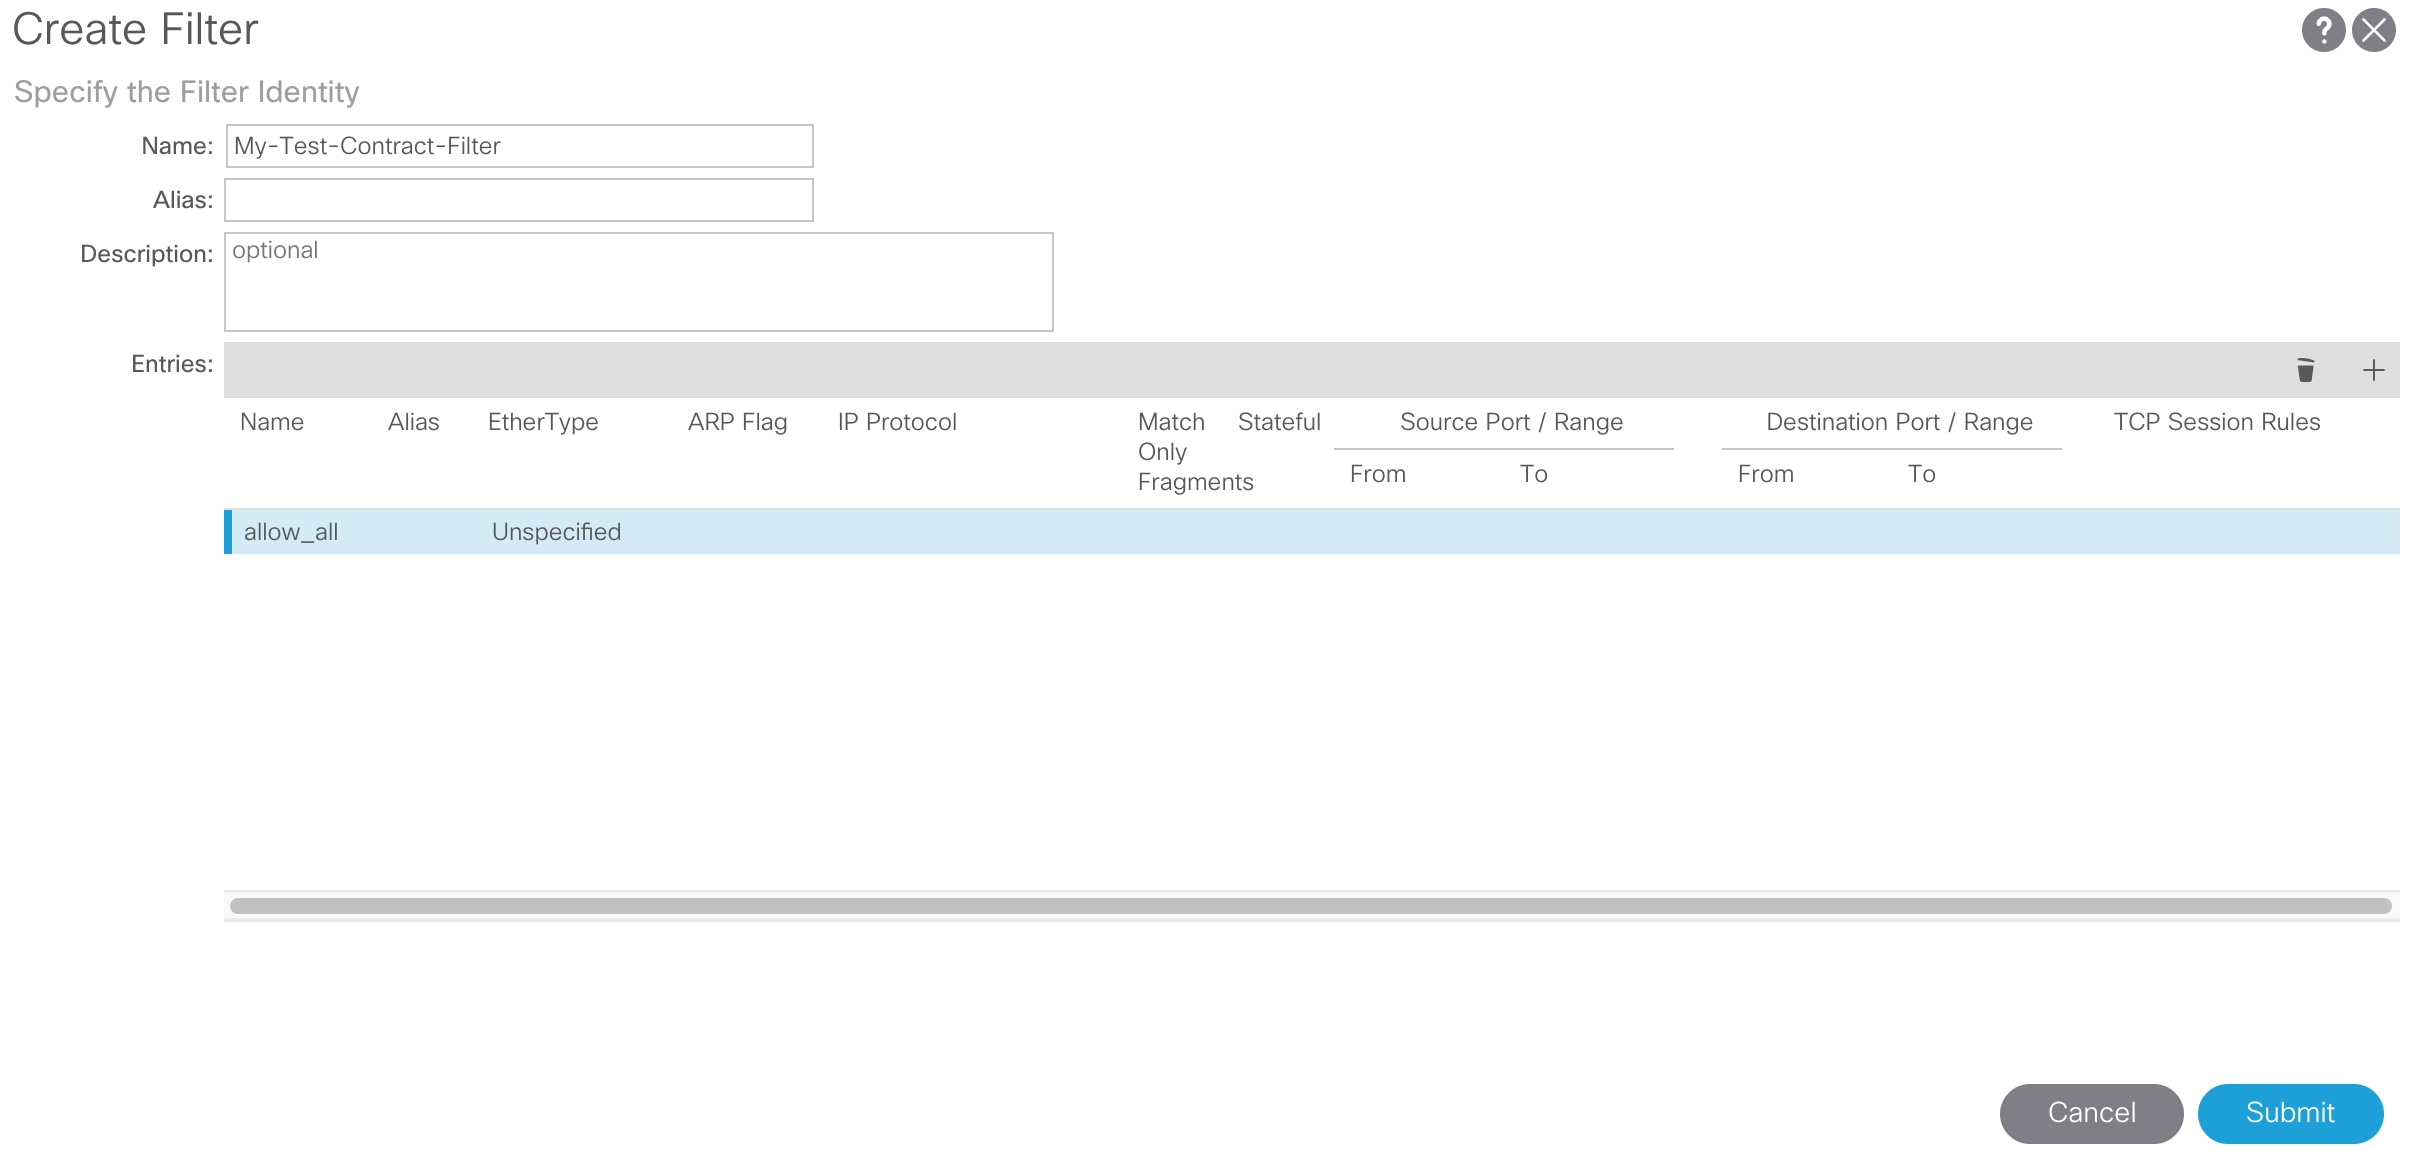
You will be prompted to enter the name of your filter. For our purposes we will name our contract filter My-Test-Contract-Filter.
You can have more than one filter entry per contract filter. For our purposes we will allow all traffic without needing to specify a protocol or port number. To do this give the filter a name such as allow_all and leave the EtherType as Unspecified.
Note: If you are choosing to not allow all traffic in the contract filter, make sure you add a contract filter entry for SSH (TCP port 22), HTTP (TCP port 80), and HTTPS (TCP port 443). If you do not allow these filter entries you will realize that all current SSH and HTTP(S) sessions will work fine, however any new SSH or HTTP(S) connections you try to establish will fail from networks outside the defined Out-of-Band IP subnet. This could lead to locking yourself out of your APICs if you are not on the same subnet as the APICs and fabric switches.
Submit your contract filter configuration.
To configure an Out-of-Band contract navigate in your APIC web GUI to the following path:
Tenants -> mgmt -> Contracts -> Out-Of-Band Contracts
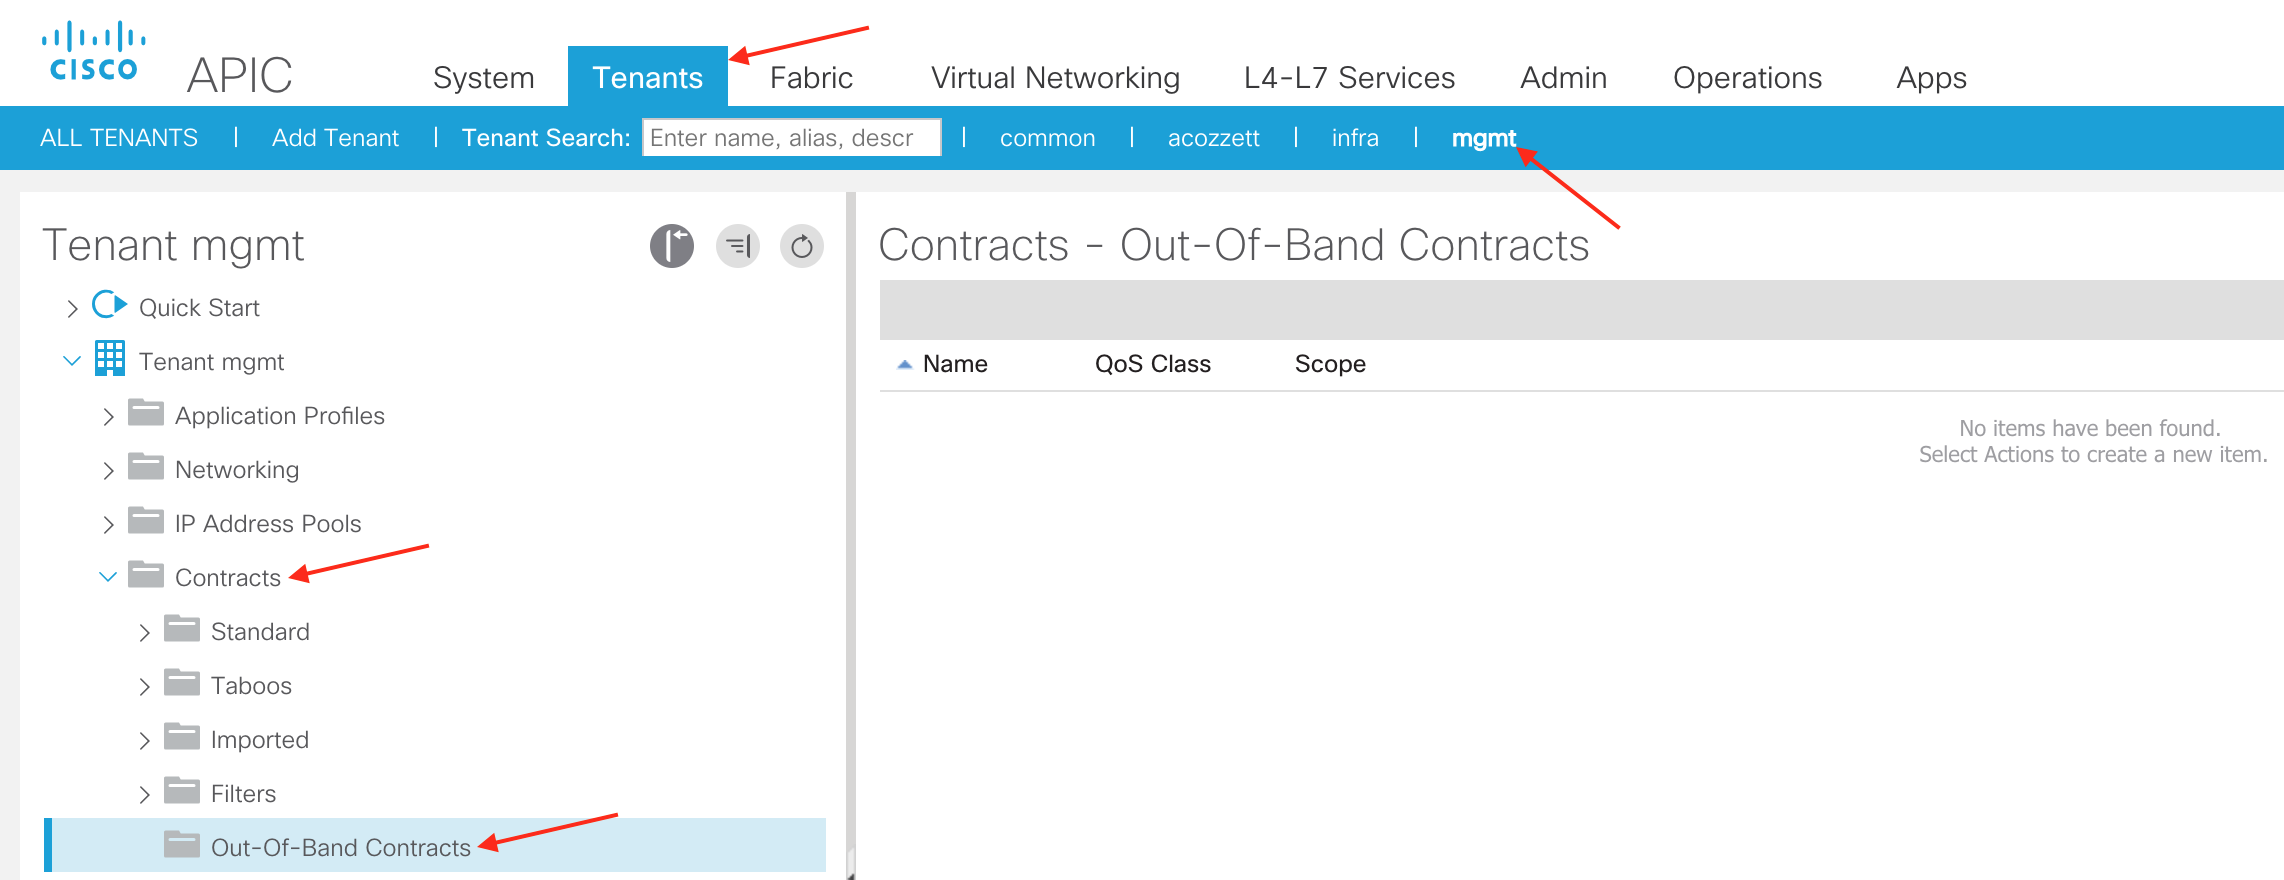
Right click Out-Of-Band Contracts and select Create Out-Of-Band Contract
You will then be prompted with the screen to create the contract structure:
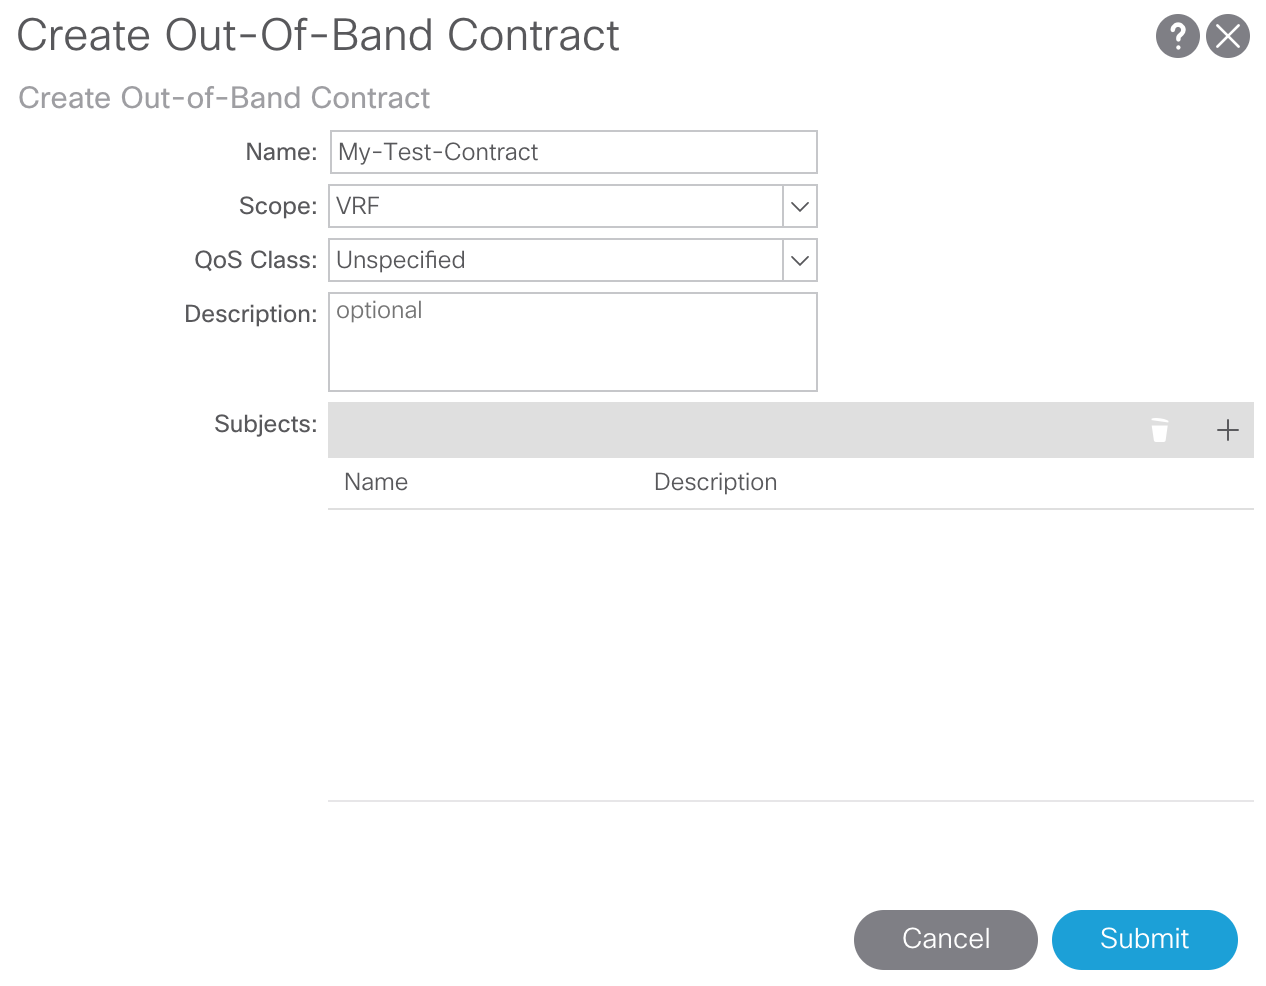
You will need to provide a Name and Subject for your contract. For our purposes we will name our contract My-Test-Contract. We can leave the default Scope, QoS Class, and Description fields. However, we will need to add a contract Subject. Click the + icon to add the contract subject. The contract subject will contain our previously created contract filter, My-Test-Contract-Filter. For our purposes we will call our contract subject My-Test-Contract-Subject.

When selecting the + icon to add a contract filter we will see our previously created contact filter My-Test-Contract-Filter:

Select the filter and submit all the changes.
The next step is to link our newly created contract, My-Test-Contract, to an Out-of-Band EPG. The Out-of-Band EPGs are listed under the following APIC web GUI path and a pre-pended with Out-of-Band EPG:
Tenants -> mgmt -> Node Management EPGs
By default there is a default Out-of-Band EPG already provided. If you remember earlier when assigning static IP addresses to our devices we selected an Out-of-Band EPG. The provided default Out-of-Band EPG, is what we linked the devices to, so for our purposes we will apply the contract to the default Out-of-Band EPG. In the default Out-of-Band EPG we will need to Provide the My-Test-Contract which we created earlier:

Once the contract is added as a provider submit the changes. Due to ACIs construct of contracts needing to be provided and consumed the next step is for us to consume the same My-Test-Contract. To consume the contract you will need to create a External Management Network Instance Profile. This External Management Network Instance Profile allows us to both consume the contract we are providing as well as define outside subnets we want to allow coming in. To create an External Management Network Instance Profile navigate in your APIC web GUI to the following path:
Tenants -> mgmt -> External Management Network Instance Profiles
Right click External Management Network Instance Profiles and click Create External Management Network Instance Profile
You will be prompted with a screen to create a External Management Network Instance Profile which requires a Name, Consumed Out-of-Band Contract, and the external Subnets you want to allow to access the Out-of-Band resources. For our purposes we will call our External Management Network Instance Profile My-EMNIP, consume the contract My-Test-Contract, and allow all external subnets to by defining a 0.0.0.0/0 subnet.
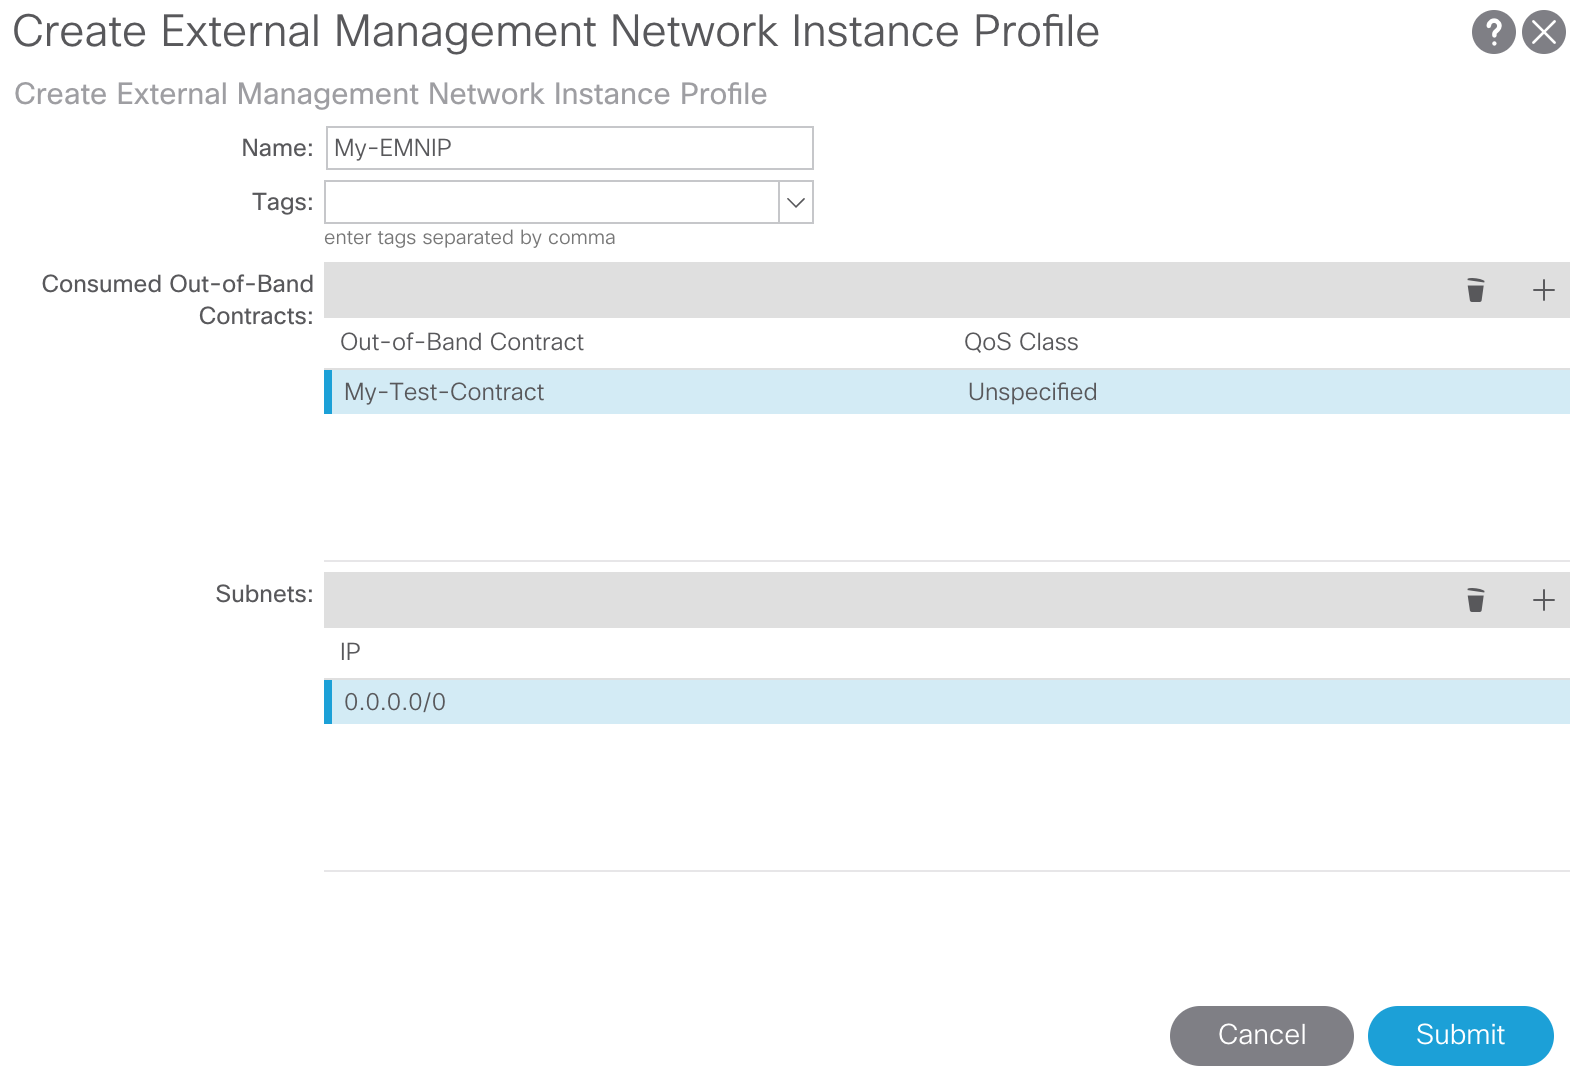
Submit your configuration to apply the changes.
This concludes all the necessary configuration for settings up Out-of-Band Management for your APICs and fabric switches.
